0%

简介

ResultSet 是一个接口,具体操作由jdbc驱动实现,本文以MySQL Driver为例分析 ResultSet 的实现。

实验

测试 executeQuery 查询结果大于 jvm 内存时会发生什么。

步骤

  1. 创建数据库 db_research

    1
    create database db_search;
  2. 创建表 table0, 具有两个字段 name varchar(255), file longblob

    1
    create table table0(name varchar(255), file longblob);
  3. 插入 64file 大小为 1024*1024 B = 1 MB 的数据

    1
    2
    3
    4
    5
    6
    7
    8
    9
    10
    pStat = conn.prepareStatement("insert into table0 values(?, ?);");
    for (int i=0; i<64; i++) {
    pStat.setString(1, "hello");
    pStat.setBinaryStream(2, new ByteArrayInputStream(
    new String(new char[1024*1024]).replace('\0', 'a').getBytes(StandardCharsets.UTF_8)));
    pStat.addBatch();
    }

    int ret[] = pStat.executeBatch();
    pStat.close();
  4. table0 中取所有数据,在默认虚拟机参数下该操作会正常执行

    1
    2
    3
    4
    5
    6
    pStat = conn.prepareStatement("select * from table0;");
    ResultSet rs = pStat.executeQuery();
    while (rs.next()) {
    System.out.println(rs.getString("name"));
    System.out.println(rs.getBinaryStream("file").read());
    }
  5. 限制 jvm 内存为 16MB,再次执行上面的 select 操作,则会由于内存不足而抛出错误,由此推测普通的查询操作试图将所有查询结果缓存到本地供用户使用

    1
    2
    3
    4
    5
    6
    7
    Exception in thread "main" java.sql.SQLException: Java heap space
    at com.mysql.cj.jdbc.exceptions.SQLError.createSQLException(SQLError.java:129)
    at com.mysql.cj.jdbc.exceptions.SQLError.createSQLException(SQLError.java:97)
    at com.mysql.cj.jdbc.exceptions.SQLExceptionsMapping.translateException(SQLExceptionsMapping.java:122)
    at com.mysql.cj.jdbc.ClientPreparedStatement.executeInternal(ClientPreparedStatement.java:953)
    at com.mysql.cj.jdbc.ClientPreparedStatement.executeQuery(ClientPreparedStatement.java:1003)
    at Main.main(Main.java:46)

结论

根据上面的测试推测,Mysql Driver试图缓存所有查询结果到本地供 ResultSet 使用(具体存放位置暂时不知道,反之是本地,占用当前进程的jvm空间),并没有在内存不足时采取一些措施来避免出错,经过查阅资料,得知可以采用流式查询来避免查询量过大时爆内存的问题

1
2
3
4
5
6
7
8
pStat = conn.prepareStatement("select * from table0;", 
ResultSet.TYPE_FORWARD_ONLY, ResultSet.CONCUR_READ_ONLY);
pStat.setFetchSize(Integer.MIN_VALUE);
ResultSet rs = pStat.executeQuery();
while (rs.next()) {
System.out.println(rs.getString("name"));
System.out.println(rs.getBinaryStream("file").read());
}

分析

经过查阅资料,得知 MySQL JDBC Driver 实际上有三种查询方式,普通查询,流式查询,基于游标的查询。下面的是最新源代码,参考链接中作者使用的是旧版源代码。

普通查询和流式查询

1
2
3
4
5
6
7
8
9
10
11
12
13
14
15
16
17
18
19
20
21
22
23
24
25
 public <T extends Resultset> T readAllResults(int maxRows, boolean streamResults, NativePacketPayload resultPacket, boolean isBinaryEncoded,
ColumnDefinition metadata, ProtocolEntityFactory<T, NativePacketPayload> resultSetFactory) throws IOException {

resultPacket.setPosition(0);
T topLevelResultSet = read(Resultset.class, maxRows, streamResults, resultPacket, isBinaryEncoded, metadata, resultSetFactory);

if (this.serverSession.hasMoreResults()) {
T currentResultSet = topLevelResultSet;
if (streamResults) {
currentResultSet = readNextResultset(currentResultSet, maxRows, true, isBinaryEncoded, resultSetFactory);
} else {
while (this.serverSession.hasMoreResults()) {
currentResultSet = readNextResultset(currentResultSet, maxRows, false, isBinaryEncoded, resultSetFactory);
}
clearInputStream();
}
}

if (this.hadWarnings) {
scanForAndThrowDataTruncation();
}

reclaimLargeReusablePacket();
return topLevelResultSet;
}

代码分析

上面代码中,对分析流式查询和普通查询最关键的代码如下,大概可以判断出,代码的意思:

若当前模式为流式查询,那么只读取(从哪里读暂不清楚)下一条存入 ResultSet;若为普通查询,则读取所有结果放入 ResultSet

1
2
3
4
5
6
7
8
9
10
11
12
if (this.serverSession.hasMoreResults()) {
T currentResultSet = topLevelResultSet;
// 流式查询,只读下一条,否则,将读取所有的结果
if (streamResults) {
currentResultSet = readNextResultset(currentResultSet, maxRows, true, isBinaryEncoded, resultSetFactory);
} else {
while (this.serverSession.hasMoreResults()) {
currentResultSet = readNextResultset(currentResultSet, maxRows, false, isBinaryEncoded, resultSetFactory);
}
clearInputStream();
}
}

能否在MySQL连接关闭后继续使用 ResultSet

下面的错误是我试图执行完 executeQuery之后关闭 MySQL服务来探究是否支持在连接断开后继续使用 ResultSet 的结果。

  1. 结果显示使用流式查询时,若连接断开(关闭MySQL服务器),将不能再使用 ResultSet
  2. 而使用普通查询时,在断开MySQL连接之后,依旧可以持续使用 ResultSet
1
2
3
4
5
6
7
8
9
10
11
12
13
14
15
16
17
18
19
20
21
22
23
24
25
26
27
28
29
30
31
32
33
34
35
36
37
38
39
Exception in thread "main" java.sql.SQLException: Error retrieving record: Unexpected Exception: java.io.EOFException message given: Can not read response from server. Expected to read 1,048,586 bytes, read 573,436 bytes before connection was unexpectedly lost.

Nested Stack Trace:


** BEGIN NESTED EXCEPTION **

java.io.EOFException
MESSAGE: Can not read response from server. Expected to read 1,048,586 bytes, read 573,436 bytes before connection was unexpectedly lost.

STACKTRACE:

java.io.EOFException: Can not read response from server. Expected to read 1,048,586 bytes, read 573,436 bytes before connection was unexpectedly lost.
at com.mysql.cj.protocol.FullReadInputStream.readFully(FullReadInputStream.java:67)
at com.mysql.cj.protocol.a.SimplePacketReader.readMessage(SimplePacketReader.java:108)
at com.mysql.cj.protocol.a.SimplePacketReader.readMessage(SimplePacketReader.java:45)
at com.mysql.cj.protocol.a.TimeTrackingPacketReader.readMessage(TimeTrackingPacketReader.java:57)
at com.mysql.cj.protocol.a.TimeTrackingPacketReader.readMessage(TimeTrackingPacketReader.java:41)
at com.mysql.cj.protocol.a.MultiPacketReader.readMessage(MultiPacketReader.java:61)
at com.mysql.cj.protocol.a.MultiPacketReader.readMessage(MultiPacketReader.java:44)
at com.mysql.cj.protocol.a.ResultsetRowReader.read(ResultsetRowReader.java:75)
at com.mysql.cj.protocol.a.ResultsetRowReader.read(ResultsetRowReader.java:42)
at com.mysql.cj.protocol.a.NativeProtocol.read(NativeProtocol.java:1583)
at com.mysql.cj.protocol.a.result.ResultsetRowsStreaming.next(ResultsetRowsStreaming.java:193)
at com.mysql.cj.protocol.a.result.ResultsetRowsStreaming.next(ResultsetRowsStreaming.java:62)
at com.mysql.cj.jdbc.result.ResultSetImpl.next(ResultSetImpl.java:1738)
at Main.main(Main.java:54)

** END NESTED EXCEPTION **

at com.mysql.cj.jdbc.exceptions.SQLError.createSQLException(SQLError.java:129)
at com.mysql.cj.jdbc.exceptions.SQLError.createSQLException(SQLError.java:97)
at com.mysql.cj.jdbc.exceptions.SQLExceptionsMapping.translateException(SQLExceptionsMapping.java:122)
at com.mysql.cj.jdbc.result.ResultSetImpl.next(ResultSetImpl.java:1753)
at Main.main(Main.java:54)
Disconnected from the target VM, address: '127.0.0.1:8753', transport: 'socket'

Process finished with exit code 1

普通查询和流式查询的网络占用情况对比

通过Wireshark抓包(npcap txdy,winpcap不支持localhost抓包),发现:

  1. 流式传输时,会在每一次调用 rs.next 之后发生一次小规模的网络传输,推测可能是传输本次所需数据
  2. 普通查询时,只会在一开始调用 execQuery 时,发生一次超大规模的网络传输,推测可能是传输完所有所需数据

普通查询和流式查询的内存占用情况对比

  1. 使用普通查询时,若查询结果数据量较大,则程序对应的java进程内存占用量会明显增加
  2. 使用流式查询时,程序对应的java进程内存占用量与所读取的数据量没有明显关联

游标查询与另外两种的区别

游标查询源码暂未分析,根据查询到的资料,结合上面的测试,三种查询的异同如下:

  1. 流式查询普通查询 的区别发生在 客户端,服务端对这两种查询的反应都是一次查询出所有所需数据,然后试图全部发送给客户端。但是 流式查询 时,客户端在调用 rs.next() 才给服务端返回 ack(TCP协议) 以接收下一条数据,导致服务端不能一直发送数据,也就达到了 流式传输 的目的,而普通查询会在 execQuery() 时配合服务端接受所有的数据
  2. 流式查询游标查询 的区别发生在 服务端。服务端在流式传输中的行为上面已经说明;而服务端在游标查询中的行为是:按照 fecthSize 的指示查询出所需数目的数据并发送给客户端,这时客户端会直接接收 fetchSize 条数据(相比之下,流式查询客户端 一次从服务端接收一条),如果客户端需要更多数据,则会再次向服务端发送请求

参考资料

[1] mysql-connector-java 8.0.22 源代码
[2] https://www.jianshu.com/p/c7c5dbe63019
T135 会在下列输入时报错

1
[1,2,3,5,4,3,2,1,4,3,2,1,3,2,1,1,2,3,4,4,3,2,1]

可能跟sort内部实现有关,记得要使用 <= 而不要用 >

错误版本代码

sort 里面使用 <=

1
2
3
4
5
6
7
8
9
10
11
12
13
14
15
16
17
18
19
20
21
22
23
24
25
26
27
class Solution {
public:
int candy(vector<int>& ratings) {
vector<int> index(ratings.size());
for (int i=0; i<index.size(); i++) {
index[i] = i;
}
sort(index.begin(), index.end(), [&ratings](int ind1, int ind2) {
return ratings[ind1] <= ratings[ind2];
});

vector<int> candy(ratings.size());
for(auto ind: index) {
int ct = 1;
if(ind-1 >= 0 && ratings[ind] > ratings[ind-1]) {
ct = max(candy[ind-1] + 1, ct);
}
if(ind+1 < ratings.size() && ratings[ind] > ratings[ind+1]) {
ct = max(candy[ind+1] + 1, ct);
}
candy[ind] = ct;
}

return accumulate(candy.begin(), candy.end(), 0);

}
};

正确版本代码

sort 里面使用 <

1
2
3
4
5
6
7
8
9
10
11
12
13
14
15
16
17
18
19
20
21
22
23
24
25
26
27
class Solution {
public:
int candy(vector<int>& ratings) {
vector<int> index(ratings.size());
for (int i=0; i<index.size(); i++) {
index[i] = i;
}
sort(index.begin(), index.end(), [&ratings](int ind1, int ind2) {
return ratings[ind1] < ratings[ind2];
});

vector<int> candy(ratings.size());
for(auto ind: index) {
int ct = 1;
if(ind-1 >= 0 && ratings[ind] > ratings[ind-1]) {
ct = max(candy[ind-1] + 1, ct);
}
if(ind+1 < ratings.size() && ratings[ind] > ratings[ind+1]) {
ct = max(candy[ind+1] + 1, ct);
}
candy[ind] = ct;
}

return accumulate(candy.begin(), candy.end(), 0);

}
};

SAT solver

SAT

布尔可满足性问题(Boolean satisfiability problem),指是否存在一组解可以使一个布尔公式结果为True,此问题是NPC问题。现有算法可以有效解决涉及数万个变量和数百万子句的问题的能力。

算法

  1. 完备算法:DPLL, CDCL, LA
  2. 不完备算法:SLS, MP, EA
  3. 混合求解
  4. 并行求解

    SAT Solver

    是可用布尔公式(合取范式)描述的的一类问题的求解器。

    求解方法

    将问题转换为合取范式,代入求解器即可。

    应用方向

  5. 电路可满足问题:验证是否存在一组input,使得output为true
  6. 电路形式等效检查:验证两个电路等效

    示例

    比如若要求解使析取范式 $(\neg A \vee B) \wedge (C \vee D)$ 为 True的所有结果
    1
    2
    3
    4
    5
    6
    import pycosat

    # 用数字标识一个变量
    # (not a or b) and (c or d)
    for solution in list(pycosat.itersolve([(-1, 2), (3, 4)])):
    print(solution)
    输出如下
    1
    2
    3
    4
    5
    6
    7
    8
    9
    [-1, 2, 3, 4]
    [-1, 2, 3, -4]
    [-1, 2, -3, 4]
    [-1, -2, -3, 4]
    [-1, -2, 3, 4]
    [-1, -2, 3, -4]
    [1, 2, 3, 4]
    [1, 2, 3, -4]
    [1, 2, -3, 4]

SMT solver

SMT solver

是SAT的扩展,使用一阶逻辑描述问题, 变量类型不再限于布尔变量,还可以是常量、函数、谓词等

应用方向

  1. 软件包依赖检查
  2. 数独问题
  3. 八皇后
  4. 算术表达式满足性检查

    应用方向示例

    可以进行变量约束问题求解
    1
    2
    3
    4
    5
    6
    7
    8
    9
    10
    11
    12
    13
    14
    15
    16
    17
    18
    19
    20
    21
    22
    23
    24
    from z3 import Int, Solver
    x = Int('x')
    y = Int('y')

    s = Solver()
    print(s)

    s.add(x > 10, y == x + 2)
    print(s)
    print("Solving constraints in the solver s ...")
    print(s.check())

    print("Create a new scope...")
    s.push()
    s.add(y < 11)
    print(s)
    print("Solving updated set of constraints...")
    print(s.check())

    print("Restoring state...")
    s.pop()
    print(s)
    print("Solving restored set of constraints...")
    print(s.check())
    结果如下
    1
    2
    3
    4
    5
    6
    7
    8
    9
    10
    11
    12
    []
    [x > 10, y == x + 2]
    Solving constraints in the solver s ...
    sat
    Create a new scope...
    [x > 10, y == x + 2, y < 11]
    Solving updated set of constraints...
    unsat
    Restoring state...
    [x > 10, y == x + 2]
    Solving restored set of constraints...
    sat

    参考资料

    [1] https://rhettinger.github.io/overview.html
    [2] https://resources.mpi-inf.mpg.de/departments/rg1/conferences/vtsa08/slides/barret2_smt.pdf
    [3] http://www.jsjkx.com/CN/article/openArticlePDF.jsp?id=16156
    [4] https://pysathq.github.io/docs/pysat.pdf
    [5] https://ericpony.github.io/z3py-tutorial/guide-examples.htm

冒泡排序代码

1
2
3
4
5
6
7
8
9
10
11
12
13
14
15
16
17
18
19
20
21
#include <stddef.h>
#include <stdio.h>

void bubble_sort(int *arr, size_t arrsiz)
{
printf("\n");
for (int ind = 0; ind < (int)(arrsiz) - 1; ind++) {
for (int jnd = (int)(arrsiz) - 1; jnd > ind; jnd--) {
if (arr[jnd] < arr[jnd - 1]) {
int tmp = arr[jnd];
arr[jnd] = arr[jnd - 1];
arr[jnd - 1] = tmp;
}
}
printf("\r\033[k");
printf("Progress: %d / %ld", ind, arrsiz);
}
printf("\r\033[k");
printf(" ");
printf("\r\033[k");
}

效率测试框架

插入排序 类似

测试结果

比插入和简单选择慢

>>> BUBBLE SORT >>>
[SORT array_size=10]
        gen_time: 0
                ORIGION ARRAY: [ 3, 6, 7, 5, 3, 5, 6, 2, 9, 1]
        sort_time: 0
                SORTED ARRAY: [ 1, 2, 3, 3, 5, 5, 6, 6, 7, 9]
[SORT array_size=100]
        gen_time: 0
        sort_time: 0
[SORT array_size=10000]
        gen_time: 0
        sort_time: 1
[SORT array_size=100000]
        gen_time: 0
        sort_time: 31
[SORT array_size=1000000]
        gen_time: 0
        sort_time: 3037
<<< BUBBLE SORT <<<

归并排序代码

1
2
3
4
5
6
7
8
9
10
11
12
13
14
15
16
17
18
19
20
21
22
23
24
25
26
27
28
29
30
31
32
33
34
35
36
37
38
39
40
41
42
43
44
45
46
47
48
49
// divide_merge.c

#include <stddef.h>
#include <stdio.h>
#include <limits.h>

void merge(int *arr, size_t p, size_t q, size_t r)
{
size_t n1 = q - p + 1;
size_t n2 = r - q;

int arr_left[n1+1], arr_right[n2+1];
for (int ind = 0; ind < n1; ind++) {
arr_left[ind] = arr[p + ind];
}
for (int ind = 0; ind < n2; ind++) {
arr_right[ind] = arr[q + 1 + ind];
}
// sentinel
arr_left[n1] = arr_right[n2] = INT_MAX;

int ind = 0;
int jnd = 0;

for (int knd = p; knd <= r; knd++) {
if (arr_left[ind] <= arr_right[jnd]) {
arr[knd] = arr_left[ind];
++ind;
} else {
arr[knd] = arr_right[jnd];
++jnd;
}
}
}

void merge_sort(int *arr, int head, int tail)
{
if (head < tail) {
int mid = (head + tail) / 2;
merge_sort(arr, head, mid);
merge_sort(arr, mid + 1, tail);
merge(arr, head, mid, tail);
}
}

void divide_merge_sort(int *arr, size_t arrsiz)
{
merge_sort(arr, 0, (int)arrsiz - 1);
}

效率测试框架

插入排序 类似

测试结果

直接起飞!!!

>>> DEVIDE-MERGE SORT >>>
[SORT array_size=10]
    gen_time: 0
        ORIGION ARRAY: [ 3, 6, 7, 5, 3, 5, 6, 2, 9, 1]
    sort_time: 0
        SORTED ARRAY: [ 1, 2, 3, 3, 5, 5, 6, 6, 7, 9]
[SORT array_size=100]
    gen_time: 0
    sort_time: 0
[SORT array_size=10000]
    gen_time: 0
    sort_time: 0
[SORT array_size=100000]
    gen_time: 0
    sort_time: 0
[SORT array_size=1000000]
    gen_time: 0
    sort_time: 0
<<< DEVIDE-MERGE SORT <<<

简单选择排序代码

1
2
3
4
5
6
7
8
9
10
11
12
13
14
15
16
17
18
19
20
21
22
23
24
25
// primeselect.c

#include <stddef.h>
#include <stdio.h>

void primeselect_sort(int *arr, size_t arrsiz)
{
printf("\n"); // 避免同一行刷新排序进度时覆盖其他程序输出
for (int ind = 0; ind < arrsiz; ind++) {
int max_ind = ind;
for (int jnd = ind + 1; jnd < arrsiz; jnd++) {
if (arr[jnd] > arr[max_ind]) {
max_ind = jnd;
}
}
int swap_val = arr[max_ind];
arr[max_ind] = arr[ind];
arr[ind] = swap_val;
printf("\r\033[k");
printf("Progress: %d / %ld", ind, arrsiz);
}
printf("\r\033[k"); // 同一行刷新排序进度
printf(" ");
printf("\r\033[k"); // 清空刷新内容,避免干扰后续输出
}

效率测试框架

插入排序 类似

测试结果

>>> PRIEM SELECT SORT >>>
[SORT array_size=10]
        gen_time: 0
                ORIGION ARRAY: [ 3, 6, 7, 5, 3, 5, 6, 2, 9, 1]
        sort_time: 0
                SORTED ARRAY: [ 9, 7, 6, 6, 5, 5, 3, 3, 2, 1]
[SORT array_size=100]
        gen_time: 0
        sort_time: 0
[SORT array_size=10000]
        gen_time: 0
        sort_time: 0
[SORT array_size=100000]
        gen_time: 0
        sort_time: 13
[SORT array_size=1000000]
        gen_time: 0
        sort_time: 1354

插入排序代码

1
2
3
4
5
6
7
8
9
10
11
12
13
14
15
16
17
18
19
20
21
22
23
24
25
// insertion.c

#include <stddef.h>
#include <stdio.h>

void insertion_sort(int *arr, size_t arrsiz)
{
printf("\n"); // 避免同一行刷新排序进度时覆盖其他程序输出
for(int target_index=0; target_index < arrsiz; target_index++)
{
int target_value = arr[target_index];
int compare_index = target_index - 1;
while(compare_index >= 0 && target_value < arr[compare_index])
{
arr[compare_index + 1] = arr[compare_index];
--compare_index;
}
arr[compare_index + 1] = target_value;
printf("\r\033[k");
printf("Progress: %d / %ld", target_index, arrsiz);
}
printf("\r\033[k"); // 同一行刷新排序进度
printf(" ");
printf("\r\033[k"); // 清空刷新内容,避免干扰后续输出
}

效率测试框架

1
2
3
4
5
6
7
8
9
10
11
12
13
14
15
16
17
18
19
20
21
22
23
24
25
26
27
28
29
30
31
32
33
34
35
36
37
38
39
40
41
42
43
44
45
46
47
48
// sort.c

#include <stdlib.h>
#include <stdio.h>
#include <time.h>

void sort(void (*func)(int*, size_t))
{
const size_t lens[5] = {10, 100, 10000, 100000, 1000000};
for (size_t ind = 0; ind < 5; ind++) {
int arr[lens[ind]];
srand(0);
printf("[SORT array_size=%lu]\n", lens[ind]);
time_t gen_start_time, gen_end_time, sort_start_time, sort_end_time;
gen_start_time = time(NULL);
for (size_t jnd = 0; jnd < lens[ind]; jnd++)
{
arr[jnd] = rand() % lens[ind];
}
gen_end_time = time(NULL);
printf("\tgen_time: %ld\n", gen_end_time - gen_start_time);

// output the first origin array to ensure the alg is correct
if(ind == 0) {
printf("\t\tORIGION ARRAY: [");
for (size_t jnd = 0; jnd < lens[ind]; jnd++)
{
printf(" %d,", arr[jnd]);
}
printf("\b]\n");
}

sort_start_time = time(NULL);
func(arr, lens[ind]);
sort_end_time = time(NULL);
printf("\tsort_time: %ld\n", sort_end_time - sort_start_time);

// output the first sorted array to ensure the alg is correct
if(ind == 0) {
printf("\t\tSORTED ARRAY: [");
for (size_t jnd = 0; jnd < lens[ind]; jnd++)
{
printf(" %d,", arr[jnd]);
}
printf("\b]\n");
}
}
}
1
2
3
4
5
6
7
8
9
10
11
12
13
14
// sort_test.c

#include <stddef.h>
#include <stdio.h>

void insertion_sort(int *arr, size_t arrsiz);
void sort(void (*func)(int*, size_t));

int main()
{
printf(">>> INSERTION SORT >>>\n");
sort(&insertion_sort);
printf(">>> INSERTION SORT >>>\n");
}

测试结果

>>> INSERTION SORT >>>
[SORT array_size=10]
    gen_time: 0
        ORIGION ARRAY: [ 3, 6, 7, 5, 3, 5, 6, 2, 9, 1]
    sort_time: 0                                                              
        SORTED ARRAY: [ 1, 2, 3, 3, 5, 5, 6, 6, 7, 9]

[SORT array_size=100]
    gen_time: 0
    sort_time: 0                                                                               

[SORT array_size=10000]
    gen_time: 0
    sort_time: 0                                                                         

[SORT array_size=100000]
    gen_time: 0
    sort_time: 7                                                                         

[SORT array_size=1000000]
    gen_time: 0
    sort_time: 750

HP PCs - Wake On LAN Does Not Work After Windows 10 Upgrade is Performed

This document pertains to HP and Compaq computers with Windows 10.

The Wake On LAN (WOL) stops working after upgrading to Windows 10 or after the Windows 10 updates are installed. Windows 8 registry key enables Wake On LAN support under Classic Shutdown mode, but not under Hybrid Shutdown mode. After the operating system is upgraded to Windows 10, the registry key is not carried over, so the WOL function may not work after the upgrade is performed.

To enable the Wake On LAN (WOL) function after upgrading to Windows 10 or installing the Windows 10 update, perform the following the steps:

Step 1: Update the BIOS

Verify the computer has the latest BIOS version installed. Refer to the following links to locate, download and install the appropriate BIOS update for your computer:

Step 2: Disable Hybrid Shutdown mode

  1. Open Control Panel and select Hardware and Sound.

  2. Select Power Options.

  3. Click Require a password on wakeup.

  4. Confirm the option of Turn on fast startup is unchecked.

  5. Save changes.

Step 3: Enable Wake On LAN (WOL) setting for LAN driver

  1. Open Device Manager.

  2. Select Network adapters.

  3. Locate the LAN device and click on it.

  4. Select the Advanced tab.

  5. Confirm Shutdown Wake-On-Lan is enabled.

  6. Select the Power Management tab.

  7. Check the option Allow this device to wake the computer.

  8. Save changes.

  9. Close Device Manager.

Step 4: Manually add the HP registry key

CAUTION:

If you use Registry Editor incorrectly, you may cause serious problems that may require you to reinstall your operating system. HP cannot guarantee that you can solve problems that result from using Registry Editor incorrectly. Use Registry Editor at your own risk.

  1. Press Win + x, select Run and type regedit in the run line.

  2. Select OK to launch the Registry Editor.

  3. Navigate
    to KEY_LOCAL_MACHINE\SYSTEM\CurrentControlSet\Services\NDIS\Parameters.

  4. Right click on Parameters.

  5. Select New DWORD (32-bit) Value.

  6. Add the key AllowWakeFromS5.

  7. Set the value to 1.

  8. Close the Registry Editor.

  9. Restart the computer.

网络连接方式

Openwrt虚拟机通过多个桥接接口多拨,主机连接Openwrt的Lan进行联网,主机和虚拟机Lan的连接方式为Host-Only。

1
2
3
4
5
6
7
8

[LAN]<----->[eth0]<------>[HOST-VMware Virtual Ethernet Adapter for VMnet1]<----->[USER]
|
| /[VWAN1]--->[eth1]-----\
| /[VWAN2]---->[eth2]------\
[WAN] (..........................)-->[Host-Realtek_Gaming_GBE_Family_Controller]--->[ISP]
\[VWAN3]---->[ethX]------/
\[VWAN4]--->[ethY]-----/

多个网络接口同时连接无法联网

我的原因是路由表中存在多项默认路由,删除多余默认路由,只保留到Openwrt虚拟机的默认路由即可。

安装mwan和macvlan

1
2
opkg update
opkg install kmod-macvlan mwan3 luci-app-mwan3

测试多拨

创建虚拟网卡

使用macvlan创建虚拟网卡,其中接口名称需要根据实际情况调整,此处我使用 eth0,并且可以创建多个虚拟接口多次拨号,此处演示双拨,创建好之后使用 ifconfig 命令便可以看到

方法一

这种方法重启会失效,需要写入启动脚本中

1
2
ip link add link eth0 name veth01 type macvlan
ifconfig veth01 up

方法二

写入 /etc/config/network

1
2
3
4
config device 'veth01'
option name 'veth01'
option ifname 'eth0'
option type 'macvlan'

创建虚拟WAN

写入 /etc/config/network,此处需要注意每一个wan(包括原本的wan和创建的虚拟wan)都需要设置metric(跃点数),而且需要各不相同

1
2
3
4
5
6
7
config interface 'vwan1'
option ifname 'veth01'
option proto 'pppoe'
option password '******'
option ipv6 'auto'
option metric '5'
option username '*************'

测试

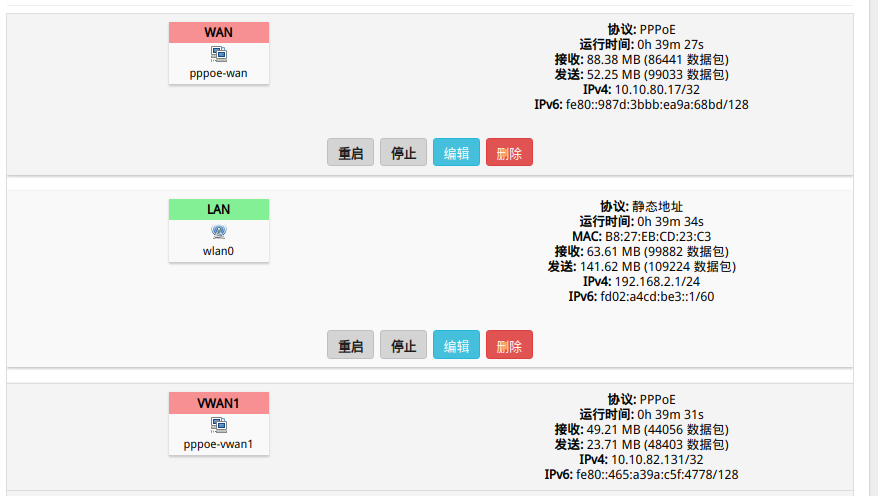
设置好之后就可以看是否各个接口都能获取到IP,如果可以,那就是支持多播,可以继续操作,否则就没必要继续看了,我的可以获取,结果是这样的

修改防火墙

网络-防火墙-区域 中修改wan,覆盖网络中勾选vwan1。在接口中关闭wan,尝试是否能够正常上网。

负载均衡

需要设置四项内容:接口、成员、策略、规则

接口

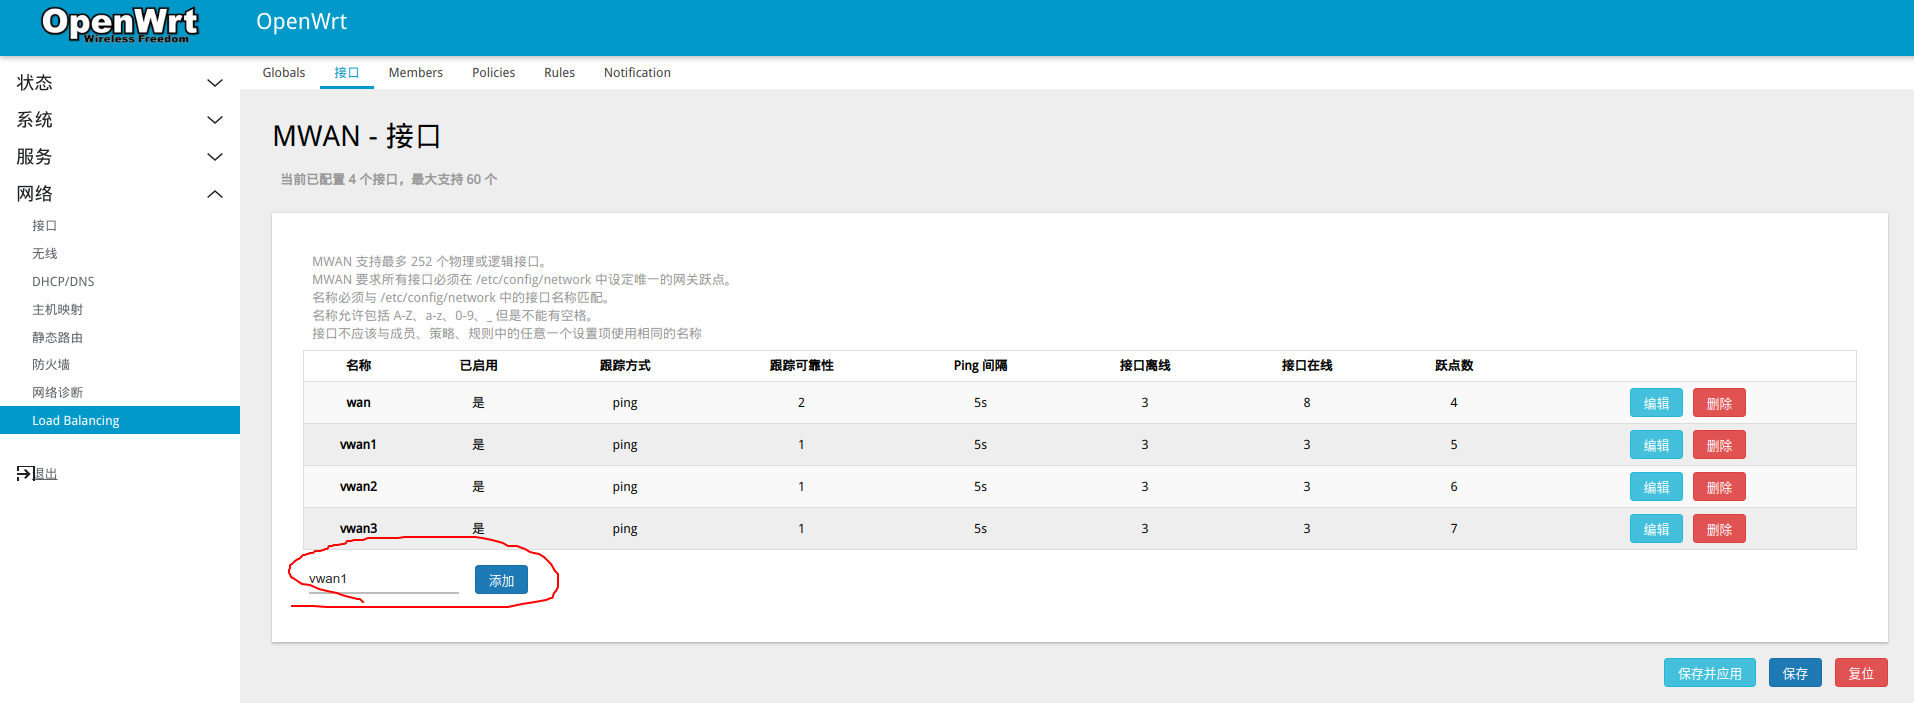
在luci界面的 网络->负载均衡->接口 中添加接口,如果有默认的,全部删掉

添加

输入接口名称,点击添加

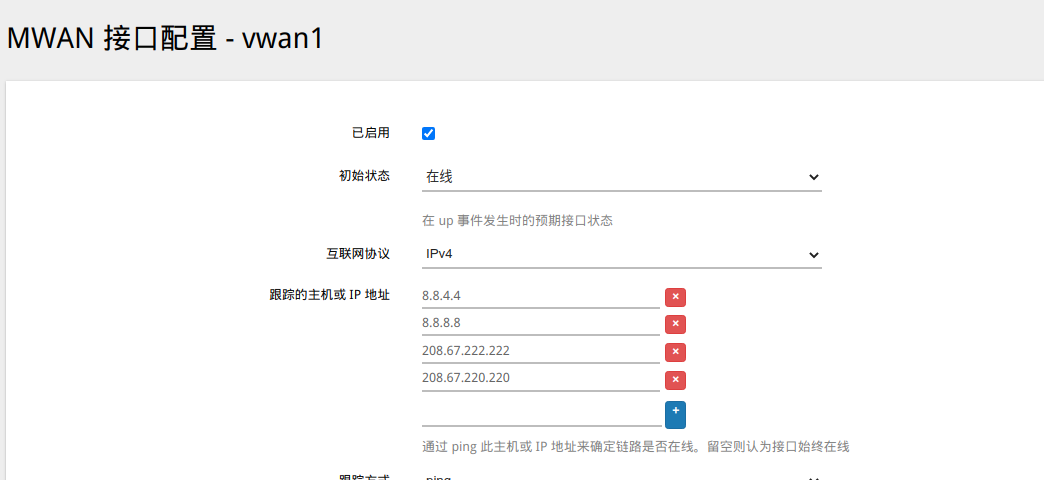
设置设置追踪的域名或IP

点击添加之后,仅需 设置追踪的域名或IP,可以使用 8.8.4.4,也可以设置我所使用的这四个

成员

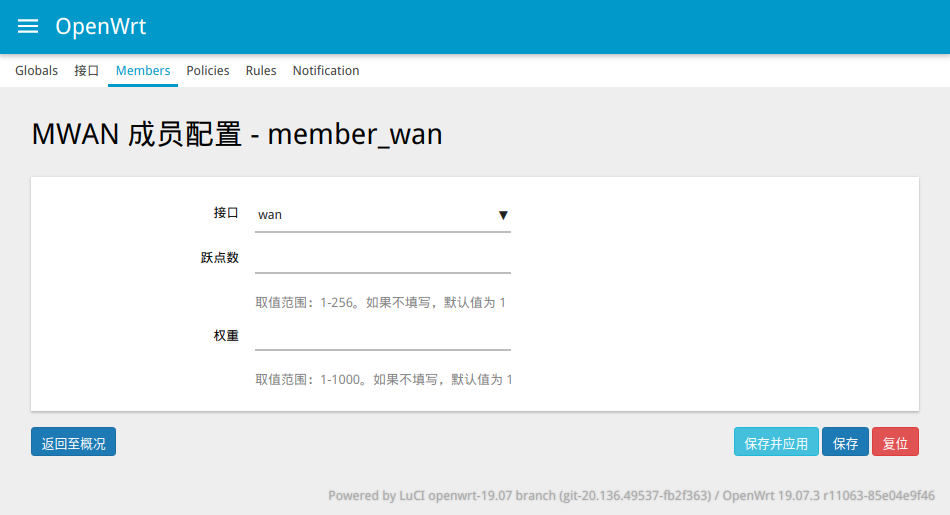
网络->负载均衡->成员 中输入 member_wan,点击添加,并选好接口,跃点数保持默认。按照相同的步骤添加其他虚拟接口。

策略

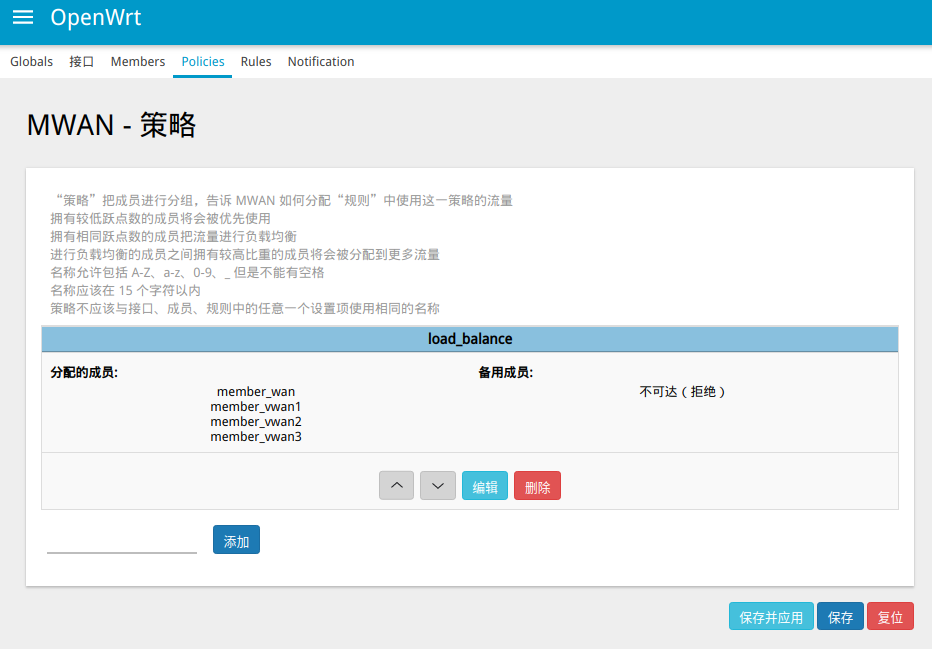
添加一个名为load_balance的策略,成员选择上一步创建的几个成员。

规则

添加一条名为default的规则,通讯协议选all,策略选择上一步创建的策略即可

结束

以上参考了以下几篇文章:

LEDE/OpenWrt使用macvlan和mwan3实现单线多拨

OpenWrt使用macvlan+mwan3实现单线多拨