0%

简介

DBus:一个消息总线服务,在Linux桌面环境下应用广泛。Gnome和KDE的许多组件都使用了DBus。

freedesktop:制定了许多桌面环境下的设计规范,各个Linux桌面都或多或少实现了其中的一些规范,很多应用也依照规范提供的接口进行设计。

参考资料

https://unix.stackexchange.com/questions/46301/a-list-of-available-d-bus-services
https://www.freedesktop.org/wiki/Software/dbus/
https://www.freedesktop.org/wiki/Specifications/secret-storage-spec/
https://www.freedesktop.org/wiki/Specifications/file-manager-interface/

DBus命令行测试工具

dbus-monitor 可以监测消息

dbus-send 可以发送消息

列出DBus已知的服务

1
dbus-send --print-reply --dest=org.freedesktop.DBus  /org/freedesktop/DBus org.freedesktop.DBus.ListNames

结果如下,可以看到其中有几个org.freedesktop系列的服务,包括org.freedesktop.secrets,VSCode应该就是通过这个服务存储密钥的,根据我的配置,应该是由Gnome Keyring实际提供了这个服务。

1
2
3
4
5
6
7
8
9
10
11
12
13
14
15
16
17
18
19
20
21
22
23
24
25
26
27
28
29
30
31
32
33
34
35
36
37
38
39
40
41
42
43
44
45
46
47
48
49
method return time=1609574874.565918 sender=org.freedesktop.DBus -> destination=:1.236 serial=3 reply_serial=2
array [
string "org.freedesktop.DBus"
string ":1.7"
string ":1.93"
string "org.freedesktop.network-manager-applet"
string "org.freedesktop.portal.IBus"
string ":1.8"
string ":1.9"
string "org.xfce.Thunar"
string ":1.95"
string "org.a11y.Bus"
string "org.freedesktop.systemd1"
string ":1.20"
string ":1.21"
string ":1.10"
string "org.xfce.Xfconf"
string ":1.22"
string "org.gnome.keyring"
string ":1.11"
string ":1.23"
string "org.freedesktop.FileManager1"
string ":1.12"
string ":1.13"
string ":1.0"
string "org.gtk.vfs.Daemon"
string ":1.14"
string "org.freedesktop.secrets"
string ":1.15"
string ":1.2"
string ":1.113"
string ":1.16"
string ":1.3"
string "org.lxde.lxpolkit"
string ":1.17"
string "org.xfce.FileManager"
string "org.freedesktop.IBus.Panel.Extension.Gtk3"
string ":1.4"
string ":1.236"
string ":1.115"
string ":1.104"
string "ca.desrt.dconf"
string ":1.18"
string ":1.5"
string ":1.105"
string "org.freedesktop.IBus"
string ":1.6"
]

列出文件夹中的文件

执行下面的命令,然后默认的文件管理器就会打开Pictures文件夹了

1
dbus-send --print-reply --dest=org.freedesktop.FileManager1 /org/freedesktop/FileManager1 org.freedesktop.FileManager1.ShowFolders array:string:"file:///home/lpy/Pictures" string:3

使用DBus的应用

https://www.freedesktop.org/wiki/Software/dbus/
https://www.freedesktop.org/wiki/Specifications/desktop-config-spec/
https://www.freedesktop.org/wiki/Specifications/file-manager-interface/

GNOME Keyring

VSCode

参考资料

https://www.docs4dev.com/docs/zh/linux-pam/1.1.2/reference/adg-introduction.html

示例程序

注意按照程序开头的注释添加 /etc/pam.d/check_user
编译命令如下:

1
gcc -o check_user check_user.c -lpam -lpam_misc

编译完之后运行,程序会提示你输入密码,然后告诉你授权是否成功。

1
2
3
4
5
6
7
8
9
10
11
12
13
14
15
16
17
18
19
20
21
22
23
24
25
26
27
28
29
30
31
32
33
34
35
36
37
38
39
40
41
42
43
44
45
46
47
48
49
50
51
52
53
54
55
56
57
58
59
/*
This program was contributed by Shane Watts
[modifications by AGM and kukuk]

You need to add the following (or equivalent) to the
/etc/pam.d/check_user file:
# check authorization
auth required pam_unix.so
account required pam_unix.so
*/

#include <security/pam_appl.h>
#include <security/pam_misc.h>
#include <stdio.h>

static struct pam_conv conv = {
misc_conv,
NULL
};

int main(int argc, char *argv[])
{
pam_handle_t *pamh=NULL;
int retval;
const char *user="nobody";

if(argc == 2) {
user = argv[1];
}

if(argc > 2) {
fprintf(stderr, "Usage: check_user [username]\n");
exit(1);
}

retval = pam_start("check_user", user, &conv, &pamh);

if (retval == PAM_SUCCESS)
retval = pam_authenticate(pamh, 0); /* is user really user? */

if (retval == PAM_SUCCESS)
retval = pam_acct_mgmt(pamh, 0); /* permitted access? */

/* This is where we have been authorized or not. */

if (retval == PAM_SUCCESS) {
fprintf(stdout, "Authenticated\n");
} else {
fprintf(stdout, "Not Authenticated\n");
}

if (pam_end(pamh,retval) != PAM_SUCCESS) { /* close Linux-PAM */
pamh = NULL;
fprintf(stderr, "check_user: failed to release authenticator\n");
exit(1);
}

return ( retval == PAM_SUCCESS ? 0:1 ); /* indicate success */
}

PAM的应用

GNOME Keyring

先随便列一下,有空再填坑

arch安装

dhcpcd,sudo,nvim,
nvim alias as vim/vi
sudo alias 'sudo '

Xorg安装

基本无需配置,只要写.xinitrc就行了,参考Arch Wiki 关于xinitrc的介绍

注意先复制系统xinitrc,在其基础上修改,如果非要自己写,至少要记得source /etc/X11/xinit/xinitrc.d/中的脚本

xorg-xserver,xorg-uitls,xorg-initx

i3安装以及默认启动

https://wiki.archlinux.org/index.php/I3
https://wiki.archlinux.org/index.php/Autostarting

这个其实没啥问题,不过后面的东西都是由于i3太过简单而必须自己配置

联网问题

dhcpcd -> NetworkManager,network-manager-applet

输入法问题

https://wiki.archlinux.org/index.php/IBus
ibus,rime

多屏显示设置

xrandr

使用 alsa-utlls 进行声音输入输出设备管理

https://wiki.archlinux.org/index.php/Advanced_Linux_Sound_Architecture#Installation

alsamixer,amixer

安装虚拟终端 termite

bash自动补全、智能提示

bash-completion软件包

使用 thunar 进行文件管理

https://wiki.archlinux.org/index.php/File_manager_functionality#Overview
https://wiki.archlinux.org/index.php/thunar
https://wiki.archlinux.org/index.php/Udisks

需要关注 gvfs 系列软件包,还有 udisks2,它提供的udiskctl可以将设备挂载到 /run/media/$USERNAME的子目录中,可能ubuntu上所做的自动挂载也跟它有关系

使用 polkit 解决GUI中的权限问题

https://wiki.archlinux.org/index.php/Polkit

比如 thunar中磁盘挂载时可能需要授权,gparted的启动需要授权

相要使用它在GUI中授权还需要一个前端软件配合完成授权,我选择的是 lxsession 软件包,安装之后还需要设置使 lxpolkit 自启动,可以写在i3配置文件中。

GNOME Keyring

参考资料

https://wiki.archlinux.org/index.php/GNOME/Keyring

起因是这个
keyring

Troubleshooting Guide页面为:https://code.visualstudio.com/docs/editor/settings-sync#_troubleshooting-keychain-issues

之前犯的愚蠢错误

GUI界面叫seahorse,现在按照文档配置了一下,似乎vscode还会报错,但seahorse可以打开

改用了 PAM 方法似乎还是不行呀

现在可以了,记录下全过程

componet是启动之后就没改过,下面说的只是gnome-keyring的配置

  1. 只配.xinitrc,结果无效
  2. 只配PAM,无效
  3. PAM和.xinitrc都配,无效
  4. 配PAM,并在.xinitrc 中 source /etc/X11/xinit/xinitrc.d/50-systemd-user.sh,这次奇迹般的可以了,参考
    https://unix.stackexchange.com/questions/265503/how-do-i-fix-no-such-secret-collection-at-path-for-gnome-keyring-and-arch-l
  5. 只source,不配PAM可以吗?

破案了!!!

之前所说的一切错误都源自不规范定义的.xinitrc,正确的做法是先复制默认的配置,然后在默认配置基础上更改其行为,至少要保证source /etc/X11/xinit/xinitrc.d/ 中的脚本。

这些脚本有些是应用定义的关键脚本,如果不执行的话,可能会导致应用行为不正常。而我原先的.xinitrc是自己写的,没有source /etc/X11/xinit/xinitrc.d/ 中的脚本,出错也就不奇怪了,而默认的/etc/X11/xinit/xinitrc中就执行了类似的重要操作,在这个基础上修改就可以了

参考Arch Wiki 关于xinitrc的介绍

其中可能涉及一个关键脚本

1
2
3
4
5
6
7
8
9
[lpy@lpyarch ~]$ cat /etc/X11/xinit/xinitrc.d/50-systemd-user.sh 
#!/bin/sh

systemctl --user import-environment DISPLAY XAUTHORITY

if command -v dbus-update-activation-environment >/dev/null 2>&1; then
dbus-update-activation-environment DISPLAY XAUTHORITY
fi
[lpy@lpyarch ~]$

/etc/X11/xinit/xinitrc.d/50-systemd-user.sh 会为用户级的systemd导入两个变量 DISPLAYXAUTHORITY,据说十分重要。

参考这篇文章 https://wiki.archlinux.org/index.php/systemd/User#DISPLAY_and_XAUTHORITY

1
DISPLAY is used by any X application to know which display to use and XAUTHORITY to provide a path to the user's .Xauthority file and thus the cookie needed to access the X server. If you plan on launching X applications from systemd units, these variables need to be set. Systemd provides a script in /etc/X11/xinit/xinitrc.d/50-systemd-user.sh to import those variables into the systemd user session on X launch. [3] So unless you start X in a nonstandard way, user services should be aware of the DISPLAY and XAUTHORITY

进一步分析

如果不source那个脚本,启动后会无法在seahorse中ublock,一个推测是,有运行在daemon的程序尝试让我输入密码来解锁,但它不知道DISPLAY和XAUTH,所以无法解锁

相关日志如下

1
2
3
4
5
6
7
8
9
10
11
12
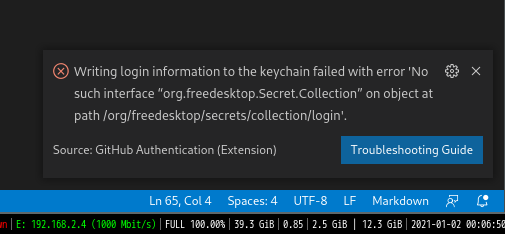
Jan 02 18:56:45 lpyarch dbus-daemon[474]: [session uid=1000 pid=474] Activating service name='org.gnome.keyring.SystemPrompter' requested by ':1.34' (uid=1000 pid=404 comm="/usr/bin/gnome-keyring-daemon --daemonize --login ")
Jan 02 18:56:45 lpyarch org.gnome.keyring.SystemPrompter[1890]: Unable to init server: Could not connect: Connection refused
Jan 02 18:56:45 lpyarch gcr-prompter[1890]: cannot open display:
Jan 02 18:56:45 lpyarch dbus-daemon[474]: [session uid=1000 pid=474] Activated service 'org.gnome.keyring.SystemPrompter' failed: Process org.gnome.keyring.SystemPrompter exited with status 1
Jan 02 18:56:45 lpyarch gnome-keyring-daemon[404]: couldn't create system prompt: GDBus.Error:org.freedesktop.DBus.Error.Spawn.ChildExited: Process org.gnome.keyring.SystemPrompter exited with status 1


Jan 02 18:57:15 lpyarch dbus-daemon[474]: [session uid=1000 pid=474] Activating service name='org.gnome.keyring.SystemPrompter' requested by ':1.34' (uid=1000 pid=404 comm="/usr/bin/gnome-keyring-daemon --daemonize --login ")
Jan 02 18:57:16 lpyarch org.gnome.keyring.SystemPrompter[1899]: Unable to init server: Could not connect: Connection refused
Jan 02 18:57:16 lpyarch gcr-prompter[1899]: cannot open display:
Jan 02 18:57:16 lpyarch dbus-daemon[474]: [session uid=1000 pid=474] Activated service 'org.gnome.keyring.SystemPrompter' failed: Process org.gnome.keyring.SystemPrompter exited with status 1
Jan 02 18:57:16 lpyarch gnome-keyring-daemon[404]: couldn't create system prompt: GDBus.Error:org.freedesktop.DBus.Error.Spawn.ChildExited: Process org.gnome.keyring.SystemPrompter exited with status 1

经过分析,可能的原因是:
相关应用通过dbus,请求keyring进行密码验证,但是kering运行在systemd中,这时候由于没有执行上述/etc/X11/xinit/xinitrc.d/50-systemd-user.sh, daemon中没有 XAUTHORITYDISPLAY,keyring也就无法得知应该在哪里显示验证界面,所需授权文件又是哪个,故无法完成授权操作。

那么,在遇到这个问题的通过命令行systemd和dbus设置环境变量理应也可以解决这个问题,下面就来实际操作一下。

执行如下命令,再次去尝试unlock

1
2
systemctl --user import-environment DISPLAY XAUTHORITY
dbus-update-activation-environment DISPLAY XAUTHORITY

这一次执行日志如下,可以看到最后的信息已经表明解锁成功了,当然在GUI里面也能看到效果,这一次成功弹出了请求密码的界面。

我实际操作时,先故意输入了错误的密码,又一次输入了正确的密码,所以日志里有错误相关的信息也不奇怪

1
2
3
4
5
6
7
8
9
10
11
12
13
14
15
16
17
18
19
20
21
22
23
24
25
26
27
28
29
30
31
32
33
34
35
36
37
38
39
40
41
42
43
44
45
46
47
48
Jan 02 19:45:17 lpyarch dbus-daemon[474]: [session uid=1000 pid=474] Activating service name='org.gnome.keyring.SystemPrompter' requested by ':1.34' (uid=1000 pid=404 comm="/usr/bin/gnome-keyring-daemon --daemonize --login ")
Jan 02 19:45:17 lpyarch gcr-prompter[3670]: Gcr: bus acquired: org.gnome.keyring.SystemPrompter
Jan 02 19:45:17 lpyarch gcr-prompter[3670]: Gcr: registering prompter
Jan 02 19:45:17 lpyarch gcr-prompter[3670]: Gcr: bus acquired: org.gnome.keyring.PrivatePrompter
Jan 02 19:45:17 lpyarch dbus-daemon[474]: [session uid=1000 pid=474] Successfully activated service 'org.gnome.keyring.SystemPrompter'
Jan 02 19:45:17 lpyarch gcr-prompter[3670]: Gcr: acquired name: org.gnome.keyring.SystemPrompter
Jan 02 19:45:17 lpyarch gcr-prompter[3670]: Gcr: received BeginPrompting call from callback /org/gnome/keyring/Prompt/p56@:1.34
Jan 02 19:45:17 lpyarch gcr-prompter[3670]: Gcr: preparing a prompt for callback /org/gnome/keyring/Prompt/p56@:1.34
Jan 02 19:45:17 lpyarch gcr-prompter[3670]: Gcr: creating new GcrPromptDialog prompt
Jan 02 19:45:17 lpyarch gcr-prompter[3670]: GLib-GIO: _g_io_module_get_default: Found default implementation gvfs (GDaemonVfs) for ‘gio-vfs’
Jan 02 19:45:17 lpyarch gcr-prompter[3670]: Gcr: automatically selecting secret exchange protocol
Jan 02 19:45:17 lpyarch gcr-prompter[3670]: Gcr: generating public key
Jan 02 19:45:18 lpyarch gcr-prompter[3670]: Gcr: beginning the secret exchange: [sx-aes-1]\npublic=2G5a5ux0oDxyKtwTtKQeVK1Y8xiejwsV88063Ue4SCKhagOPRZcHCF+XKSNjn6Xb74zHTN222E3/a5RrNbGcS8VRmPTVGxxUc9mNBlWlgUg4MtBNtKF4t9DPBTC4RA4zw1ybsu20vXqyCm+z1OCmic+SmrpBqQzSYYRFn3633l/WirlYBmK/B/W0OFtuCZYJH39M46n/RJCC2PsyVI0WATBN8wyjnIGWjeC/X87qs8hrYPQTFQVpdDwSZ3sTvfkM\n
Jan 02 19:45:18 lpyarch gcr-prompter[3670]: Gcr: calling the PromptReady method on /org/gnome/keyring/Prompt/p56@:1.34
Jan 02 19:45:18 lpyarch gcr-prompter[3670]: Gcr: acquired name: org.gnome.keyring.PrivatePrompter
Jan 02 19:45:18 lpyarch gcr-prompter[3670]: Gcr: returned from the PromptReady method on /org/gnome/keyring/Prompt/p56@:1.34
Jan 02 19:45:18 lpyarch gcr-prompter[3670]: Gcr: received PerformPrompt call from callback /org/gnome/keyring/Prompt/p56@:1.34
Jan 02 19:45:18 lpyarch gcr-prompter[3670]: Gcr: receiving secret exchange: [sx-aes-1]\npublic=DD1Zv/mXj0MFxWWAleJ1k8HlPzKHpAIsC3Xx8PNnEe0MhY17Nu4NXBNI9isZXxMY5yJXBQbFWXHe9oE2URrSwAMIkkd3I2Myb2jWTgRjH+oIFDonvPGJTKfojyUBkWEvyy3B5a17W5RanbZ3lf0BF3PgA1boQDBiFIXrXwWUQedUkrf8OUdYmlcLFMR5eUpJDDcllwP8qeNonWJI0zI8OeC+xMc71BWTxVHcx9P7ArL3nX4r5Ol5j4NNV/YGoyZ/\n
Jan 02 19:45:18 lpyarch gcr-prompter[3670]: Gcr: deriving shared transport key
Jan 02 19:45:18 lpyarch gcr-prompter[3670]: Gcr: deriving transport key
Jan 02 19:45:18 lpyarch gcr-prompter[3670]: Gcr: starting password prompt for callback /org/gnome/keyring/Prompt/p56@:1.34
Jan 02 19:45:31 lpyarch gcr-prompter[3670]: Gcr: completed password prompt for callback :1.34@/org/gnome/keyring/Prompt/p56
Jan 02 19:45:31 lpyarch gcr-prompter[3670]: Gcr: encrypting data
Jan 02 19:45:31 lpyarch gcr-prompter[3670]: Gcr: sending the secret exchange: [sx-aes-1]\npublic=2G5a5ux0oDxyKtwTtKQeVK1Y8xiejwsV88063Ue4SCKhagOPRZcHCF+XKSNjn6Xb74zHTN222E3/a5RrNbGcS8VRmPTVGxxUc9mNBlWlgUg4MtBNtKF4t9DPBTC4RA4zw1ybsu20vXqyCm+z1OCmic+SmrpBqQzSYYRFn3633l/WirlYBmK/B/W0OFtuCZYJH39M46n/RJCC2PsyVI0WATBN8wyjnIGWjeC/X87qs8hrYPQTFQVpdDwSZ3sTvfkM\nsecret=YJvt3wtzr/dkfsZxg2nl1w==\niv=eTAIkduomuAKw163hVZkGQ==\n
Jan 02 19:45:31 lpyarch gcr-prompter[3670]: Gcr: calling the PromptReady method on /org/gnome/keyring/Prompt/p56@:1.34
Jan 02 19:45:31 lpyarch gcr-prompter[3670]: Gcr: returned from the PromptReady method on /org/gnome/keyring/Prompt/p56@:1.34
Jan 02 19:45:31 lpyarch gcr-prompter[3670]: Gcr: received PerformPrompt call from callback /org/gnome/keyring/Prompt/p56@:1.34
Jan 02 19:45:31 lpyarch gcr-prompter[3670]: Gcr: receiving secret exchange: [sx-aes-1]\npublic=DD1Zv/mXj0MFxWWAleJ1k8HlPzKHpAIsC3Xx8PNnEe0MhY17Nu4NXBNI9isZXxMY5yJXBQbFWXHe9oE2URrSwAMIkkd3I2Myb2jWTgRjH+oIFDonvPGJTKfojyUBkWEvyy3B5a17W5RanbZ3lf0BF3PgA1boQDBiFIXrXwWUQedUkrf8OUdYmlcLFMR5eUpJDDcllwP8qeNonWJI0zI8OeC+xMc71BWTxVHcx9P7ArL3nX4r5Ol5j4NNV/YGoyZ/\n
Jan 02 19:45:31 lpyarch gcr-prompter[3670]: Gcr: starting password prompt for callback /org/gnome/keyring/Prompt/p56@:1.34
Jan 02 19:45:38 lpyarch gcr-prompter[3670]: Gcr: completed password prompt for callback :1.34@/org/gnome/keyring/Prompt/p56
Jan 02 19:45:38 lpyarch gcr-prompter[3670]: Gcr: encrypting data
Jan 02 19:45:38 lpyarch gcr-prompter[3670]: Gcr: sending the secret exchange: [sx-aes-1]\npublic=2G5a5ux0oDxyKtwTtKQeVK1Y8xiejwsV88063Ue4SCKhagOPRZcHCF+XKSNjn6Xb74zHTN222E3/a5RrNbGcS8VRmPTVGxxUc9mNBlWlgUg4MtBNtKF4t9DPBTC4RA4zw1ybsu20vXqyCm+z1OCmic+SmrpBqQzSYYRFn3633l/WirlYBmK/B/W0OFtuCZYJH39M46n/RJCC2PsyVI0WATBN8wyjnIGWjeC/X87qs8hrYPQTFQVpdDwSZ3sTvfkM\nsecret=TOLxilfEWSSqacnL1hAEMw==\niv=uoSuwtbaJMNBvJt2sTdZpw==\n
Jan 02 19:45:38 lpyarch gcr-prompter[3670]: Gcr: calling the PromptReady method on /org/gnome/keyring/Prompt/p56@:1.34
Jan 02 19:45:38 lpyarch gcr-prompter[3670]: Gcr: returned from the PromptReady method on /org/gnome/keyring/Prompt/p56@:1.34
Jan 02 19:45:38 lpyarch gcr-prompter[3670]: Gcr: received PerformPrompt call from callback /org/gnome/keyring/Prompt/p56@:1.34
Jan 02 19:45:38 lpyarch gcr-prompter[3670]: Gcr: stopping prompting for operation /org/gnome/keyring/Prompt/p56@:1.34
Jan 02 19:45:38 lpyarch gcr-prompter[3670]: Gcr: closing the prompt
Jan 02 19:45:38 lpyarch gcr-prompter[3670]: Gcr: stopping prompting for operation /org/gnome/keyring/Prompt/p56@:1.34
Jan 02 19:45:38 lpyarch gcr-prompter[3670]: Gcr: couldn't find the callback for prompting operation /org/gnome/keyring/Prompt/p56@:1.34
Jan 02 19:45:38 lpyarch gcr-prompter[3670]: Gcr: stopping prompting for operation /org/gnome/keyring/Prompt/p56@:1.34
Jan 02 19:45:38 lpyarch gcr-prompter[3670]: Gcr: couldn't find the callback for prompting operation /org/gnome/keyring/Prompt/p56@:1.34
Jan 02 19:45:38 lpyarch gcr-prompter[3670]: Gcr: stopping prompting for operation /org/gnome/keyring/Prompt/p56@:1.34
Jan 02 19:45:38 lpyarch gcr-prompter[3670]: Gcr: couldn't find the callback for prompting operation /org/gnome/keyring/Prompt/p56@:1.34
Jan 02 19:45:38 lpyarch gcr-prompter[3670]: Gcr: calling the PromptDone method on /org/gnome/keyring/Prompt/p56@:1.34, and ignoring reply
Jan 02 19:45:49 lpyarch gcr-prompter[3670]: Gcr: 10 second inactivity timeout, quitting
Jan 02 19:45:49 lpyarch gcr-prompter[3670]: Gcr: unregistering prompter
Jan 02 19:45:49 lpyarch gcr-prompter[3670]: Gcr: disposing prompter
Jan 02 19:45:49 lpyarch gcr-prompter[3670]: Gcr: finalizing prompter

至于为何在设置变量后就会自动授权而无需输入密码解锁,就是另一个问题了,可能跟设置的PAM有关。

锁屏

xsslock,i3lock,这个地方可能需要再好好了解一下系统的Session的概念和作用

https://rapiz.me/2019/lock-and-suspend/

壁纸

概要

这一部分主要研究X Window System的远程连接和鉴权机制。

涉及这几个概念或程序。

  1. Xsession - initialize X session
  2. xhost - server access control program for X
  3. Xsecurity - X display access control
  4. xauth - X authority file utility

本地用户ypl将自己的X Client连接到在lpy所登录的GUI环境中

背景

根据 Xsession中的文档,得知Xsession执行过程包括这样一个文件,其功能是为本地同一用户赋予X Server的访问权限。

1
2
3
4
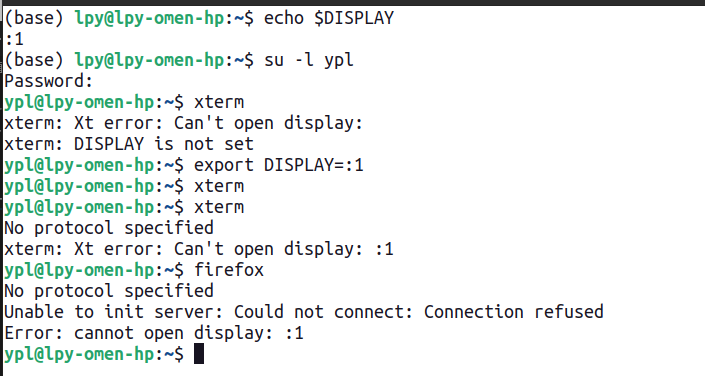
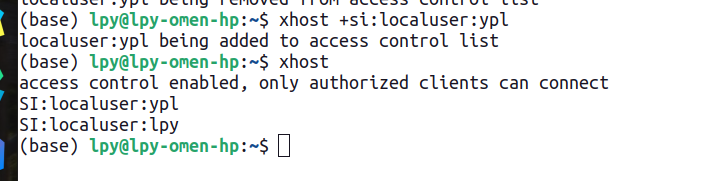
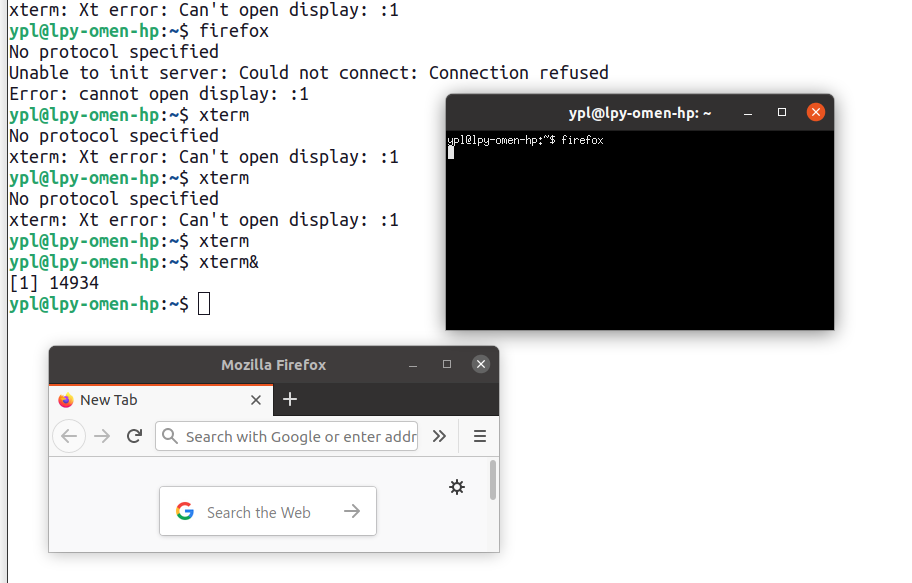
/etc/X11/Xsession.d/35x11-common_xhost-local
Give access to the X server to the same user on the local host. If the
xhost command is available, it will use it to allow any process of the
same user running on the local host to access the X server.

而这个文件的内容如下:
它所做的事情就是使用 xhost +si:localuser:$(id -un) 命令允许当前用户添加到访问控制列表中。

1
2
3
4
5
6
7
8
9
10
# This file is sourced by Xsession(5), not executed.

# If xhost (from x11-xserver-utils) is installed, use it to give access
# to the X server to any process from the same user on the local host.
# Unlike other uses of xhost, this is safe since the kernel can check
# the actual owner of the calling process.

if type xhost >/dev/null 2>&1; then
xhost +si:localuser:$(id -un) || :
fi

xhost命令简介如下:

1
2
3
4
5
6
7
8
9
10
11
12
13
14
NAME
xhost - server access control program for X

SYNOPSIS
xhost [[+-]name ...]

DESCRIPTION
The xhost program is used to add and delete host names or user names to the list
allowed to make connections to the X server. In the case of hosts, this provides
a rudimentary form of privacy control and security. It is only sufficient for a
workstation (single user) environment, although it does limit the worst abuses.
Environments which require more sophisticated measures should implement the user-
based mechanism or use the hooks in the protocol for passing other authentication
data to the server.

看到这里的时候,我并不确定本地其它用户能否不经配置就将自己的X Client连接至其它用户登录时系统所创建的X Server。

尝试直接连接

尝试切换用户然后直接连接,结果如下,报错 No protocol specified

使用xhost授权

Grant

再次连接

就可以正常启动了。

Reconect

使用 Ctrl+Alt+F1..7 切换到一个console,然后执行下面的命令杀掉 Xorg进程即可

1
sudo pkill Xorg

如何连其它console都进不去,只能强制关机重启了

概要

在上一篇文章了解了X Window System的基本架构,现在来讨论如何使用。
本文关注的是如何在本机启动基于X的桌面环境,以及如何配置使其自动启动,最后讨论了执行 X 命令所需的权限。

本文主要涉及这几个概念或程序。

  1. xinit - X Window System initializer
  2. startx - initialize an X session
  3. Xsession - initialize X session

在本地启动X Server和X Client并连接

在上一篇文章讲了手动启动X Server,然后再启动X Client,使其连接到所创建X Server的方法。
但是使用那种操作方式虽然直观,但是一旦X Server启动成功,虚拟机显示器和其它外设便会由X Server接管,
也就无法在虚拟机本机同时完成X Server和X Client的启动。那么如何只使用一台机器完成操作呢?

也许使用对X使用vt参数可以借助虚拟终端完成本地启动?

这个想法在我电脑的Ubuntu系统上是可行的,可以在启动 X 时通过 vtN 参数指定其所占用的虚拟终端,这样一来执行 X 之后还能通过 Ctrl+Alt+FN 切回原来的console/tty,在其中启动X Client,并连接至刚才启动的X Server。
但是在虚拟机中的Arch里面似乎在试图切换到其它tty的时候会死机,暂不清楚原因,也许跟视频驱动有关系。

可以使用shell脚本完成。

使用SHELL脚本完成GUI启动

可以创建如下脚本,使用bash执行。

1
2
3
4
5
6
7
8
9
10
11
12
13
14
# !/usr/bin/sh

export DISPLAY=:0.0

# X Server
X :0 &

# sleep是为了等待X Server启动
# 否则有可能因为X Client试图连接到X Server失败而退出
# 导致X Server最终启动成功,却没有X Client
sleep 3

# X Client
i3 &

使用root权限执行脚本就可以看到i3桌面环境了,如果想要回到刚才的命令行界面,可以在i3桌面下调出xterm,执行pkill Xorg

之前由于未加sleep语句而导致的愚蠢错误

破案了!!!在X Client前面加上一句 sleep 3 就能正常启动了,推测是因为X Server还没完全启动,xterm就尝试连接,发现失败,然后报错了,,,
之前犯的愚蠢错误,可以忽略
虽然说X Client应该没有什么限制,但至少可以排除一个xterm,该程序似乎无法用超级用户权限执行(这么说应该不合适,因为随后进入i3桌面之后可以调出xterm,但是把脚本中i3换成xterm确实看不到它正常显示),也就是说如果把脚本中的i3换成xterm,看起来和只执行X是一样的效果,这一现象一度使我误以为X Server启动之后,后面的命令便无法执行了(显然这种猜测不合常理)。 报错信息如下:
error

模拟非root用户登录

上面的脚本执行完毕会以root用户的身份启动X Client应用。这和平时所用的桌面环境行为并不一致,那么如何修改上述脚本从而以普通用户的身份启动i3桌面呢?可以像下面这样:

1
2
3
4
5
6
7
8
9
10
11
12
13
# !/usr/bin/sh

# X Server
X :0 &

# sleep是为了等待X Server启动
# 否则有可能因为X Client试图连接到X Server失败而退出
# 导致X Server最终启动成功,却没有X Client
sleep 3

# X Client
# 需要设置 DISPLAY 变量
su lpy -l -c "DISPLAY=:0.0 i3 &"

该脚本与上面的不同之处仅在X Client上,借助 su $USER -l -c ... 来以普通用户的身份启动X Client即可。

在这里使用 -l 参数是为了模拟login,避免当前root用户身份下的一些配置被传递给 i3 进程。
当时我遇到的情况是,由于环境变量PWD=/root被传递给了i3,我在i3中启动的xterm初始路径会是/root,尽管当时是以 lpy 的身份启动i3的。

1
2
3
4
5
6
7
8
9
10
11
12
13
14
-, -l, --login
Start the shell as a login shell with an environment similar to a real lo‐
gin:

o clears all the environment variables except TERM and variables
specified by --whitelist-environment

o initializes the environment variables HOME, SHELL, USER, LOG‐
NAME, and PATH

o changes to the target user's home directory

o sets argv[0] of the shell to '-' in order to make the shell a
login shell

至此我们了解了利用脚本启动X Window System的方法。
这种方式还有个致命的缺陷,一旦一不小心退出了X Client,由于X Server还控制着显示器和其它外设,我们将无法进行其它操作。

新的疑问:能否在脚本里面指定vt_n这样的参数将其运行在某个虚拟终端上,而不是像现在这样无法切换虚拟终端?

xinit 和 startx

自己完全控制X Server 和 X Client的启动及连接并不方便,现在介绍另外两个用于启动X Window System的工具。

xinit

xinit 是X Window System的初始化程序。

该程序用于在不使用Diaplay Manager(例如xdm)的系统中启动X Server和第一个X Client程序,当其启动的第一个X Client程序退出之后,xinit将会关闭X Server,然后退出。

从console执行下面的命令可以启动i3,并且一旦i3退出,相应X Server也会退出,可以回到console。

1
sudo xinit i3

官方文档似乎提到了对出现在xinit参数中的程序名格式的限制,但这里并没有遵守,也可以正常执行

An alternate client and/or server may be specified on the command line. The de‐
sired client program and its arguments should be given as the first command line
arguments to xinit. To specify a particular server command line, append a double
dash (—) to the xinit command line (after any client and arguments) followed by
the desired server command.

Both the client program name and the server program name must begin with a slash
(/) or a period (.). Otherwise, they are treated as an arguments to be appended
to their respective startup lines. This makes it possible to add arguments (for
example, foreground and background colors) without having to retype the whole
command line.

具体用法参考官方文档

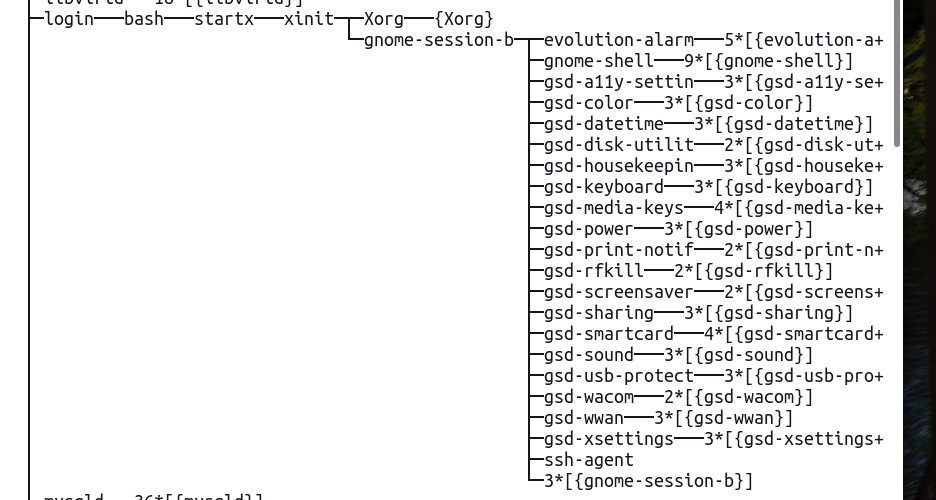
关于xinit,很重要的一点是要理解它的行为,它会启动两个程序,一个叫做作 A(称为Client),另一个叫作B(称为Server),一旦它检测到 A 进程结束,它就会终止 B 进程。
也许可以这么说(我瞎猜的),xinit程序本身并不知道它所启动的到底是两个什么程序,它所做的事情仅仅是等待 A 完成,然后终止 B。只要按照约定将 X Client 程序传递给它作为 A,将 X Server 传递给它作为 B,就能实现 X Client 进程结束时自动终止 X Server 的效果。也许可以尝试使用SHELL脚本模拟这个过程。

理解了这个过程,就可以讨论 xinit 所接受的程序参数类型了。既然只要可以运行为一个进程就可以,也就不是必须传递给它二进制程序了,SHELL脚本也是可以的,因为可以由xinit创建一个sh进程执行脚本,然后将此sh进程作为所谓的的 Client 进程,等待它结束然后去终止 Server进程,同样的,所谓的 Server 进程也可以是shell脚本。

在实际使用中,几乎总是使用脚本作为程序参数传递给xinit,并在 Server 脚本的最后使用 exec 命令启动X Server,这样一来就能将此sh进程转变成 X Server 进程,在 Client 脚本的最后使用 exec 命令启动 X Client,然后xinit按照其运行逻辑等待 Client 进程结束并终止 Server 即可。

而且,如何没有给xinit提供client和server参数,xinit会使用缺省参数,它会将 /etc/X11/xinit/xserverrc 作为 Server,将 /etx/X11/xinit/xinitrc 作为 Client

下面的就是 /etc/X11/xinit/xserverrc 的内容,其实它就做了一件事,就是使用 exec 在sh进程空间运行 X。注意命令最后的 $@,意思是接收所有传递给该脚本的的命令行参数并传递给 /usr/bin/X

1
2
#!/bin/sh
exec /usr/bin/X -nolisten tcp "$@"

startx

简介

startxxinit 的一个前端,是一个shell脚本,位于 /usr/bin/startx

既然已经有了xinit,为什么还需要 startx呢?
因为 xinit 的缺省配置并不友好,它的缺省 DISPLAY 总是 :0,默认情况不会使用 vt_N 参数使用虚拟终端,它仅仅提供了最基本的功能,几乎需要指明各种参数。

startx 所做的事情就是在 xinit 的基础上按照其定义的策略确定一组恰当的默认配置参数,然后用这组参数调用 xinit 从而完成启动,从而减轻用户使用负担。它负责确定的配置,包括 DISPLAYvt_Nclientclient_optionsserverserver_options等。除了负责确定一组合适的xinit调用参数,它还会进行一些 X Window System 鉴权相关操作,比如设置 xhostxauth等。

startx 的参数格式也与 xinit 完全相同,可以像调用 xinit 那样直接调用 startx。下面的命令就可以在第8个虚拟终端上启动X Server和i3wm。

1
startx i3 -- :0 vt8

配置文件

配置文件其实就是要传递给 xinit 的 Client 和 Server 脚本。在 commandline options 中提供的 Server 和 Client 优先级最高,如果用户没有提供 Client 和 Server 参数,startx 就会按照其约定的规则搜索确定要使用的 Client 和 Server 脚本。

startx 相比 xinit 增加了用户配置文件的概念,会优先搜索用户配置 ~/.xinitrc 作为 xinit 的 client,搜索 ~/.xserverrc 作为 xinit 的 server,如果用户配置不存在,才会继续搜索系统配置文件。

具体配置文件路径及匹配规则如下:

1
2
3
4
5
6
7
8
9
10
11
12
13
14
15
16
17
18
19
20
To determine the client to run, startx looks for the following files, in order:

$(HOME)/.startxrc

/usr/lib/x86_64-linux-gnu/sys.startxrc
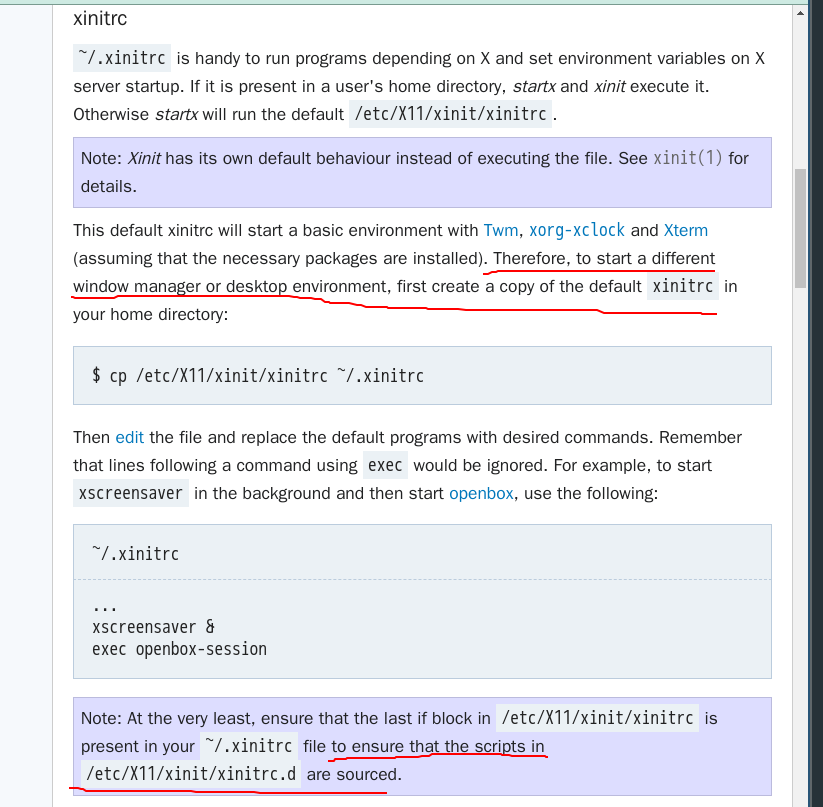
$(HOME)/.xinitrc

/etc/X11/xinit/xinitrc

If command line client options are given, they override this behavior and revert
to the xinit(1) behavior. To determine the server to run, startx first looks for
a file called .xserverrc in the user's home directory. If that is not found, it
uses the file xserverrc in the xinit library directory. If command line server
options are given, they override this behavior and revert to the xinit(1) behav‐
ior. Users rarely need to provide a .xserverrc file. See the xinit(1) manual
page for more details on the arguments.

The system-wide xinitrc and xserverrc files are found in the /etc/X11/xinit di‐
rectory.

基于Debian的系统-XSession文件

1
2
3
4
5
6
7
Note that in the Debian system, what many people traditionally put in the  .xini‐
trc file should go in .xsession instead; this permits the same X environment to
be presented whether startx, xdm, or xinit is used to start the X session. All
discussion of the .xinitrc file in the xinit(1) manual page applies equally well
to .xsession. Keep in mind that .xinitrc is used only by xinit(1) and completely
ignored by xdm(1).

使用 man Xsession 命令进一步了解,这是Debian对Xsession的介绍。

在我的Ubuntu系统上,/etc/X11/xinit/xinitrc 只是简单地执行了 /etc/X11/Xsession

1
2
3
4
5
6
7
8
9
#!/bin/sh

# /etc/X11/xinit/xinitrc
#
# global xinitrc file, used by all X sessions started by xinit (startx)

# invoke global X session script
. /etc/X11/Xsession

startx脚本分析

如果需要在console启动X Windows System,一般会使用 startx, 因此理解 startx 的执行过程有助于更好地理解其配置方法。下面是我对startx脚本的简单注释,主要是指出了一些我之前未曾接触过的shell语法。

1
2
3
4
5
6
7
8
9
10
11
12
13
14
15
16
17
18
19
20
21
22
23
24
25
26
27
28
29
30
31
32
33
34
35
36
37
38
39
40
41
42
43
44
45
46
47
48
49
50
51
52
53
54
55
56
57
58
59
60
61
62
63
64
65
66
67
68
69
70
71
72
73
74
75
76
77
78
79
80
81
82
83
84
85
86
87
88
89
90
91
92
93
94
95
96
97
98
99
100
101
102
103
104
105
106
107
108
109
110
111
112
113
114
115
116
117
118
119
120
121
122
123
124
125
126
127
128
129
130
131
132
133
134
135
136
137
138
139
140
141
142
143
144
145
146
147
148
149
150
151
152
153
154
155
156
157
158
159
160
161
162
163
164
165
166
167
168
169
170
171
172
173
174
175
176
177
178
179
180
181
182
183
184
185
186
187
188
189
190
191
192
193
194
195
196
197
198
199
200
201
202
203
204
205
206
207
208
209
210
211
212
213
214
215
216
217
218
219
220
221
222
223
224
225
226
227
228
229
230
231
232
233
234
235
236
237
238
239
240
241
242
243
244
245
246
247
248
249
250
251
252
253
254
255
256
257
258
259
260
261
262
#!/bin/sh

#
# This is just a sample implementation of a slightly less primitive
# interface than xinit. It looks for user .xinitrc and .xserverrc
# files, then system xinitrc and xserverrc files, else lets xinit choose
# its default. The system xinitrc should probably do things like check
# for .Xresources files and merge them in, start up a window manager,
# and pop a clock and several xterms.
#
# Site administrators are STRONGLY urged to write nicer versions.
#

unset DBUS_SESSION_BUS_ADDRESS
unset SESSION_MANAGER
userclientrc=$HOME/.xinitrc
sysclientrc=/etc/X11/xinit/xinitrc

userserverrc=$HOME/.xserverrc
sysserverrc=/etc/X11/xinit/xserverrc
defaultclient=/usr/bin/xterm
defaultserver=/usr/bin/X
defaultclientargs=""
defaultserverargs=""
defaultdisplay=""
clientargs=""
serverargs=""
vtarg=""
enable_xauth=1


# Automatically determine an unused $DISPLAY
# 自动找一个可用的 $DISPLAY
#(如果用户没有通过命令行界面指定 DISPLAY,就会使用这个参数)
d=0
while true ; do
[ -e "/tmp/.X$d-lock" -o -S "/tmp/.X11-unix/X$d" ] || break
d=$(($d + 1))
done
defaultdisplay=":$d"
unset d


# 这一部分主要解析传递给 startx 的命令行参数,之后会传递给 xinit
whoseargs="client"

# 这个判断条件的意思是,$1不为空
# 看起来有点奇怪,可能是早期shell的限制导致不得不这么写吧
while [ x"$1" != x ]; do
case "$1" in
# '' required to prevent cpp from treating "/*" as a C comment.
/''*|\./''*) # 匹配一个看起来像是路径的东西
# 这个 PATTERN 可能是专门用来匹配 client 或 server 程序的
# 这么奇怪可能与 xinit 对程序名这个参数的限制有关系
# 似乎要求必须以 / 或 . 开头
# 但是 xinit i3 又能正常执行启动i3桌面,又如何解释呢?
# xinit 文档里是这么说的
# An alternate client and/or server may be specified on the command line. The de‐
# sired client program and its arguments should be given as the first command line
# arguments to xinit. To specify a particular server command line, append a double
# dash (--) to the xinit command line (after any client and arguments) followed by
# the desired server command.
#
# Both the client program name and the server program name must begin with a slash
# (/) or a period (.). Otherwise, they are treated as an arguments to be appended
# to their respective startup lines. This makes it possible to add arguments (for
# example, foreground and background colors) without having to retype the whole
# command line.

# 当前处理的是关于client的参数(--分隔符之前)
if [ "$whoseargs" = "client" ]; then
# 如何还未设置client及其options(按照约定client路径应该作为第一个参数)
if [ x"$client" = x ] && [ x"$clientargs" = x ]; then
client="$1" # 设置 client
else
clientargs="$clientargs $1" # 设置 client options
fi
else
# 当前处理的是关于server的参数(--分隔符之前)
if [ x"$server" = x ] && [ x"$serverargs" = x ]; then
server="$1" # 设置 server
else
serverargs="$serverargs $1" # 设置 server options
fi
fi
;;

# 遇到这个分隔符,表明接下来的是 server 相关参数
--)
whoseargs="server"
;;
*)
if [ "$whoseargs" = "client" ]; then
clientargs="$clientargs $1"
else
# display must be the FIRST server argument
if [ x"$serverargs" = x ] && \
expr "$1" : ':[0-9][0-9]*$' > /dev/null 2>&1; then
display="$1"
else
serverargs="$serverargs $1"
fi
fi
;;
esac
shift
done

# process client arguments
# 如果未通过commandline options确定client,就根据顺序选定一个配置脚本作为client
if [ x"$client" = x ]; then
client=$defaultclient

# For compatibility reasons, only use startxrc if there were no client command line arguments
if [ x"$clientargs" = x ]; then
if [ -f "$userclientrc" ]; then
client=$userclientrc
elif [ -f "$sysclientrc" ]; then
client=$sysclientrc
fi
fi
fi

# if no client arguments, use defaults
if [ x"$clientargs" = x ]; then
clientargs=$defaultclientargs
fi

# 如果未通过commandline options确定server,就根据顺序选定一个配置脚本作为server
# process server arguments
if [ x"$server" = x ]; then
server=$defaultserver


# When starting the defaultserver start X on the current tty to avoid
# the startx session being seen as inactive:
# "https://bugzilla.redhat.com/show_bug.cgi?id=806491"
tty=$(tty)
if expr "$tty" : '/dev/tty[0-9][0-9]*$' > /dev/null; then
tty_num=$(echo "$tty" | grep -oE '[0-9]+$')
vtarg="vt$tty_num -keeptty"
fi


# For compatibility reasons, only use xserverrc if there were no server command line arguments
if [ x"$serverargs" = x -a x"$display" = x ]; then
if [ -f "$userserverrc" ]; then
server=$userserverrc
elif [ -f "$sysserverrc" ]; then
server=$sysserverrc
fi
fi
fi

# if no server arguments, use defaults
if [ x"$serverargs" = x ]; then
serverargs=$defaultserverargs
fi

# 设置vt参数(虚拟终端编号)
# if no vt is specified add vtarg (which may be empty)
have_vtarg="no"
for i in $serverargs; do
if expr "$i" : 'vt[0-9][0-9]*$' > /dev/null; then
have_vtarg="yes"
fi
done
if [ "$have_vtarg" = "no" ]; then
serverargs="$serverargs $vtarg"
fi

# if no display, use default
if [ x"$display" = x ]; then
display=$defaultdisplay
fi

# 这一部分控制身份验证相关的内容,还没仔细看
if [ x"$enable_xauth" = x1 ] ; then
if [ x"$XAUTHORITY" = x ]; then
XAUTHORITY=$HOME/.Xauthority
export XAUTHORITY
fi

removelist=

# set up default Xauth info for this machine

# check for GNU hostname
if hostname --version > /dev/null 2>&1; then
if [ -z "`hostname --version 2>&1 | grep GNU`" ]; then
hostname=`hostname -f`
fi
fi

if [ -z "$hostname" ]; then
hostname=`hostname`
fi

authdisplay=${display:-:0}

mcookie=`/usr/bin/mcookie`


if test x"$mcookie" = x; then
echo "Couldn't create cookie"
exit 1
fi
dummy=0

# create a file with auth information for the server. ':0' is a dummy.
xserverauthfile=`mktemp --tmpdir serverauth.XXXXXXXXXX`
trap "rm -f '$xserverauthfile'" HUP INT QUIT ILL TRAP KILL BUS TERM
xauth -q -f "$xserverauthfile" << EOF
add :$dummy . $mcookie
EOF


serverargs=${serverargs}" -auth "${xserverauthfile}


# now add the same credentials to the client authority file
# if '$displayname' already exists do not overwrite it as another
# server may need it. Add them to the '$xserverauthfile' instead.
for displayname in $authdisplay $hostname$authdisplay; do
authcookie=`xauth list "$displayname" \
| sed -n "s/.*$displayname[[:space:]*].*[[:space:]*]//p"` 2>/dev/null;
if [ "z${authcookie}" = "z" ] ; then
xauth -q << EOF
add $displayname . $mcookie
EOF
removelist="$displayname $removelist"
else
dummy=$(($dummy+1));
xauth -q -f "$xserverauthfile" << EOF
add :$dummy . $authcookie
EOF
fi
done
fi


# 启动!
xinit "$client" $clientargs -- "$server" $display $serverargs

retval=$?

if [ x"$enable_xauth" = x1 ] ; then
if [ x"$removelist" != x ]; then
xauth remove $removelist
fi
if [ x"$xserverauthfile" != x ]; then
rm -f "$xserverauthfile"
fi
fi

if command -v deallocvt > /dev/null 2>&1; then
deallocvt
fi

exit $retval

Ubuntu默认配置下,Gnome是如何被启动的

经过查看,我的Ubuntu系统上并不存在 ~/.xinitrc,~/.xsession 等文件,因此启动Gnone这样的设定应该是某个系统配置文件所为,根据前面所说,在Debian系列系统上 /etc/X11/xinit/xinitrc 本身并无作用,只是在其中执行了 . /etc/X11/Xsession,因此推测应该是 Xsession 部分的某个系统配置文件所为。

下面这段文档讲了Xsession的一个执行环节,其中涉及多个配置文件:

1
2
3
4
5
6
7
8
9
10
11
12
13
14
15
16
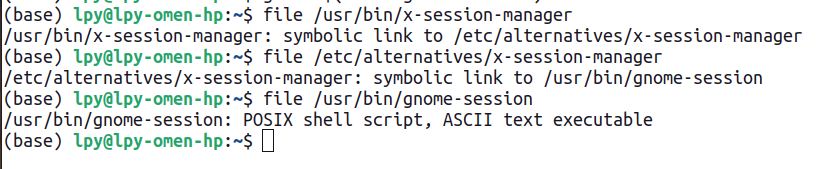
/etc/X11/Xsession.d/50x11-common_determine-startup
Determine startup program. The X client to launch as the controlling
process (the one that, upon exiting, causes the X server to exit as well)
is determined next. If a program or failsafe argument was given and is
allowed (see above), it is used as the controlling process. Otherwise, if
the line ‘allow-user-xsession’ is present in Xsession.options, a
user-specified session program or script is used. In the latter case, two
historically popular names for user X session scripts are searched for:
$HOME/.xsession and $HOME/.Xsession (note the difference in case). The
first one found is used. If the script is not executable, it is marked to
be executed with the Bourne shell interpreter, sh. Finally, if none of
the above succeeds, the following programs are searched for:
/usr/bin/x-session-manager, /usr/bin/x-window-manager, and /usr/bin/x-ter‐
minal-emulator. The first one found is used. If none are found, Xsession
aborts with an error.

由于我的用户目录没有Xsession相关配置,所以重点关注系统配置文件。

上面文档提到的第一个系统配置文件 /usr/bin/x-session-manager 是个多级符号链接
/usr/bin/x-session-manager

内容如下,可以看到其中有对 gnome-session-binary 的调用,Gnome的启动应该与此脚本有关。

1
2
3
4
5
6
7
8
9
10
11
12
13
14
15
16
17
18
19
20
21
22
23
24
25
26
27
28
29
30
31
32
33
34
35
36
#!/bin/sh

if [ "x$XDG_SESSION_TYPE" = "xwayland" ] &&
[ "x$XDG_SESSION_CLASS" != "xgreeter" ] &&
[ -n "$SHELL" ] &&
grep -q "$SHELL" /etc/shells &&
! (echo "$SHELL" | grep -q "false") &&
! (echo "$SHELL" | grep -q "nologin"); then
if [ "$1" != '-l' ]; then
exec bash -c "exec -l '$SHELL' -c '$0 -l $*'"
else
shift
fi
fi

#SETTING=$(G_MESSAGES_DEBUG='' gsettings get org.gnome.system.locale region)
#REGION=${SETTING#\'}
#REGION=${REGION%\'}

if [ -n "$REGION" ]; then
unset LC_TIME LC_NUMERIC LC_MONETARY LC_MEASUREMENT LC_PAPER

if [ "$LANG" != "$REGION" ] ; then
export LC_TIME=$REGION
export LC_NUMERIC=$REGION
export LC_MONETARY=$REGION
export LC_MEASUREMENT=$REGION
export LC_PAPER=$REGION
fi
fi

if [ -d "${XDG_RUNTIME_DIR}/systemd" ]; then
exec /usr/libexec/gnome-session-binary --systemd "$@"
else
exec /usr/libexec/gnome-session-binary --builtin "$@"
fi

具体启动路径推测

只考虑在 multi-user 模式下,在 console 执行 startx 手动启动 GUI 的过程。
我的 Ubuntu 系统的情况是,/home/lpy 里面没有任何 .xinitrc/.xsession/.xserverrc 等X Window System 的用户配置文件。

具体启动步骤可能是这样的:

  1. 用户执行 startx
  2. startx 脚本根据文档所述规则,寻找用户配置失败
  3. startx 确定使用 /etc/X11/xinit/xinitrc 作为 client,使用 /etc/X11/xinit/xserverrc 作为 Server
  4. startx 调用 xinit /etc/X11/xinit/xinitrc [options...] -- /etc/X11/xinit/xserverrc [options...] 启动 xinit
  5. xinit 启动一个shell进程执行 /etc/X11/xinit/xserverrc,该shell进程作为 Server,脚本执行过程中使用 exec X ...在shell进程空间内执行X Server,此后原shell进程本质上已经变成 X Server 进程了
  6. xinit 启动另一个shell进程执行 /etc/X11/xinit/xinitrc,该shell进程作为 Client,脚本执行过程如下
  7. /etc/X11/xinit/xinitrc 执行 . /etc/X11/Xsession
  8. /etc/X11/Xsession 执行 . /etc/X11/Xsession.d/50x11-common_determine-startup
  9. /etc/X11/Xsession.d/50x11-common_determine-startup 选定 STARTUP=/usr/bin/x-session-manager
  10. /etc/X11/Xsession 执行 /etc/X11/Xsession.d/99x11-common_start
  11. /etc/X11/Xsession.d/99x11-common_start 执行 exec $STARTUP,也就是 exec /usr/bin/x-session-manager,在此shell进程空间中执行 /usr/bin/x-session-manager 程序,经过查看,/usr/bin/x-session-manager 实际上是 /usr/bin/gnome-session 的符号链接,也就是此shell进程最后实际上成为了 /usr/bin/gnome-session 进程
  12. 至此gnome相关程序已经成功启动了

startx-gnome-pstree

使用 startx 启动 gnome-session,进程关系如下:

startx-gnome-pstree

通过Xsession配置文件默认启动 i3wm

这种方式理论上来说,在使用startx启动GUI时应该是会生效的。
如果使用Display Manger登录,我还不太确定是否应该生效,但是似乎在我的Ubuntu系统上测试并没有生效。

添加~/.xsession文件

内容如下,最关键的是最后的 exec /usr/bin/i3

1
2
3
4
5
6
7
8
9
10
11
12
13
14
15
16
17
18
19
20
21
22
23
24
25
26
27
28
29
30
31
32
33
34
35
36
37
38
39
# Disable DPMS turning off the screen
xset dpms force on
xset s off

# Disable bell
# xset -b

# Enable zapping (C-A-<Bksp> kills X)
setxkbmap -option terminate:ctrl_alt_bksp

# Enforce correct locales from the beginning
unset LC_COLLATE
# export LC_CTYPE=zh_CN.UTF-8
export LC_TIME=zh_CN.UTF-8
export LC_NUMERIC=zh_CN.UTF-8
export LC_MONETARY=zh_CN.UTF-8
# export LC_MESSAGES=C
export LC_PAPER=zh_CN.UTF-8
export LC_NAME=zh_CN.UTF-8
export LC_ADDRESS=zh_CN.UTF-8
export LC_TELEPHONE=zh_CN.UTF-8
export LC_MEASUREMENT=zh_CN.UTF-8
export LC_IDENTIFICATION=zh_CN.UTF-8

# Use XToolkit in java applications
export AWT_TOOLKIT=XToolkit

# Set background color
xsetroot -solid "#333333"

# Enable core dumps in case something goes wrong
ulimit -c unlimited

# 下面的带日志的启动命令会导致无法启动,不清楚原因
# Start i3 and log to ~/.i3/logfile
# echo "Starting at $(date)" >> ~/.i3/i3log-$(date +'%F-%k-%M-%S') 2>&1
# exec /usr/bin/i3 -V -d all >> ~/.i3/i3log-$(date +'%F-%k-%M-%S') 2>&1

exec i3

运行逻辑

与gnome启动过程类似,区别主要发生在 /etc/X11/Xsession.d/50x11-common_determine-startup 的执行过程中:

  1. 用户执行 startx
  2. startx 脚本根据文档所述规则,寻找用户配置失败
  3. startx 确定使用 /etc/X11/xinit/xinitrc 作为 client,使用 /etc/X11/xinit/xserverrc 作为 Server
  4. startx 调用 xinit /etc/X11/xinit/xinitrc [options...] -- /etc/X11/xinit/xserverrc [options...] 启动 xinit
  5. xinit 启动一个shell进程执行 /etc/X11/xinit/xserverrc,该shell进程作为 Server,脚本执行过程中使用 exec X ...在shell进程空间内执行X Server,此后原shell进程本质上已经变成 X Server 进程了
  6. xinit 启动另一个shell进程执行 /etc/X11/xinit/xinitrc,该shell进程作为 Client,脚本执行过程如下
  7. /etc/X11/xinit/xinitrc 执行 . /etc/X11/Xsession
  8. /etc/X11/Xsession 执行 . /etc/X11/Xsession.d/50x11-common_determine-startup
  9. /etc/X11/Xsession.d/50x11-common_determine-startup 选定 STARTUP=$HOME/.xsession
  10. /etc/X11/Xsession 执行 /etc/X11/Xsession.d/99x11-common_start
  11. /etc/X11/Xsession.d/99x11-common_start 执行 exec $STARTUP,也就是 exec $HOME/.xsession
  12. 具体如何exec一个脚本我还不是很确定,但是肯定是需要shell的,推测 exec $HOME/.xsession 的实际执行结果是在原先的shell进程空间运行了shell,然后在shell环境下执行 $HOME/.xsession 这个脚本的内容
  13. 执行 $HOME/.xsession 这个脚本时遇到命令 exec /usr/bin/i3,然后在其shell进程空间中执行 i3 程序,也就是此shell进程最后实际上成为了 i3 进程
  14. 至此 i3 已经成功启动了

startx-i3-pstree

使用 startx 启动 i3,进程关系如下:

startx-i3-pstree

执行 X 程序所需权限

默认情况下,执行 X 命令是需要 root 权限的。但是在我的Ubuntu系统上不经配置就可以以普通用户的身份执行 X。难道是在Ubuntu上原本就允许以普通用户的的身份直接执行 X 吗?

通过执行 startx,然后使用 pstree -u 就可以看到带有用户信息的进程树了,在图中可以看到,尽管startxxinit都是以用户身份执行的,但是 Xorg 进程所属用户却是 root
pstree-u

从这个信息可以知道,Xorg 并不是以用户的身份执行的,而是以 root 用户的身份执行的。可以推测,用户启动 startx 时,借助某个 setuid 程序完成了 Xorg 程序的启动。

那么是哪个setuid程序呢?我们可以沿着startx的执行路径寻找。在默认情况下,startx 会选定 /etc/X11/xinit/xserverrc 作为传递给 xinit 的Server参数,然后 xinit 启动它作为 Server。可以看到/etc/X11/xinit/xserverrc所做的事情是执行了X命令,继续追踪下去会发现 X 也是一个shell脚本,它的内容如下:

1
2
3
4
5
6
7
8
9
10
11
#!/bin/sh
#
# Execute Xorg.wrap if it exists otherwise execute Xorg directly.
# This allows distros to put the suid wrapper in a separate package.

basedir=/usr/lib/xorg
if [ -x "$basedir"/Xorg.wrap ]; then
exec "$basedir"/Xorg.wrap "$@"
else
exec "$basedir"/Xorg "$@"
fi

它的运行逻辑是,如果存在 /usr/lib/xorg/Xorg.wrap 便启动它,否则启动 /usr/lib/xorg/Xorg,下面我们来看一些这两个文件的信息:
Xorg[.wrap]

从图中可以看到,这两个都是可执行二进制文件,并且 Xorg.wrapsetuidsetgid 的,简单地说就是任何对 Xorg.wrap 的执行都将以 Xorg.wrap 这个程序所属用户和用户组的身份进行,进一步查看就会发现它所属用户和用户组都是 root,也就是不管谁执行 Xorg.wrap 这个程序,都会以root身份进行,这样一来,普通用户能执行 XX 要求root权限两件事情就不矛盾了。
Xorg.wrap setuid

根据上面的讨论,可以确定正是借助 Xorg.wrap,我才能在Ubuntu系统上以普通用户的身份执行 X,也就可以执行基于X的 xinitstartx 了。

但是我的虚拟机中的 Arch 没有 Xorg.wrap, 因此以普通用户身份执行 X 会出错也就不奇怪了,经过搜索,我得知在Arch中,Xorg.wrap 是由 xorg-server这个程序包提供的,因此应该可以安装这个包并经过合适的配置,使得普通用户也可以启动桌面环境。(我没配好)

简介

使用Linux桌面环境也两三年了,也曾几次打开介绍Xorg的文章,不过基本都是简单看一眼就过去了,这次打算好好看下基于Xorg的Liunx桌面环境总体构成、运行原理。

X基本知识

基本术语

X: 即 X Window System,提供了用于构建GUI系统所需的基本框架或原语,这仅仅是一个规范,并不是实现
X11: X的最新版本
Xorg: 目前最流行的X实现
下文可能会混用这些词汇,但很多地方可以认为泛指X Window System

组成部分

X采用C/S架构,由 X ServerX Client 组成,两者之间使用 X Protocol 进行通信。
Xorg C/S

C/S架构解释

在Xorg中,Server 和 Client划分可能并不是那么合乎人们的日常认识。

  1. X Server运行在用户端,X Server控制显示器以及外设资源,但是它并不知道要绘制什么样的画面。
  2. X Client是应用程序,可以运行在远程服务器上,它本身并没有显示器资源,它与X Server通信以指示X Server绘制画面,还可以接收X Server发过来的外设操作指令。
  3. 这里的C/S划分是从Xorg的视角说的,根据显示器资源和外设资源而定的,X Server拥有显示器资源和外设资源,并向X Client(应用程序)提供服务。

启动一个X Server并将X Client连接到X Server

平时使用的桌面环境都具有开箱即用的桌面环境,对用户屏蔽了Xorg的工作细节,因此这一次我决定使用Arch Linux从零配置基于Xorg的GUI环境。

系统安装

Arch Linux KVM 虚拟机,基本都是默认配置,按照官方安装指引教程安装即可,网卡也是默认的桥接模式。

关于联网有一点需要注意:在安装好系统之后先不要重启,要在有网环境下在目标系统中安装好 dhcpcd
然后重启进入系统,执行如下命令,再重启,系统就会自动通过dhcpcd为连接到局域网的网卡分配ip了

1
2
systemctl enable dhcpd
systemctl start dhcpd

至于添加用户、配置sudo这种事情就不多说了。

Xorg安装

按照Arch官方指引进行即可

启动X Server

启动X Server,此处仅指定了一个DisplayNumber参数。

1
X :0

启动之后,X Server就会接管显示器和外设资源,并为X Client提供服务。在执行完成上述命令之后,
由于还没有X Client连接至此X Server,虚拟机当中的虚拟显示器会黑屏,无法继续操作,需要有X Client连接上才能恢复(一旦连接,X Client会指示X Server进行UI绘制,然后就可以操作X Client对应的应用程序了)

手动在本地启动X Client并连接至X Server

启动X Server的时候,显示器资源已经被X Server接管了,原本的终端应该已经无法正常使用了,可以使用ssh(当然,在此之前需要安装openssh并启动sshd)连接到虚拟机进行下面的操作。说起连接虚拟机就需要获取虚拟机IP,我所使用的KVM虚拟机可以在主机中用下面的命令获取已分配的IP:virsh net-dhcp-leases default

要想启动X Client,首先要配置DISPALY环境变量:[Address]:{DisplayNumber}.{ScreenNumber} ,
ScreenNumber的具体含义暂不深究,这里使用0是可行的

1
export DISPLAY=:0.0

然后就可以启动X Client了,可以直接启动 xterm,也可以启动 twm

1
2
xterm &
twm &

此时原本被X Server控制的屏幕应该就会出现上面启动的X Client了。
至此,我们已经使用手动的方式启动X Server,并将X Client连接至X Server了,似乎Xorg已经不再那么神秘了呢!

X Forwarding

上面实现了本地X Server和本地X Client之间的连接,那么如何通过网络连接处于不同设备的X Server和X Client呢?

一种方式是使用ssh 的 X Forwarding功能(有没有其它办法我也不知道)。

接下来将说明如何通过X Forwarding功能在我的Ubuntu系统上运行位于Arch虚拟机当中的xterm程序。
架构如下。

  1. 远程机器需要具备运行X Client的环境,但是不需要具备桌面环境
  2. 本地机器需要具有显示器等运行X Server所需要的资源

X Forwarding

配置Arch虚拟机

启用sshd的X Forwarding功能

修改 /etc/ssh/sshd_config

1
2
3
4
5
...
AllowTcpForwarding yes
...
X11Forwarding yes
...

然后重启sshd服务

1
sudo systemctl restart sshd 

安装xauth程序,用于X Forwarding,没有这个软件就无法正常使用

1
sudo pacman -S xorg-xauth 

在Ubuntu桌面环境下上使用ssh X Forwarding启动虚拟机中的xterm

使用ssh -X连接至remote Arch

1
ssh -X user@host

可以看到,在X Forawding正常启动的情况下,remote Arch的 DISPLAY 变量已经被设置好了

然后就可以启动X Client了

1
xterm

不仅xterm,firefox这样的程序也是可以启动的remote Firefox

X Forwarding与VNC、RDP技术的比较

很遗憾,经过查阅资料,得知 X Forwarding 应用领域和可靠性不如另外两种技术。

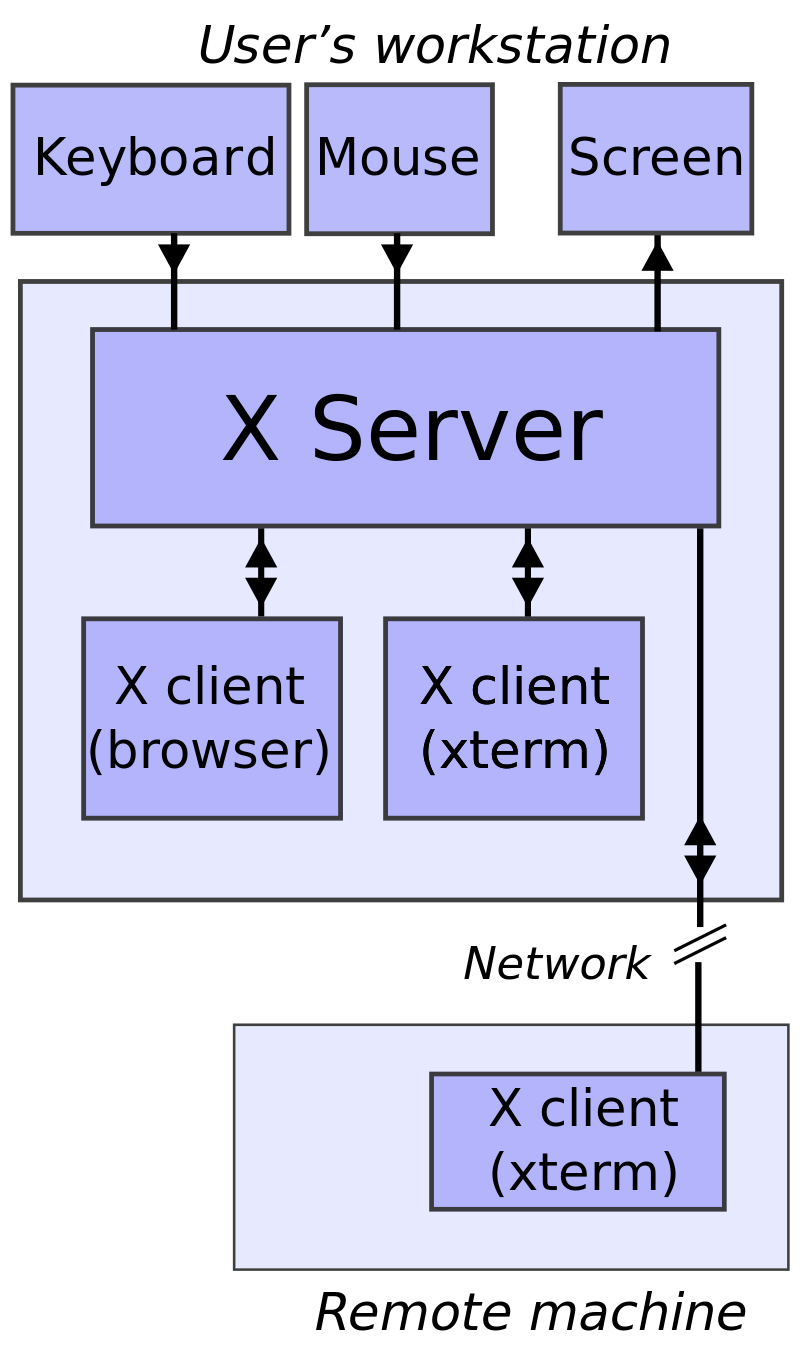
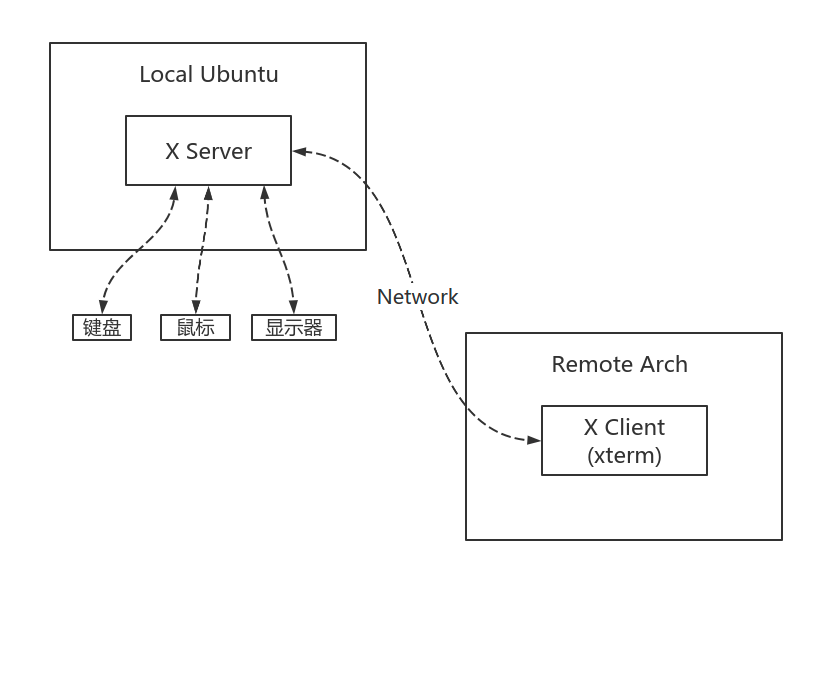
  1. X Forwarding对的带宽要求比另外两者高,因为X Client需要发送所有的绘制指令至X Server,然后由X Server绘制,而VNC技术直接传输图像,从理论上来说X Forward应该需要更少的网络资源才对,而实际上绘制指令往往比较随机,难以有效压缩,但VNC技术能有效利用现有数据压缩技术减少数据量,参考这篇博文

  2. X Forwarding本身没有断线重连机制,即使可以使用screen对终端进行断线重连,也无法恢复经过X Forwarding的应用程序,参考维基百科

    An X client cannot generally be detached from one server and reattached to another unless its code specifically provides for it (Emacs is one of the few common programs with this ability). As such, moving an entire session from one X server to another is generally not possible.

参考链接

解答

贪心策略为:只要知道今天比昨天赚钱,我就一定能把这点钱给赚了且能保证绝不在任意一天亏钱!具体可以按如下方法操作:

假如我知道第 i+1 天股价高于第 i 天,那就一定可以赚到这笔钱。

假如我在第 i 天未持有股票,那就选择购买股票
假如我在第 i 天持有股票,那保留股票即可,无需操作

假如我知道第 i+1 天股价低于第 i 天,我一定可以保证不亏钱。

假如我在第 i 天未持有股票,那就不进行操作
假如我在第 i 天持有股票,那就售出股票

在知道一定可以赚取所有收益且无任何亏损的情况下就不必实际进行买卖操作了,只需计算出前后两天之间的股价差,把所有的正值累加即可。

1
2
3
4
5
6
7
8
9
10
11
12
13
14
class Solution {
public:
int maxProfit(vector<int>& prices) {
int postiveSum = 0;
for (int i=1; i<prices.size(); i++) {
int diff = prices[i] - prices[i-1];
if (diff > 0) {
postiveSum += diff;
}
}
return postiveSum;
}
};

解答

贪心策略为:从头开始搜索,使子串尽可能短。此题最关键的是事先确定每一个字符最后一次出现位置。

1
2
3
4
5
6
7
8
9
10
11
12
13
14
15
16
17
18
19
20
21
22
23
class Solution {
public:
vector<int> partitionLabels(string S) {
// 记录每个字母最后一次出现的位置
map<char, int> lastPos;
for (int i=0; i<S.size(); i++)
lastPos[S[i]] = i;

vector<int> retVec;

int pos = 0;
while(pos < S.size()) {
int startPos = pos;
int endPos = lastPos[S[pos]];
for (; pos <= endPos; pos++) {
endPos = max(endPos, lastPos[S[pos]]);
}
retVec.push_back(pos - startPos);
}
return retVec;
}
};

题目

在二维空间中有许多球形的气球。对于每个气球,提供的输入是水平方向上,气球直径的开始和结束坐标。由于它是水平的,所以纵坐标并不重要,因此只要知道开始和结束的横坐标就足够了。开始坐标总是小于结束坐标。

一支弓箭可以沿着 x 轴从不同点完全垂直地射出。在坐标 x 处射出一支箭,若有一个气球的直径的开始和结束坐标为 xstart,xend, 且满足 xstart ≤ x ≤ xend,则该气球会被引爆。可以射出的弓箭的数量没有限制。 弓箭一旦被射出之后,可以无限地前进。我们想找到使得所有气球全部被引爆,所需的弓箭的最小数量。
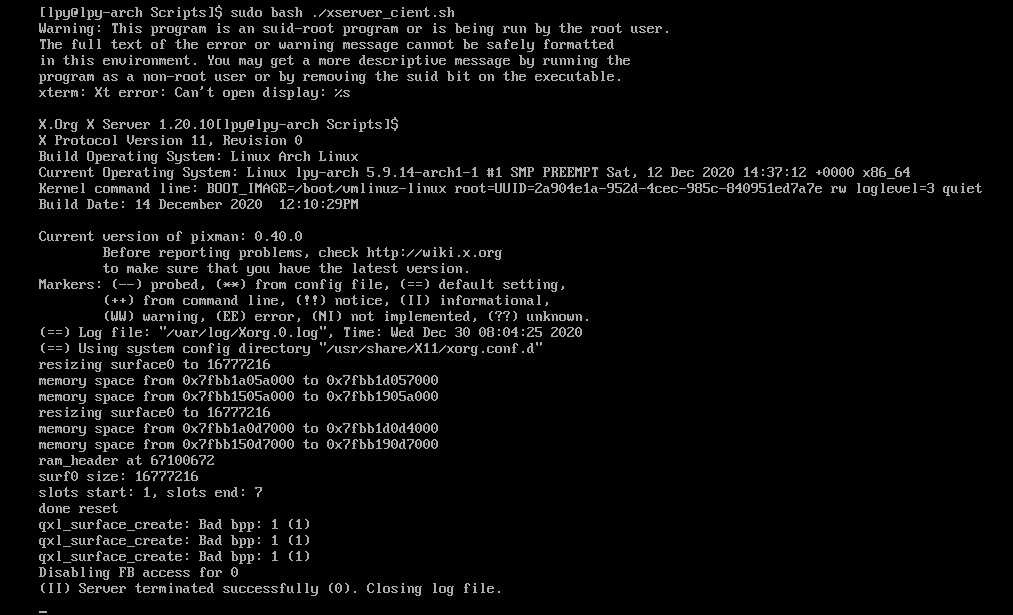
给你一个数组 points ,其中 points [i] = [xstart,xend] ,返回引爆所有气球所必须射出的最小弓箭数。

示例 1:

输入:points = [[10,16],[2,8],[1,6],[7,12]]
输出:2
解释:对于该样例,x = 6 可以射爆 [2,8],[1,6] 两个气球,以及 x = 11 射爆另外两个气球
示例 2:

输入:points = [[1,2],[3,4],[5,6],[7,8]]
输出:4
示例 3:

输入:points = [[1,2],[2,3],[3,4],[4,5]]
输出:2
示例 4:

输入:points = [[1,2]]
输出:1
示例 5:

输入:points = [[2,3],[2,3]]
输出:1

提示:

0 <= points.length <= 104
points[i].length == 2
-231 <= xstart < xend <= 231 - 1

来源:力扣(LeetCode)
链接:https://leetcode-cn.com/problems/minimum-number-of-arrows-to-burst-balloons
著作权归领扣网络所有。商业转载请联系官方授权,非商业转载请注明出处。

解答

贪心策略为:优先向末端最靠前的气球射箭,且射箭位置为气球末端

1
2
3
4
5
6
7
8
9
10
11
12
13
14
15
16
17
18
19
20
21
22
23
24
25
26
27
28
29
30
31
32
33
class Solution {
public:
int findMinArrowShots(vector<vector<int>>& points) {
if (points.size() == 0)
return 0;

// 按照气球末端的位置进行排序
sort(points.begin(), points.end(), [](auto &pt1, auto &pt2) {
return pt1.back() < pt2.back();
});

// 记录前一支箭的位置和已射出箭的数目
// 默认为第0支箭的末端位置,1支箭
int arrowPos = points.front().back();
int arrCnt = 1;

// 从第一支箭开始循环
for (int i=1; i<points.size(); i++) {
auto &pt = points[i];
// 只需检查前一支箭能否射中该气球,因为是按照气球末端的位置排序
// 前一支箭必定是最靠近此气球末端的箭,
// 若它都不能射中此气球,前面的箭就更不可能射中此气球了
if (!(arrowPos >= pt.front() && arrowPos <= pt.back()))
{
++arrCnt;
arrowPos = pt.back();
}
}

return arrCnt;
}
};