0%

Outline

In this blog, you will know how to install Debian for an Android device with root privileges.

No Termux. No Linux Deploy. No Black Box.

Only Debian offical installer. Everything is under your control.

Prerequisites

  • root privileges
  • busybox

With Magisk installed, you can get both root privileges and busybox.

Install Debian with debootstrap

Switch to root user

Most commands should be executed with root privileges.

With adb, you can type:

1
2
adb shell
su

Prepare necessary commands

debootstrap requires several basic commands to run.

1
2
3
4
5
6
7
8
9
10
11
12
13
14
# The most important program is busybox, and we can use busybox binary from Magisk
export BUSYBOX=/data/adb/magisk/busybox

# Set the base directory of our Linux distributions
export LINUX_DIST=/data/linux_dist
mkdir -p $LINUX_DIST

# Prepare necessary utils required by debootstrap
LINUX_UTILS=$LINUX_DIST/utils
mkdir -p $LINUX_UTILS
ln -s $BUSYBOX $LINUX_UTILS/ar
ln -s $BUSYBOX $LINUX_UTILS/wget
ln -s $BUSYBOX $LINUX_UTILS/xzcat
export PATH=$LINUX_UTILS:$PATH

Setup debian system image path and mount point

1
2
3
4
5
6
# Set the debian inst directory
export DEBINST=$LINUX_DIST/debinst
mkdir -p $DEBINST

# Debian rootfs image path
export DEBIMG=/sdcard/debian.img

Create a img file as rootfs

1
2
3
dd if=/dev/zero of=$DEBIMG bs=1G count=10
mkfs.ext4 $DEBIMG
$BUSYBOX mount -o loop $DEBIMG $DEBINST

Build pkgdetail (on your pc/server)

1
2
wget -O pkgdetails.c https://salsa.debian.org/installer-team/base-installer/-/raw/master/pkgdetails.c?inline=false
aarch64-linux-gnu-gcc -static -o pkgdetail pkgdetails.c

Transfer pkgdetail to Android device

Take adb as an example.

1
adb push pkgdetail /sdcard

Install debootstrap

Download debootstrap and prepare pkgdetails for it.
Note: the dest file is pkgdetails, not pkgdetail

1
2
3
4
5
6
7
8
9
10
11
12
# Download debootstrap
cd $LINUX_DIST
wget -O debootstrap.tgz http://mirrors.aliyun.com/debian/pool/main/d/debootstrap/debootstrap_1.0.133.tar.gz
tar -xf $LINUX_DIST/debootstrap.tgz

# Set the necessary environment: DEBOOTSTRAP_DIR
export DEBOOTSTRAP_DIR=$LINUX_DIST/debootstrap

# Put pkgdetail to $LINUX_DIST/pkgdetails
# !!! Note that the dest file is: pkgdetails (not pkgdetail)
cp /sdcard/pkgdetail $DEBOOTSTRAP_DIR/pkgdetails
chmod +x $DEBOOTSTRAP_DIR/pkgdetails

Install Debian with debootstrap

1
2
# Install Debian
$DEBOOTSTRAP_DIR/debootstrap --arch arm64 stable $DEBINST http://mirrors.aliyun.com/debian/

Configure Debian

Chroot to Debian: chroot-debian.sh

1
2
3
4
5
6
7
8
9
10
11
12
13
14
BUSYBOX=/data/adb/magisk/busybox
DEBINST=/data/linux_dist/debinst

$BUSYBOX mount --rbind /dev $DEBINST/dev/
$BUSYBOX mount --rbind /proc $DEBINST/proc/
$BUSYBOX mount --rbind /sys $DEBINST/sys/
$BUSYBOX mount -t tmpfs tmpfs $DEBINST/tmp/

$BUSYBOX chroot $DEBINST /bin/env --ignore-environment su -l

# $BUSYBOX umount $DEBINST/dev/
# $BUSYBOX umount $DEBINST/proc/
# $BUSYBOX umount $DEBINST/sys/
# $BUSYBOX umount $DEBINST/tmp/

Fix network error inside Debian

1
2
3
4
5
6
7
8
9
10
11
12
# Add network related groups required by Android kernel
groupadd -g 3001 aid_bt
groupadd -g 3002 aid_bt_net
groupadd -g 3003 aid_inet
groupadd -g 3004 aid_net_raw
groupadd -g 3005 aid_admin

# Add root to network groups so that root has network access rights
usermod -aG aid_bt,aid_bt_net,aid_inet,aid_net_raw,aid_admin root

# Set gid of _apt as aid_inet to fix apt network error
usermod -g aid_inet _apt

Configure DNS resolution

1
2
3
4
5
6
cat >/etc/resolv.conf <<EOL
domain lan
search lan
nameserver 223.5.5.5
nameserver 223.6.6.6
EOL

Enjoy your Debian!

1
apt update && apt install neovim

Troubles

Android kernel does not support System V IPC

Applications that rely on System V IPC, such as PostgreSQL, cannot be run directly in Debian on Android.

Possible solutions: Termux emulates System V IPC.

Refer to:

Android kernel allows only specific groups to access the network

That’s why we add root to some groups and modify gid of _apt to aid_inet

Refer to:

If your application fail to run, check if it’s a network issue!

For example, mysqld run as user mysql, and its default group is mysql.

1
mysql:x:104:104:MySQL Server,,,:/nonexistent:/bin/false

Without modifying its group to aid_inet, service start mysql / mysqld would fail.

If you do not change the group of user mysql to aid_inet, command service start mysql / mysqld will fail.

Optional Steps

Modern bashrc

1
2
3
4
5
6
7
8
9
10
11
12
13
14
15
16
17
18
19
20
# ~/.bashrc: executed by bash(1) for non-login shells.

# Note: PS1 and umask are already set in /etc/profile. You should not
# need this unless you want different defaults for root.
PS1="\[\e]0;\u@\h: \w\a\]${debian_chroot:+($debian_chroot)}\[\033[01;32m\]\u@\h\[\033[00m\]:\[\033[01;34m\]\w\[\033[00m\]\$ "
# umask 022

export TERM=xterm-256color

# You may uncomment the following lines if you want `ls' to be colorized:
export LS_OPTIONS='--color=auto'
eval "`dircolors`"
alias ls='ls $LS_OPTIONS'
alias ll='ls $LS_OPTIONS -l'
# alias l='ls $LS_OPTIONS -lA'
#
# Some more alias to avoid making mistakes:
alias rm='rm -i'
alias cp='cp -i'
alias mv='mv -i'

Update apt source list

Refer to Tsinghua Mirrors - Debian

Install sysvinit-core to run daemons

1
2
apt update && apt install sysvinit-core
# apt remove systemd

Configure timezone

1
dpkg-reconfigure tzdata

Configure locales

1
2
apt install locales
dpkg-reconfigure locales

Install and configure mariadb

Install mariadb with proper apt source

1
apt install mariadb-server

You must change group of user mysql to aid_inet

1
usermod -g aid_inet mysql

If package sysvinit-core is installed, start mysqld with

1
service mysql start

Without sysvinit-core, you can run

1
mysqld

Configure bash completion

1
apt install bash-completion

References

Background

This blog grew out of a question I asked in the SuperUser community : Relay TCP upload traffic and make download traffic go directly to the client.

Purpose

the traffic flow

  • Client sends request traffic to RelayServer:10080
  • RelayServer:10080 relay request traffic from client to TargetServer:10080 (Achieved by DNAT rules on the relay server)
  • TargetServer:10080 response client as if it is RelayServer:10080 (Achieved by SNAT rules on the target server)
  • Client receives response traffic from RelayServer:10080, which is actually from TargetServer:10080
  • it works for both TCP and UDP protocol

Note

It cannot be implemented in the real-world network due to the source address verification.

Environment

  • Devices: 4 Vmware Machines with bridged network

    • Router
    • Client
    • Relay Server
    • Target Server
  • OS: Alpine Linux 3.15.1

Devices IP Addresses

  • Client
    • IP: 192.168.10.2/24
    • Gateway: 192.168.10.1
    • MAC: 00:0c:29:06:c7:7e
  • Relay Server
    • IP: 192.168.20.2/24
    • Gateway: 192.168.20.1
    • MAC: 00:0c:29:5b:89:3e
  • Target Server
    • IP: 192.168.30.2/24
    • Gateway: 192.168.30.1
    • MAC: 00:0c:29:15:da:6a

Router Config

Network Interfaces

  • eth0
    • MAC: 00:0c:29:65:3c:a3
    • IP: 192.168.10.1/24
  • eth1
    • MAC: 00:0c:29:65:3c:ad
    • IP: 192.168.20.1/24
  • eth2
    • MAC: 00:0c:29:65:3c:b7
    • IP: 192.168.30.1/24

Enable ipv4_forward

1
echo 1 > /proc/sys/net/ipv4/ip_forward

Disable source address verification for all interfaces

For linux-based router, refer to kernel sysctl parameter rp_filter

1
2
3
echo 0 > /proc/sys/net/ipv4/conf/eth0/rp_filter
echo 0 > /proc/sys/net/ipv4/conf/eth1/rp_filter
echo 0 > /proc/sys/net/ipv4/conf/eth2/rp_filter

Relay/Target Server Config

Both

  • uninstall iptables & install nftables
  • enable ipv4_forward option for the kernel
    1
    echo 1 > /proc/sys/net/ipv4/ip_forward

nftables rules for the relay server

1
2
3
4
5
6
7
table ip route {
chain prerouting {
type filter hook prerouting priority dstnat + 1; policy accept;
ip daddr 192.168.20.2 udp dport 10080 ip daddr set 192.168.30.2
ip daddr 192.168.20.2 tcp dport 10080 ip daddr set 192.168.30.2
}
}

nftables rules for the target server:

1
2
3
4
5
6
7
8
9
10
11
12
13
14
table ip raw {
chain prerouting {
type filter hook prerouting priority raw; policy accept;
ip daddr 192.168.30.2 udp dport 10080 notrack return
ip daddr 192.168.30.2 tcp dport 10080 notrack return
}
}
table ip route {
chain output {
type filter hook postrouting priority srcnat + 1; policy accept;
ip saddr 192.168.30.2 udp sport 10080 ip saddr set 192.168.20.2
ip saddr 192.168.30.2 tcp sport 10080 ip saddr set 192.168.20.2
}
}

How to test

  • On the target server, start a tcp/udp server

    1
    2
    nc -s 192.168.30.2 -l -p 10080 # for tcp
    nc -s 192.168.30.2 -l -u -p 10080 # for udp
  • On the client, start a tcp/udp client to server

    1
    2
    nc -s 192.168.10.2 -p 12345 192.168.20.2 10080 # for tcp
    nc -s 192.168.10.2 -u -p 12345 192.168.20.2 10080 # for udp

My Testing

Steps

  1. The client establishes a TCP connection with the server
  2. The client sends “Hello” to the server
  3. The server replies “World” to the client
  4. The client terminates the TCP connection

Packets flow captured by the Router

1
2
3
4
5
6
7
8
9
10
11
12
13
14
15
16
17
18
19
20
21
22
23
24
25
26
27
28
29
30
31
router:~# tcpdump '(dst 192.168.10.2 && dst port 12345) || (src 192.168.10.2 && src port 12345)' -e
tcpdump: verbose output suppressed, use -v[v]... for full protocol decode
listening on eth0, link-type EN10MB (Ethernet), snapshot length 262144 bytes
17:33:45.712751 00:0c:29:06:c7:7e (oui Unknown) > 00:0c:29:65:3c:a3 (oui Unknown), ethertype IPv4 (0x0800), length 74: 192.168.10.2.12345 > 192.168.20.2.10080: Flags [S], seq 4018363570, win 64240, options [mss 1460,sackOK,TS val 1510067563 ecr 0,nop,wscale 7], length 0
17:33:45.712870 00:0c:29:65:3c:ad (oui Unknown) > 00:0c:29:5b:89:3e (oui Unknown), ethertype IPv4 (0x0800), length 74: 192.168.10.2.12345 > 192.168.20.2.10080: Flags [S], seq 4018363570, win 64240, options [mss 1460,sackOK,TS val 1510067563 ecr 0,nop,wscale 7], length 0
17:33:45.713459 00:0c:29:5b:89:3e (oui Unknown) > 00:0c:29:65:3c:ad (oui Unknown), ethertype IPv4 (0x0800), length 74: 192.168.10.2.12345 > 192.168.30.2.10080: Flags [S], seq 4018363570, win 64240, options [mss 1460,sackOK,TS val 1510067563 ecr 0,nop,wscale 7], length 0
17:33:45.713460 00:0c:29:65:3c:b7 (oui Unknown) > 00:0c:29:15:da:6a (oui Unknown), ethertype IPv4 (0x0800), length 74: 192.168.10.2.12345 > 192.168.30.2.10080: Flags [S], seq 4018363570, win 64240, options [mss 1460,sackOK,TS val 1510067563 ecr 0,nop,wscale 7], length 0
17:33:45.713557 00:0c:29:15:da:6a (oui Unknown) > 00:0c:29:65:3c:b7 (oui Unknown), ethertype IPv4 (0x0800), length 74: 192.168.20.2.10080 > 192.168.10.2.12345: Flags [S.], seq 4008910075, ack 4018363571, win 65160, options [mss 1460,sackOK,TS val 3299425652 ecr 1510067563,nop,wscale 7], length 0
17:33:45.713572 00:0c:29:65:3c:a3 (oui Unknown) > 00:0c:29:06:c7:7e (oui Unknown), ethertype IPv4 (0x0800), length 74: 192.168.20.2.10080 > 192.168.10.2.12345: Flags [S.], seq 4008910075, ack 4018363571, win 65160, options [mss 1460,sackOK,TS val 3299425652 ecr 1510067563,nop,wscale 7], length 0
17:33:45.713802 00:0c:29:06:c7:7e (oui Unknown) > 00:0c:29:65:3c:a3 (oui Unknown), ethertype IPv4 (0x0800), length 66: 192.168.10.2.12345 > 192.168.20.2.10080: Flags [.], ack 1, win 502, options [nop,nop,TS val 1510067564 ecr 3299425652], length 0
17:33:45.713907 00:0c:29:65:3c:ad (oui Unknown) > 00:0c:29:5b:89:3e (oui Unknown), ethertype IPv4 (0x0800), length 66: 192.168.10.2.12345 > 192.168.20.2.10080: Flags [.], ack 1, win 502, options [nop,nop,TS val 1510067564 ecr 3299425652], length 0
17:33:45.714096 00:0c:29:5b:89:3e (oui Unknown) > 00:0c:29:65:3c:ad (oui Unknown), ethertype IPv4 (0x0800), length 66: 192.168.10.2.12345 > 192.168.30.2.10080: Flags [.], ack 4008910076, win 502, options [nop,nop,TS val 1510067564 ecr 3299425652], length 0
17:33:45.714207 00:0c:29:65:3c:b7 (oui Unknown) > 00:0c:29:15:da:6a (oui Unknown), ethertype IPv4 (0x0800), length 66: 192.168.10.2.12345 > 192.168.30.2.10080: Flags [.], ack 1, win 502, options [nop,nop,TS val 1510067564 ecr 3299425652], length 0
17:33:49.369321 00:0c:29:06:c7:7e (oui Unknown) > 00:0c:29:65:3c:a3 (oui Unknown), ethertype IPv4 (0x0800), length 72: 192.168.10.2.12345 > 192.168.20.2.10080: Flags [P.], seq 1:7, ack 1, win 502, options [nop,nop,TS val 1510071219 ecr 3299425652], length 6
17:33:49.369451 00:0c:29:65:3c:ad (oui Unknown) > 00:0c:29:5b:89:3e (oui Unknown), ethertype IPv4 (0x0800), length 72: 192.168.10.2.12345 > 192.168.20.2.10080: Flags [P.], seq 1:7, ack 1, win 502, options [nop,nop,TS val 1510071219 ecr 3299425652], length 6
17:33:49.369819 00:0c:29:5b:89:3e (oui Unknown) > 00:0c:29:65:3c:ad (oui Unknown), ethertype IPv4 (0x0800), length 72: 192.168.10.2.12345 > 192.168.30.2.10080: Flags [P.], seq 0:6, ack 1, win 502, options [nop,nop,TS val 1510071219 ecr 3299425652], length 6
17:33:49.369820 00:0c:29:65:3c:b7 (oui Unknown) > 00:0c:29:15:da:6a (oui Unknown), ethertype IPv4 (0x0800), length 72: 192.168.10.2.12345 > 192.168.30.2.10080: Flags [P.], seq 0:6, ack 1, win 502, options [nop,nop,TS val 1510071219 ecr 3299425652], length 6
17:33:49.370069 00:0c:29:15:da:6a (oui Unknown) > 00:0c:29:65:3c:b7 (oui Unknown), ethertype IPv4 (0x0800), length 66: 192.168.20.2.10080 > 192.168.10.2.12345: Flags [.], ack 7, win 510, options [nop,nop,TS val 3299429309 ecr 1510071219], length 0
17:33:49.370087 00:0c:29:65:3c:a3 (oui Unknown) > 00:0c:29:06:c7:7e (oui Unknown), ethertype IPv4 (0x0800), length 66: 192.168.20.2.10080 > 192.168.10.2.12345: Flags [.], ack 7, win 510, options [nop,nop,TS val 3299429309 ecr 1510071219], length 0
17:33:51.689563 00:0c:29:06:c7:7e (oui Unknown) > 00:0c:29:65:3c:a3 (oui Unknown), ethertype IPv4 (0x0800), length 72: 192.168.10.2.12345 > 192.168.20.2.10080: Flags [P.], seq 7:13, ack 1, win 502, options [nop,nop,TS val 1510073539 ecr 3299429309], length 6
17:33:51.689687 00:0c:29:65:3c:ad (oui Unknown) > 00:0c:29:5b:89:3e (oui Unknown), ethertype IPv4 (0x0800), length 72: 192.168.10.2.12345 > 192.168.20.2.10080: Flags [P.], seq 7:13, ack 1, win 502, options [nop,nop,TS val 1510073539 ecr 3299429309], length 6
17:33:51.690131 00:0c:29:5b:89:3e (oui Unknown) > 00:0c:29:65:3c:ad (oui Unknown), ethertype IPv4 (0x0800), length 72: 192.168.10.2.12345 > 192.168.30.2.10080: Flags [P.], seq 6:12, ack 1, win 502, options [nop,nop,TS val 1510073539 ecr 3299429309], length 6
17:33:51.690131 00:0c:29:65:3c:b7 (oui Unknown) > 00:0c:29:15:da:6a (oui Unknown), ethertype IPv4 (0x0800), length 72: 192.168.10.2.12345 > 192.168.30.2.10080: Flags [P.], seq 6:12, ack 1, win 502, options [nop,nop,TS val 1510073539 ecr 3299429309], length 6
17:33:51.690297 00:0c:29:15:da:6a (oui Unknown) > 00:0c:29:65:3c:b7 (oui Unknown), ethertype IPv4 (0x0800), length 66: 192.168.20.2.10080 > 192.168.10.2.12345: Flags [.], ack 13, win 510, options [nop,nop,TS val 3299431629 ecr 1510073539], length 0
17:33:51.690305 00:0c:29:65:3c:a3 (oui Unknown) > 00:0c:29:06:c7:7e (oui Unknown), ethertype IPv4 (0x0800), length 66: 192.168.20.2.10080 > 192.168.10.2.12345: Flags [.], ack 13, win 510, options [nop,nop,TS val 3299431629 ecr 1510073539], length 0
17:33:55.442820 00:0c:29:06:c7:7e (oui Unknown) > 00:0c:29:65:3c:a3 (oui Unknown), ethertype IPv4 (0x0800), length 66: 192.168.10.2.12345 > 192.168.20.2.10080: Flags [F.], seq 13, ack 1, win 502, options [nop,nop,TS val 1510077293 ecr 3299431629], length 0
17:33:55.442935 00:0c:29:65:3c:ad (oui Unknown) > 00:0c:29:5b:89:3e (oui Unknown), ethertype IPv4 (0x0800), length 66: 192.168.10.2.12345 > 192.168.20.2.10080: Flags [F.], seq 13, ack 1, win 502, options [nop,nop,TS val 1510077293 ecr 3299431629], length 0
17:33:55.443307 00:0c:29:5b:89:3e (oui Unknown) > 00:0c:29:65:3c:ad (oui Unknown), ethertype IPv4 (0x0800), length 66: 192.168.10.2.12345 > 192.168.30.2.10080: Flags [F.], seq 12, ack 1, win 502, options [nop,nop,TS val 1510077293 ecr 3299431629], length 0
17:33:55.443307 00:0c:29:65:3c:b7 (oui Unknown) > 00:0c:29:15:da:6a (oui Unknown), ethertype IPv4 (0x0800), length 66: 192.168.10.2.12345 > 192.168.30.2.10080: Flags [F.], seq 12, ack 1, win 502, options [nop,nop,TS val 1510077293 ecr 3299431629], length 0
17:33:55.486509 00:0c:29:15:da:6a (oui Unknown) > 00:0c:29:65:3c:b7 (oui Unknown), ethertype IPv4 (0x0800), length 66: 192.168.20.2.10080 > 192.168.10.2.12345: Flags [.], ack 14, win 510, options [nop,nop,TS val 3299435425 ecr 1510077293], length 0
17:33:55.486527 00:0c:29:65:3c:a3 (oui Unknown) > 00:0c:29:06:c7:7e (oui Unknown), ethertype IPv4 (0x0800), length 66: 192.168.20.2.10080 > 192.168.10.2.12345: Flags [.], ack 14, win 510, options [nop,nop,TS val 3299435425 ecr 1510077293], length 0

Useful SSH options

1
2
3
4
5
6
7
8
9
10
11
12
13
14
15
16
17
18
19
20
21
22
23
24
25
26
27
28
29
30
31
32
33
34
35
36
37
38
39
40
41
42
43
44
45
46
47
48
49
50
-D [bind_address:]port
Specifies a local “dynamic” application-level port forwarding. This works by allocating a socket to listen to port on the local
side, optionally bound to the specified bind_address. Whenever a connection is made to this port, the connection is forwarded over
the secure channel, and the application protocol is then used to determine where to connect to from the remote machine. Currently
the SOCKS4 and SOCKS5 protocols are supported, and ssh will act as a SOCKS server. Only root can forward privileged ports. Dy‐
namic port forwardings can also be specified in the configuration file.

IPv6 addresses can be specified by enclosing the address in square brackets. Only the superuser can forward privileged ports. By
default, the local port is bound in accordance with the GatewayPorts setting. However, an explicit bind_address may be used to
bind the connection to a specific address. The bind_address of “localhost” indicates that the listening port be bound for local
use only, while an empty address or ‘*’ indicates that the port should be available from all interfaces.

-L [bind_address:]port:host:hostport
-L [bind_address:]port:remote_socket
-L local_socket:host:hostport
-L local_socket:remote_socket
Specifies that connections to the given TCP port or Unix socket on the local (client) host are to be forwarded to the given host
and port, or Unix socket, on the remote side. This works by allocating a socket to listen to either a TCP port on the local side,
optionally bound to the specified bind_address, or to a Unix socket. Whenever a connection is made to the local port or socket,
the connection is forwarded over the secure channel, and a connection is made to either host port hostport, or the Unix socket
remote_socket, from the remote machine.

Port forwardings can also be specified in the configuration file. Only the superuser can forward privileged ports. IPv6 addresses
can be specified by enclosing the address in square brackets.

By default, the local port is bound in accordance with the GatewayPorts setting. However, an explicit bind_address may be used to
bind the connection to a specific address. The bind_address of “localhost” indicates that the listening port be bound for local
use only, while an empty address or ‘*’ indicates that the port should be available from all interfaces.

-R [bind_address:]port:host:hostport
-R [bind_address:]port:local_socket
-R remote_socket:host:hostport
-R remote_socket:local_socket
-R [bind_address:]port
Specifies that connections to the given TCP port or Unix socket on the remote (server) host are to be forwarded to the local side.

This works by allocating a socket to listen to either a TCP port or to a Unix socket on the remote side. Whenever a connection is
made to this port or Unix socket, the connection is forwarded over the secure channel, and a connection is made from the local ma‐
chine to either an explicit destination specified by host port hostport, or local_socket, or, if no explicit destination was speci‐
fied, ssh will act as a SOCKS 4/5 proxy and forward connections to the destinations requested by the remote SOCKS client.

Port forwardings can also be specified in the configuration file. Privileged ports can be forwarded only when logging in as root
on the remote machine. IPv6 addresses can be specified by enclosing the address in square brackets.

By default, TCP listening sockets on the server will be bound to the loopback interface only. This may be overridden by specifying
a bind_address. An empty bind_address, or the address ‘*’, indicates that the remote socket should listen on all interfaces.
Specifying a remote bind_address will only succeed if the server's GatewayPorts option is enabled (see sshd_config(5)).

If the port argument is ‘0’, the listen port will be dynamically allocated on the server and reported to the client at run time.
When used together with -O forward the allocated port will be printed to the standard output.

SOCKS tunnel for remote server via local PC

  1. Setup a forwarding from remote to local for ssh service with -R option, on the local PC

    1
    ssh -R 1022:localhost:22 ${remoteuser}@${remotehost}
  2. With that forwarding, you can login ssh of local PC via localhost:1022 on the remote server

  3. Setup a SOCKS tunnel from remote to local with -D option, on the remote server

    1
    ssh -D 1080 -p 1022 ${localuser}@localhost
  4. Then you can access network resources with SOCKS proxy socks5://localhost:1080 on the remote server

Proxy utils

Many network applications already have SOCKS support built into them.

For applications without SOCKS support, proxychains can help.

For example, you can curl with SOCKS proxy:

1
proxychains4 -f ~/.proxychains/proxychains.conf curl google.com

And you can proxychains a bash:

1
proxychains4 bash

JDK动态代理

Java中可以使用 Proxy.newProxyInstance​ 创建动态代理,动态代理可以拦截对被代理对象的方法调用,并为其附加额外功能。这种似乎一般称为JDK动态代理。

该方法的描述如下:

1
2
3
4
5
6
7
8
9
10
11
12
13
14
15
16
17
18
19
20
21
22
23
24
25
26
27
28
29
30
31
32
public static Object newProxyInstance​(ClassLoader loader,
Class<?>[] interfaces,
InvocationHandler h)
Returns a proxy instance for the specified interfaces that dispatches method invocations to the specified invocation handler.
IllegalArgumentException will be thrown if any of the following restrictions is violated:

All of Class objects in the given interfaces array must represent interfaces, not classes or primitive types.
No two elements in the interfaces array may refer to identical Class objects.
All of the interface types must be visible by name through the specified class loader. In other words, for class loader cl and every interface i, the following expression must be true:
Class.forName(i.getName(), false, cl) == i

All of the types referenced by all public method signatures of the specified interfaces and those inherited by their superinterfaces must be visible by name through the specified class loader.
All non-public interfaces must be in the same package and module, defined by the specified class loader and the module of the non-public interfaces can access all of the interface types; otherwise, it would not be possible for the proxy class to implement all of the interfaces, regardless of what package it is defined in.
For any set of member methods of the specified interfaces that have the same signature:
If the return type of any of the methods is a primitive type or void, then all of the methods must have that same return type.
Otherwise, one of the methods must have a return type that is assignable to all of the return types of the rest of the methods.
The resulting proxy class must not exceed any limits imposed on classes by the virtual machine. For example, the VM may limit the number of interfaces that a class may implement to 65535; in that case, the size of the interfaces array must not exceed 65535.
Note that the order of the specified proxy interfaces is significant: two requests for a proxy class with the same combination of interfaces but in a different order will result in two distinct proxy classes.

Parameters:
loader - the class loader to define the proxy class
interfaces - the list of interfaces for the proxy class to implement
h - the invocation handler to dispatch method invocations to
Returns:
a proxy instance with the specified invocation handler of a proxy class that is defined by the specified class loader and that implements the specified interfaces
Throws:
IllegalArgumentException - if any of the restrictions on the parameters are violated
SecurityException - if a security manager, s, is present and any of the following conditions is met:
the given loader is null and the caller's class loader is not null and the invocation of s.checkPermission with RuntimePermission("getClassLoader") permission denies access;
for each proxy interface, intf, the caller's class loader is not the same as or an ancestor of the class loader for intf and invocation of s.checkPackageAccess() denies access to intf;
any of the given proxy interfaces is non-public and the caller class is not in the same runtime package as the non-public interface and the invocation of s.checkPermission with ReflectPermission("newProxyInPackage.{package name}") permission denies access.
NullPointerException - if the interfaces array argument or any of its elements are null, or if the invocation handler, h, is null

它的基本原理是按照接口的差异为各种类型的被代理对象动态生成一个新类型,称为代理类。代理类其实就是一个实现了被代理对象所需接口的新类型,它会在生成的各种接口方法中调用 InvocationHandlerinvoke 方法,所以一般情况下需要在 InvocationHandler 中为被代理对象调用相应的方法,以实现其原本的功能。

一个实例

下面的例子中声明了两个接口,ISayISpeakHello 类实现了 ISayISpeak 两个接口。

MyInvocationHandler 接受一个被代理对象 proxiedObject 保存起来,它会在 invoke 中输出它自己和proxy参数的地址,以及 method 方法的描述,并在最后调用了被代理实例的相应 method

main 方法中的 myInvocationHandler.invoke 很容易理解,它就是一个正常的方法调用。关键在于,后面的 proxyInstance.say 其实完全等价于前面的 myInvocationHandler.invoke 调用。

接下来给出源码,后面展示输出并进行进一步的分析。

源码

1
2
3
4
5
6
7
8
9
10
11
12
13
14
15
16
17
18
19
20
21
22
23
24
25
26
27
28
29
30
31
32
33
34
35
36
37
38
39
40
41
42
43
44
45
46
47
48
49
50
51
52
53
54
55
56
57
58
import java.lang.reflect.InvocationHandler;
import java.lang.reflect.Method;
import java.lang.reflect.Proxy;

public class DynamicProxyTest3 {
interface ISay {
void say(String what);
}

interface ISpeak {
void speak(String what);
}

static class Hello implements ISay, ISpeak {
@Override
public void say(String what) {
System.out.printf("Hello.say: %s%n", what);
}

@Override
public void speak(String what) {

}
}

public static class MyInvocationHandler implements InvocationHandler {
private final Object proxiedObject;
public MyInvocationHandler(Object proxiedObject) {
this.proxiedObject = proxiedObject;
}

@Override
public Object invoke(Object proxyInstance, Method method, Object[] args) throws Throwable {
System.out.printf("invocationHandlerHashCode: {%s}%n", System.identityHashCode(this));
System.out.printf("method: {%s}%n", method.toString());
System.out.printf("proxyInstanceHashCode: {%s}%n", System.identityHashCode(proxyInstance));
System.out.printf("proxyInstanceClass: {%s}%n", proxyInstance.getClass());
return method.invoke(proxiedObject, args);
}
}

public static void main(String[] margs) throws Throwable {
Hello helloInstance = new Hello();
MyInvocationHandler myInvocationHandler = new MyInvocationHandler(helloInstance);

ISay proxyInstance = (ISay) Proxy.newProxyInstance(
Hello.class.getClassLoader(),
Hello.class.getInterfaces(),
myInvocationHandler);

myInvocationHandler.invoke(proxyInstance, ISay.class.getDeclaredMethod("say", String.class), new Object[]{"we can reach corner in the world"});

proxyInstance.say("Across the Great Wall");

Hello proxyInstance2HelloInstance = (Hello) proxyInstance;
}
}

运行输出

程序输出如下:

1
2
3
4
5
6
7
8
9
10
11
12
13
14
15
16
17
invocationHandlerHashCode: {789451787}
method: {public abstract void DynamicProxyTest3$ISay.say(java.lang.String)}
proxyInstanceHashCode: {1950409828}
proxyInstanceClass: {class $Proxy0}
Hello.say: we can reach corner in the world

invocationHandlerHashCode: {789451787}
method: {public abstract void DynamicProxyTest3$ISay.say(java.lang.String)}
proxyInstanceHashCode: {1950409828}
proxyInstanceClass: {class $Proxy0}
Hello.say: Across the Great Wall

Exception in thread "main" java.lang.ClassCastException: $Proxy0 cannot be cast to DynamicProxyTest3$Hello
at DynamicProxyTest3.main(DynamicProxyTest3.java:55)

Process finished with exit code 1

可以看到动态代理对象实例 proxyInstance 的类型是 $Proxy0,这是程序运行时动态生成的一个类型,通过执行Java虚拟机参数 -Dsun.misc.ProxyGenerator.saveGeneratedFiles=true 就可以输出这个动态生成的类的class字节码,反编译可以得到下面的内容。

可以看到,该代理类实现了 ISayISpeak 接口,它将接口中的每一个方法都写成了 super.h.invoke(this, methodObject, new Object[]{var1, var2, ...}) 的形式。

super.h 其实就是创建动态代理时传入的 InvocationHandler 对象,在这个例子里就是 myInvocationHandler。第一个参数 this 就是该代理对象本身,对应于本例的 proxyInstance,后面两个参数分别是 methodmethod 所需参数。

由此可见 main 方法中的 proxyInstance.say 其实完全等价于前面的 myInvocationHandler.invoke 调用。

这就是动态代理的基本原理,实际应用时可以在 InvocationHandler 中附加自己所需的操作来增强被代理类的功能,比如记录日志。

1
2
3
4
5
6
7
8
9
10
11
12
13
14
15
16
17
18
19
20
21
22
23
24
25
26
27
28
29
30
31
32
33
34
35
36
37
38
39
40
41
42
43
44
45
46
47
48
49
50
51
52
53
54
55
56
57
58
59
60
61
62
63
64
65
66
67
68
69
70
71
72
73
74
75
76
77
78
79
80
81
82
83
84
85
86
87
88
//
// Source code recreated from a .class file by IntelliJ IDEA
// (powered by FernFlower decompiler)
//

import DynamicProxyTest3.ISay;
import DynamicProxyTest3.ISpeak;
import java.lang.reflect.InvocationHandler;
import java.lang.reflect.Method;
import java.lang.reflect.Proxy;
import java.lang.reflect.UndeclaredThrowableException;

final class $Proxy0 extends Proxy implements ISay, ISpeak {
private static Method m1;
private static Method m2;
private static Method m3;
private static Method m4;
private static Method m0;

public $Proxy0(InvocationHandler var1) throws {
super(var1);
}

public final boolean equals(Object var1) throws {
try {
return (Boolean)super.h.invoke(this, m1, new Object[]{var1});
} catch (RuntimeException | Error var3) {
throw var3;
} catch (Throwable var4) {
throw new UndeclaredThrowableException(var4);
}
}

public final String toString() throws {
try {
return (String)super.h.invoke(this, m2, (Object[])null);
} catch (RuntimeException | Error var2) {
throw var2;
} catch (Throwable var3) {
throw new UndeclaredThrowableException(var3);
}
}

public final void say(String var1) throws {
try {
super.h.invoke(this, m3, new Object[]{var1});
} catch (RuntimeException | Error var3) {
throw var3;
} catch (Throwable var4) {
throw new UndeclaredThrowableException(var4);
}
}

public final void speak(String var1) throws {
try {
super.h.invoke(this, m4, new Object[]{var1});
} catch (RuntimeException | Error var3) {
throw var3;
} catch (Throwable var4) {
throw new UndeclaredThrowableException(var4);
}
}

public final int hashCode() throws {
try {
return (Integer)super.h.invoke(this, m0, (Object[])null);
} catch (RuntimeException | Error var2) {
throw var2;
} catch (Throwable var3) {
throw new UndeclaredThrowableException(var3);
}
}

static {
try {
m1 = Class.forName("java.lang.Object").getMethod("equals", Class.forName("java.lang.Object"));
m2 = Class.forName("java.lang.Object").getMethod("toString");
m3 = Class.forName("DynamicProxyTest3$ISay").getMethod("say", Class.forName("java.lang.String"));
m4 = Class.forName("DynamicProxyTest3$ISpeak").getMethod("speak", Class.forName("java.lang.String"));
m0 = Class.forName("java.lang.Object").getMethod("hashCode");
} catch (NoSuchMethodException var2) {
throw new NoSuchMethodError(var2.getMessage());
} catch (ClassNotFoundException var3) {
throw new NoClassDefFoundError(var3.getMessage());
}
}
}

JDK动态代理的局限性

该实例的最后一句调用试图将动态代理类实例转换成被代理的类型,但并没有成功,因为代理类只是实现了被代理类的接口,它本身并不是被代理的类型。

由于这种 Proxy 动态代理是基于接口的,被代理类需要实现相应的接口才能进行代理,但是实际使用中有可能难以或者懒得对被代理类进行改造,这种情况下可以动态代理吗?答案是可以!不过JDK动态代理显然是不行的,但 cglib 可以实现,它不依赖接口,生成的动态代理对象还可以转换成被代理的类型,具体原理我还没看。

原文链接:https://preshing.com/20141119/how-to-build-a-gcc-cross-compiler/


GCC is not just a compiler. It’s an open source project that lets you build all kinds of compilers. Some compilers support multithreading; some support shared libraries; some support multilib. It all depends on how you configure the compiler before building it.

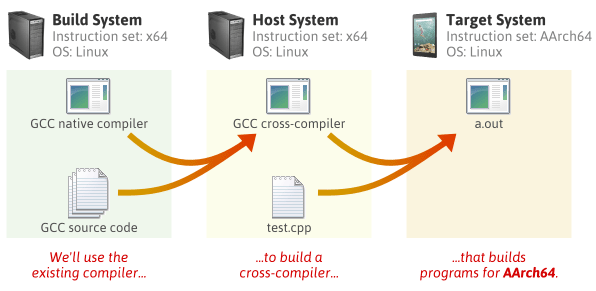
This guide will demonstrate how to build a cross-compiler, which is a compiler that builds programs for another machine. All you need is a Unix-like environment with a recent version of GCC already installed.

In this guide, I’ll use Debian Linux to build a full C++ cross-compiler for AArch64, a 64-bit instruction set available in the latest ARM processors. I don’t actually own an AArch64 device – I just wanted an AArch64 compiler to verify this bug.

Required Packages

Starting with a clean Debian system, you must first install a few packages:

1
$ sudo apt-get install g++ make gawk 

Everything else will be built from source. Create a new directory somewhere, and download the following source packages. (If you’re following this guide at a later date, there will be more recent releases of each package available. Check for newer releases by pasting each URL into your browser without the filename. For example: http://ftpmirror.gnu.org/binutils/)

1
2
3
4
5
6
7
8
9
$ wget http://ftpmirror.gnu.org/binutils/binutils-2.24.tar.gz
$ wget http://ftpmirror.gnu.org/gcc/gcc-4.9.2/gcc-4.9.2.tar.gz
$ wget https://www.kernel.org/pub/linux/kernel/v3.x/linux-3.17.2.tar.xz
$ wget http://ftpmirror.gnu.org/glibc/glibc-2.20.tar.xz
$ wget http://ftpmirror.gnu.org/mpfr/mpfr-3.1.2.tar.xz
$ wget http://ftpmirror.gnu.org/gmp/gmp-6.0.0a.tar.xz
$ wget http://ftpmirror.gnu.org/mpc/mpc-1.0.2.tar.gz
$ wget ftp://gcc.gnu.org/pub/gcc/infrastructure/isl-0.12.2.tar.bz2
$ wget ftp://gcc.gnu.org/pub/gcc/infrastructure/cloog-0.18.1.tar.gz

The first four packages – Binutils, GCC, the Linux kernel and Glibc – are the main ones. We could have installed the next three packages in binary form using our system’s package manager instead, but that tends to provide older versions. The last two packages, ISL and CLooG, are optional, but they enable a few more optimizations in the compiler we’re about to build.

How The Pieces Fit Together

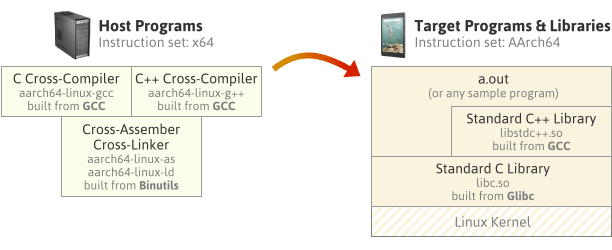
By the time we’re finished, we will have built each of the following programs and libraries. First, we’ll build the tools on the left, then we’ll use those tools to build the programs and libraries on the right. We won’t actually build the target system’s Linux kernel, but we do need the kernel header files in order to build the target system’s standard C library.

The compilers on the left will invoke the assembler & linker as part of their job. All the other packages we downloaded, such as MPFR, GMP and MPC, will be linked into the compilers themselves.

The diagram on the right represents a sample program, a.out, running on the target OS, built using the cross compiler and linked with the target system’s standard C and C++ libraries. The standard C++ library makes calls to the standard C library, and the C library makes direct system calls to the AArch64 Linux kernel.

Note that instead of using Glibc as the standard C library implementation, we could have used Newlib, an alternative implementation. Newlib is a popular C library implementation for embedded devices. Unlike Glibc, Newlib doesn’t require a complete OS on the target system – just a thin hardware abstraction layer called Libgloss. Newlib doesn’t have regular releases; instead, you’re meant to pull the source directly from the Newlib CVS repository. One limitation of Newlib is that currently, it doesn’t seem to support building multithreaded programs for AArch64. That’s why I chose not to use it here.

Build Steps

Extract all the source packages.

1
$ for f in *.tar*; do tar xf $f; done 

Create symbolic links from the GCC directory to some of the other directories. These five packages are dependencies of GCC, and when the symbolic links are present, GCC’s build script will build them automatically.

1
2
3
4
5
6
7
$ cd gcc-4.9.2
$ ln -s ../mpfr-3.1.2 mpfr
$ ln -s ../gmp-6.0.0 gmp
$ ln -s ../mpc-1.0.2 mpc
$ ln -s ../isl-0.12.2 isl
$ ln -s ../cloog-0.18.1 cloog
$ cd ..

Choose an installation directory, and make sure you have write permission to it. In the steps that follow, I’ll install the new toolchain to /opt/cross.

1
2
$ sudo mkdir -p /opt/cross
$ sudo chown jeff /opt/cross

Throughout the entire build process, make sure the installation’s bin subdirectory is in your PATH environment variable. You can remove this directory from your PATH later, but most of the build steps expect to find aarch64-linux-gcc and other host tools via the PATH by default.

1
$ export PATH=/opt/cross/bin:$PATH 

Pay particular attention to the stuff that gets installed under /opt/cross/aarch64-linux/. This directory is considered the system root of an imaginary AArch64 Linux target system. A self-hosted AArch64 Linux compiler could, in theory, use all the headers and libraries placed here. Obviously, none of the programs built for the host system, such as the cross-compiler itself, will be installed to this directory.

1. Binutils

This step builds and installs the cross-assembler, cross-linker, and other tools.

1
2
3
4
5
6
$ mkdir build-binutils
$ cd build-binutils
$ ../binutils-2.24/configure --prefix=/opt/cross --target=aarch64-linux --disable-multilib
$ make -j4
$ make install
$ cd ..
  • We’ve specified aarch64-linux as the target system type. Binutils’s configure script will recognize that this target is different from the machine we’re building on, and configure a cross-assembler and cross-linker as a result. The tools will be installed to /opt/cross/bin, their names prefixed by aarch64-linux-.
  • --disable-multilib means that we only want our Binutils installation to work with programs and libraries using the AArch64 instruction set, and not any related instruction sets such as AArch32.

This step installs the Linux kernel header files to /opt/cross/aarch64-linux/include, which will ultimately allow programs built using our new toolchain to make system calls to the AArch64 kernel in the target environment.

1
2
3
$ cd linux-3.17.2
$ make ARCH=arm64 INSTALL_HDR_PATH=/opt/cross/aarch64-linux headers_install
$ cd ..
  • We could even have done this before installing Binutils.
  • The Linux kernel header files won’t actually be used until step 6, when we build the standard C library, although the configure script in step 4 expects them to be already installed.
  • Because the Linux kernel is a different open-source project from the others, it has a different way of identifying the target CPU architecture: ARCH=arm64

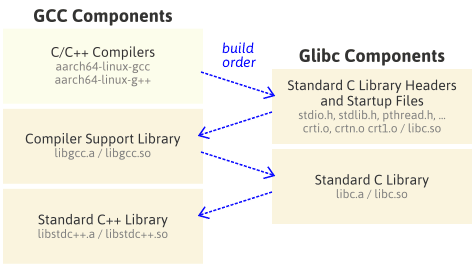
All of the remaining steps involve building GCC and Glibc. The trick is that there are parts of GCC which depend on parts of Glibc already being built, and vice versa. We can’t build either package in a single step; we need to go back and forth between the two packages and build their components in a way that satisfies their dependencies.

3. C/C++ Compilers

This step will build GCC’s C and C++ cross-compilers only, and install them to /opt/cross/bin. It won’t invoke those compilers to build any libraries just yet.

1
2
3
4
5
6
$ mkdir -p build-gcc
$ cd build-gcc
$ ../gcc-4.9.2/configure --prefix=/opt/cross --target=aarch64-linux --enable-languages=c,c++ --disable-multilib
$ make -j4 all-gcc
$ make install-gcc
$ cd ..
  • Because we’ve specified --target=aarch64-linux, the build script looks for the Binutils cross-tools we built in step 1 with names prefixed by aarch64-linux-. Likewise, the C/C++ compiler names will be prefixed by aarch64-linux-.
  • --enable-languages=c,c++ prevents other compilers in the GCC suite, such as Fortran, Go or Java, from being built.

4. Standard C Library Headers and Startup Files

In this step, we install Glibc’s standard C library headers to /opt/cross/aarch64-linux/include. We also use the C compiler built in step 3 to compile the library’s startup files and install them to /opt/cross/aarch64-linux/lib. Finally, we create a couple of dummy files, libc.so and stubs.h, which are expected in step 5, but which will be replaced in step 6.

1
2
3
4
5
6
7
8
9
$ mkdir -p build-glibc
$ cd build-glibc
$ ../glibc-2.20/configure --prefix=/opt/cross/aarch64-linux --build=$MACHTYPE --host=aarch64-linux --target=aarch64-linux --with-headers=/opt/cross/aarch64-linux/include --disable-multilib libc_cv_forced_unwind=yes
$ make install-bootstrap-headers=yes install-headers
$ make -j4 csu/subdir_lib
$ install csu/crt1.o csu/crti.o csu/crtn.o /opt/cross/aarch64-linux/lib
$ aarch64-linux-gcc -nostdlib -nostartfiles -shared -x c /dev/null -o /opt/cross/aarch64-linux/lib/libc.so
$ touch /opt/cross/aarch64-linux/include/gnu/stubs.h
$ cd ..
  • --prefix=/opt/cross/aarch64-linux tells Glibc’s configure script where it should install its headers and libraries. Note that it’s different from the usual --prefix.
  • Despite some contradictory information out there, Glibc’s configure script currently requires us to specify all three --build, --host and --target system types.
  • $MACHTYPE is a predefined environment variable which describes the machine running the build script. --build=$MACHTYPE is needed because in step 6, the build script will compile some additional tools which run as part of the build process itself.
  • --host has a different meaning here than we’ve been using so far. In Glibc’s configure, both the --host and --target options are meant to describe the system on which Glibc’s libraries will ultimately run.
  • We install the C library’s startup files, crt1.o, crti.o and crtn.o, to the installation directory manually. There’s doesn’t seem to a make rule that does this without having other side effects.

5. Compiler Support Library

This step uses the cross-compilers built in step 3 to build the compiler support library. The compiler support library contains some C++ exception handling boilerplate code, among other things. This library depends on the startup files installed in step 4. The library itself is needed in step 6. Unlike some other guides, we don’t need to re-run GCC’s configure. We’re just building additional targets in the same configuration.

1
2
3
4
$ cd build-gcc
$ make -j4 all-target-libgcc
$ make install-target-libgcc
$ cd ..
  • Two static libraries, libgcc.a and libgcc_eh.a, are installed to /opt/cross/lib/gcc/aarch64-linux/4.9.2/.
  • A shared library, libgcc_s.so, is installed to /opt/cross/aarch64-linux/lib64.

6. Standard C Library

In this step, we finish off the Glibc package, which builds the standard C library and installs its files to /opt/cross/aarch64-linux/lib/. The static library is named libc.a and the shared library is libc.so.

1
2
3
4
$ cd build-glibc
$ make -j4
$ make install
$ cd ..

7. Standard C++ Library

Finally, we finish off the GCC package, which builds the standard C++ library and installs it to /opt/cross/aarch64-linux/lib64/. It depends on the C library built in step 6. The resulting static library is named libstdc++.a and the shared library is libstdc++.so.

1
2
3
4
$ cd build-gcc
$ make -j4
$ make install
$ cd ..

Dealing with Build Errors

If you encounter any errors during the build process, there are three possibilities:

  1. You’re missing a required package or tool on the build system.
  2. You’re attempting to perform the build steps in an incorrect order.
  3. You’ve done everything right, but something is just broken in the configuration you’re attempting to build.

You’ll have to examine the build logs to determine which case applies. GCC supports a lot of configurations, and some of them may not build right away. The less popular a configuration is, the greater the chance of it being broken. GCC, being an open source project, depends on contributions from its users to keep each configuration working.

Automating the Above Steps

I’ve written a small bash script named build_cross_gcc to perform all of the above steps. You can find it on GitHub. On my Core 2 Quad Q9550 Debian machine, it takes 13 minutes from start to finish. Customize it to your liking before running.

build_cross_gcc also supports Newlib configurations. When you build a Newlib-based cross-compiler, steps 4, 5 and 6 above can be combined into a single step. (Indeed, that’s what many existing guides do.) For Newlib support, edit the script options as follows:

1
2
3
TARGET=aarch64-elf
USE_NEWLIB=1
CONFIGURATION_OPTIONS="--disable-multilib --disable-threads"

Another way to build a GCC cross-compiler is using a combined tree, where the source code for Binutils, GCC and Newlib are merged into a single directory. A combined tree will only work if the intl and libiberty libraries bundled with GCC and Binutils are identical, which is not the case for the versions used in this post. Combined trees don’t support Glibc either, so it wasn’t an option for this configuration.

There are a couple of popular build scripts, namely crosstool-NG and EmbToolkit, which automate the entire process of building cross-compilers. I had mixed results using crosstool-NG, but it helped me make sense of the build process while putting together this guide.

Testing the Cross-Compiler

If everything built successfully, let’s check our cross-compiler for a dial tone:

1
2
3
4
5
6
7
8
$ aarch64-linux-g++ -v
Using built-in specs.
COLLECT_GCC=aarch64-linux-g++
COLLECT_LTO_WRAPPER=/opt/cross/libexec/gcc/aarch64-linux/4.9.2/lto-wrapper
Target: aarch64-linux
Configured with: ../gcc-4.9.2/configure --prefix=/opt/cross --target=aarch64-linux --enable-languages=c,c++ --disable-multilib
Thread model: posix
gcc version 4.9.2 (GCC)

We can compile the C++14 program from the previous post, then disassemble it:

1
2
3
4
5
6
7
8
9
$ aarch64-linux-g++ -std=c++14 test.cpp
$ aarch64-linux-objdump -d a.out
...
0000000000400830 <main>:
400830: a9be7bfd stp x29, x30, [sp,#-32]!
400834: 910003fd mov x29, sp
400838: 910063a2 add x2, x29, #0x18
40083c: 90000000 adrp x0, 400000 <_init-0x618>
...

This was my first foray into building a cross-compiler. I basically wrote this guide to remember what I’ve learned. I think the above steps serve as a pretty good template for building other configurations; I used build_cross_gcc to build TARGET=powerpc-eabi as well. You can browse config.sub from any of the packages to see what other target environments are supported. Comments and corrections are more than welcome!

Linux命名空间

Linux命名空间是一种资源隔离机制,Docker for Linux就是主要利用Linux命名空间实现资源隔离的。

目前有八种Linux命名空间。下表列出了这些命名空间及其隔离的资源类型,Flag是用于一些系统调用的标志,Page指示如何找到相关命名空间的详细文档。

Namespace Flag Page Isolates
Cgroup CLONE_NEWCGROUP cgroup_namespaces(7) Cgroup root directory
IPC CLONE_NEWIPC ipc_namespaces(7) System V IPC,
POSIX message queues
Network CLONE_NEWNET network_namespaces(7) Network devices,
stacks, ports, etc.
Mount CLONE_NEWNS mount_namespaces(7) Mount points
PID CLONE_NEWPID pid_namespaces(7) Process IDs
Time CLONE_NEWTIME time_namespaces(7) Boot and monotonic clocks
User CLONE_NEWUSER user_namespaces(7) User and group IDs
UTS CLONE_NEWUTS uts_namespaces(7) Hostname and NIS domain name

网络命名空间与veth

本文重点探究Linux网络命名空间,Linux网络命名空间可以隔离网络设备、套接字(端口号)、网络协议栈、路由表、防火墙规则等网络资源。也可以为每个网络命名空间提供不同的DNS配置,比如假如存在一个名为 nstest 的网络命名空间,则对于nstest, DNS解析将会首先参照 /etc/netns/nstest/resolv.conf 中的DNS配置,其次才是全局DNS配置 /etc/resolv.conf

虚拟网络设备 veth 可用于连接两个网络命名空间,可以为隔离于网络命名空间中的进程提供访问外部网络的能力。
虚拟网络设备 veth 总是成对出现的,两个 veth 一端互相连接在一起,另一端与网络协议栈相连,一个 veth 收到的数据包会立即被转发到与之相连的 veth

1
2
3
4
5
6
7
8
9
10
11
12
13
14
15
16
17
+----------------------------------------------------------------+
| |
| +------------------------------------------------+ |
| | Newwork Protocol Stack | |
| +------------------------------------------------+ |
| ↑ ↑ ↑ |
|..............|...............|...............|.................|
| ↓ ↓ ↓ |
| +----------+ +-----------+ +-----------+ |
| | eth0 | | veth0 | | veth1 | |
| +----------+ +-----------+ +-----------+ |
|192.168.1.11 ↑ ↑ ↑ |
| | +---------------+ |
| | 192.168.2.11 192.168.2.1 |
+--------------|-------------------------------------------------+

Physical Network

网络命名空间的介绍参考network_namespaces(7),网络命名空间的的创建、删除与操纵,参考ip-netns(8)veth的介绍参考veth(4)veth of Linux Virtual Network Device

网络命名空间相关操作

可以用 ip netns 进行网络命名空间的创建、删除、在特定网络命名空间执行进程等操作,用 ip link 可以进行在特定命名空间创建接口,为接口变更命名空间等操作。下面给出几个示例:

  • 创建网络命名空间 nstest
    1
    ip netns add nstest
  • 删除命名空间 nstest
    1
    ip netns del nstest
  • 在网络命名空间 nstest 中执行命令
    1
    ip netns exec nstest COMMAND
  • 创建虚拟网络接口对 veth0s0veth0s1
    1
    ip link add veth0s0 type veth peer veth0s1
  • 将虚拟网络接口 veth0s1 移动至网络命名空间 nstest
    1
    2
    3
    # 一旦将网络接口移动至 nstest ,就无法在默认网络命名空间中看到该网络接口
    # 因为一个网络接口只能属于一个网络命名空间,物理网络接口也是如此!!!
    ip link set veth0s1 netns nstest
  • 将虚拟网络接口 veth0s1 移动至默认网络命名空间
    1
    2
    3
    4
    # 由于网络接口 veth0s1 属于 nstest ,所以需要在该网络命名空间中操作
    # 因为各个网络命名空间中的接口时相互隔离的
    # 其中 1 指的是默认网络命名空间的 id
    ip netns exec nstest ip link set veth0s1 netns 1

实验测试

实验一:利用veth连通两个网络命名空间

大致流程为:

  • 创建新的网络命名空间nstest
  • 利用 veth 虚拟网络接口对连接默认网络命名空间和 nstest
  • veth 配置IP进行测试

配置命令如下:

1
2
3
4
5
6
7
ip netns add nstest
ip link add veth0s0 type veth peer veth0s1
ip link set veth0s1 netns nstest
ip link set veth0s0 up
ip addr add 192.168.11.100/24 dev veth0s0
ip netns exec nstest ip link set veth0s1 up
ip netns exec nstest ip addr add 192.168.11.101/24 dev veth0s1

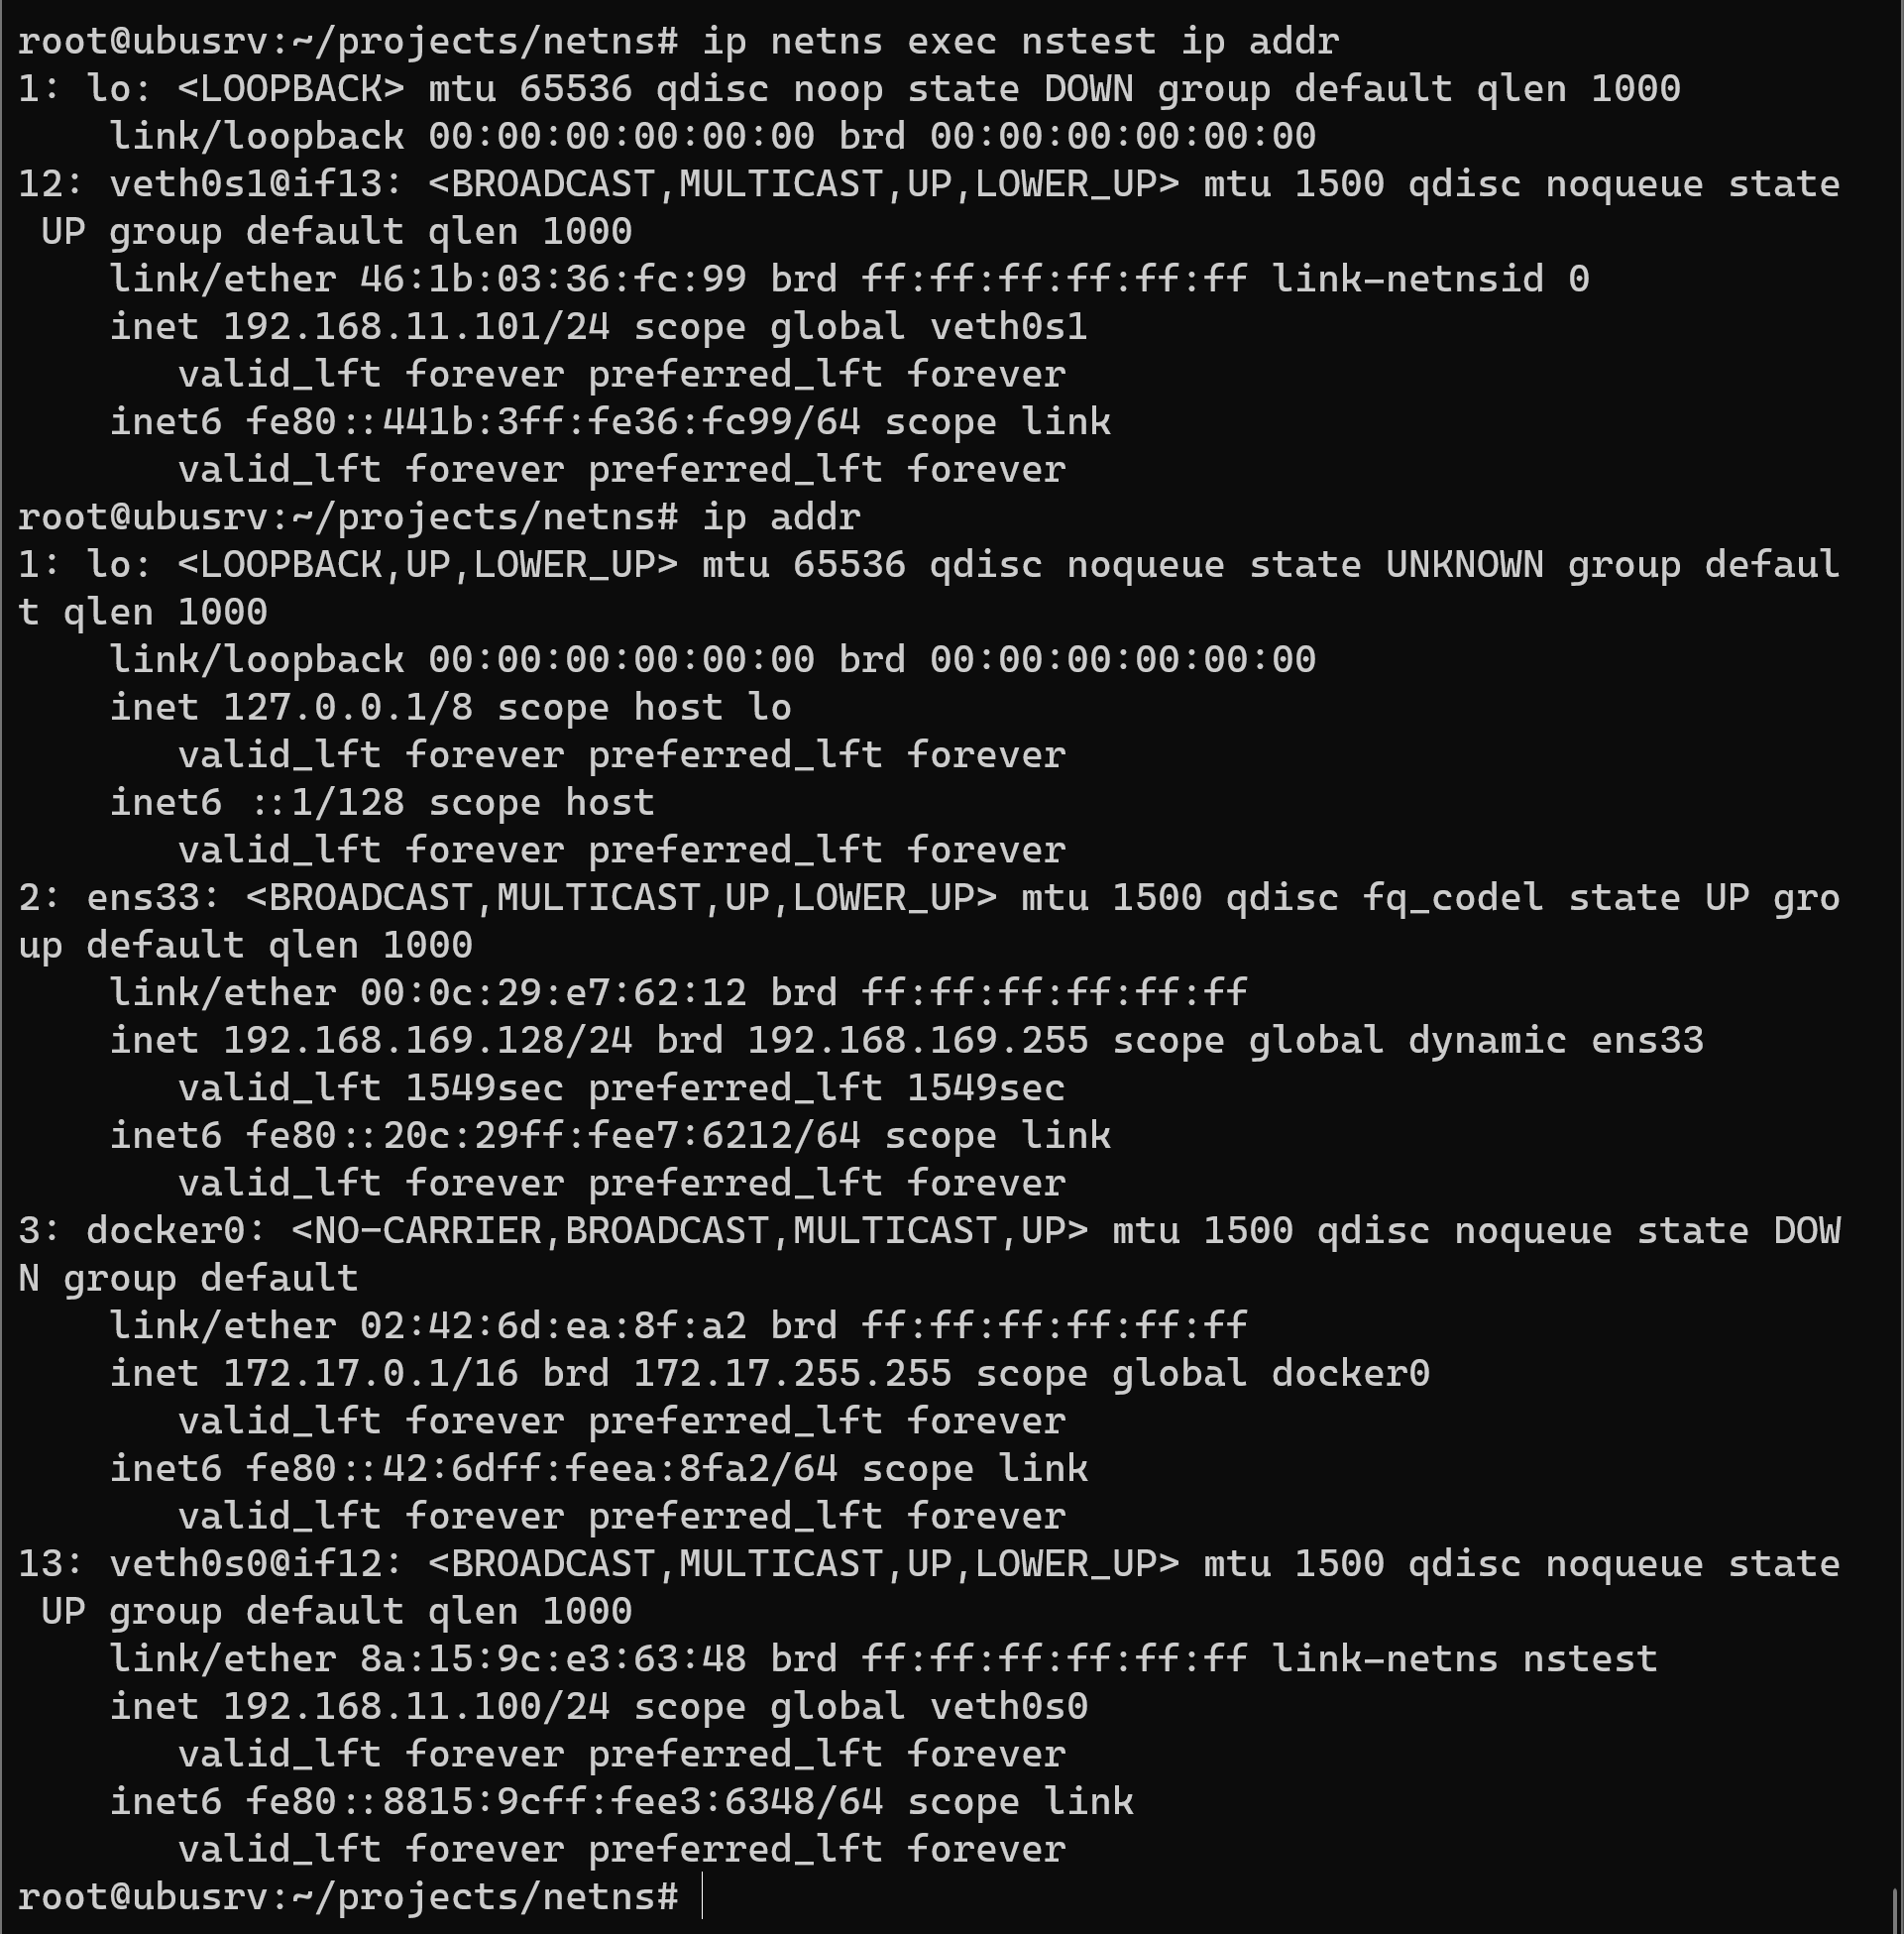
配置好之后,可以使用 ip addr 确认一下网络情况:

下图是我电脑上的情况,可以看到 nstest 只存在 loveth0s1,它与默认网络命名空间的接口是互相隔离的。

然后就可以实现默认网络命名空间与 nstest 之间的通信。

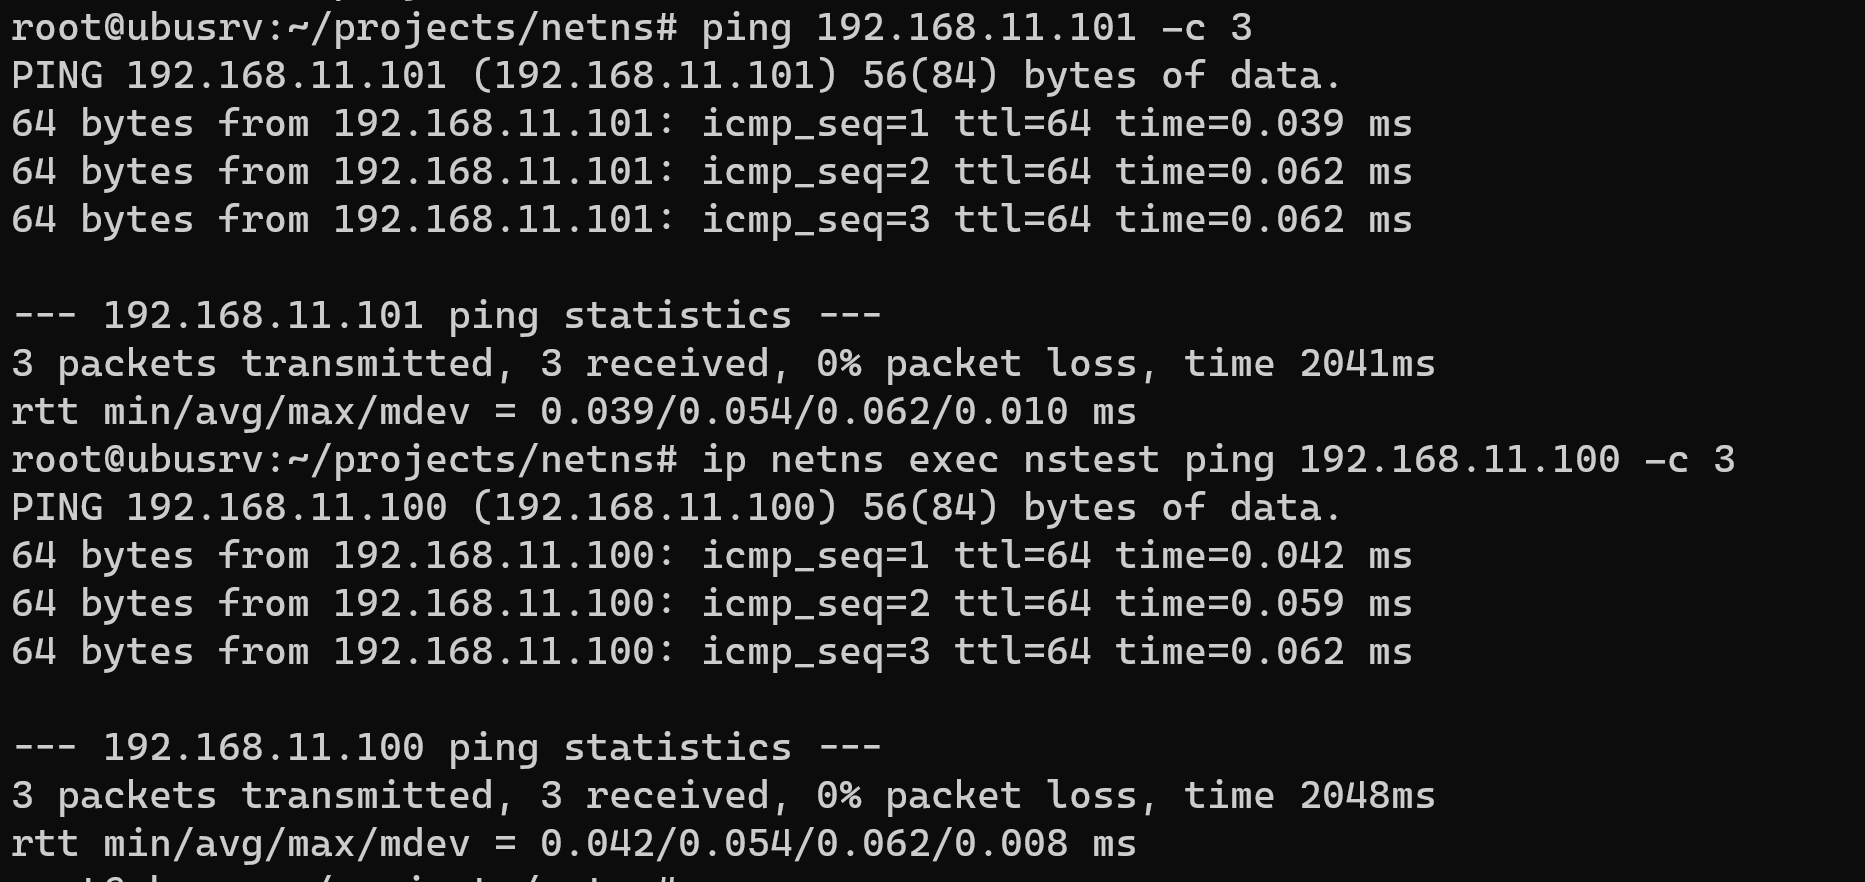
可以通过ping测试:

1
2
ping 192.168.11.101
ip netns exec nstest ping 192.168.11.100

实验一拓展配置

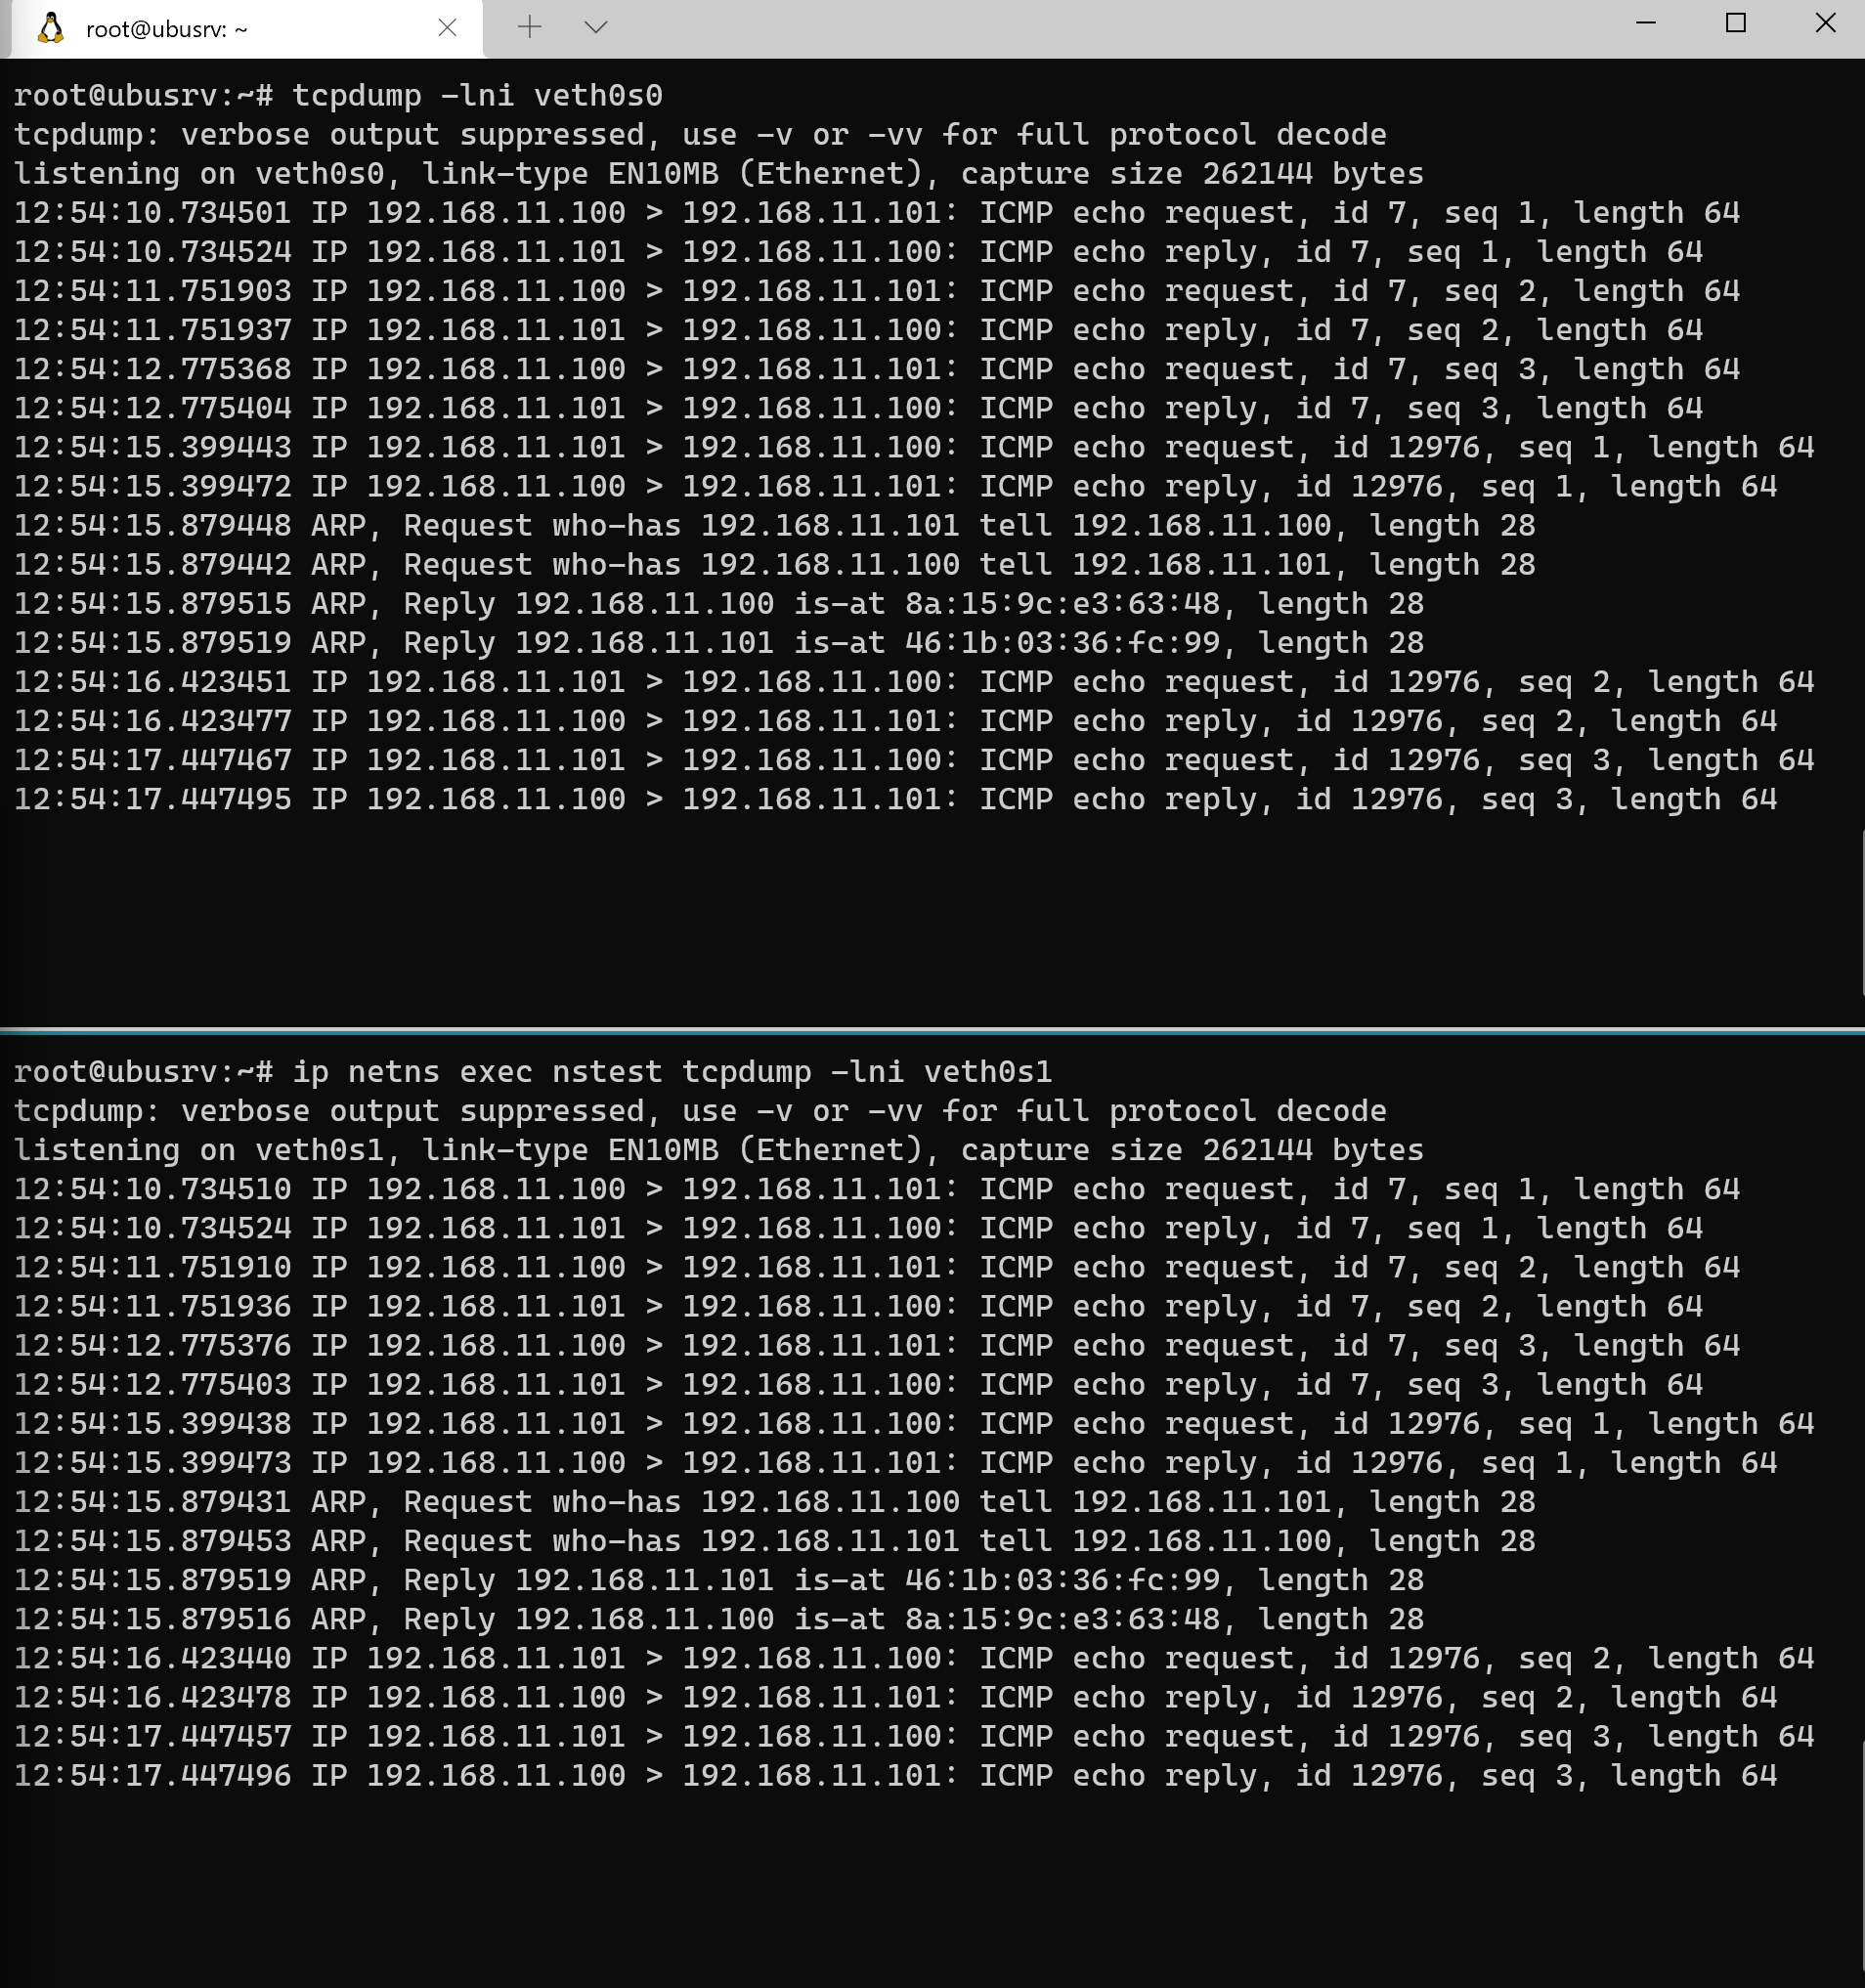
首先介绍一下如何捕获经过网络接口的数据包,在Linux上可以使用 tcpdump 捕获数据包,如果只是想要捕获特定接口的数据包,可以使用 tcpdump -lni interface_name

下面是实验一进行ping测试的抓包截图:

现在nstest和默认网络命名空间可以互相ping通了,那么nstest能否访问外部网络呢?结果是不可以。

首先,如果想要访问 baidu.com,需要配置好网关,并且,由于我们希望访问域名,也就需要配置好DNS解析服务。
那么,新建的网络命名空间中的网关和DNS配置又是怎么的呢?可以通过 ip route 查看网关。而DNS配置仍是通过 /etc/resolv.conf 文件控制,如果仅仅使用 /etc/resolv.conf 控制DNS,那么理论上 nstest 中的DNS配置是与默认网络命名空间相同的,不过如今大部分Linux发行版默认情况下都默认安装了网络服务相关守护进程,Ubuntu Server 20.04中使用的是netplan服务,所以说了这么多,我也不太清楚nstest中默认的DNS配置是怎么的,可能与网络接口的IP地址配置有关系,如果采用DHCP,应该会根据DHCP服务器返回的结果设置DNS,具体可以查看netplan配置文件。

首先查看 nstest 的网关配置,下图顺便展示了默认网络命名空间的路由信息,用于突出网络命名空间之间路由表的隔离性:

可以看到, nstest 中未配置默认路由,所以自然无法访问 baidu.com 了,下面为它配置默认路由,这里我们将 veth0s0 的IP地址 192.168.11.100 设为 nstest 中的默认网关。

1
ip netns exec nstest ip route add default via 192.168.11.100

然后检查 nstest 的路由表就会看到默认路由,那么我们现在ping 114.114.114.114baidu.com,看能否通过 tcpdump 抓到包。

可以看到发往 114.114.114.114ICMP echo request,但是没有回应,也有发往 127.0.0.53 的DNS查询,同样没有回应。(DNS查询应该和DNS配置有关系,这里不深究了)

这里要关注的一点是,veth0s0 收到了来自 nstestveth0s1 的数据包,如果进一步配置NAT,veth0s1 就可以访问外部网络了。其实使用桥接网络模式的docker容器就是利用类似的技术访问外部网络的,只不过docekr容器并非直接配置NAT,而是将对端veth接入了docker网桥,再进一步通过网桥访问外部网络。

接下来,使用iptables为配置NAT:

1
2
3
4
5
IFACE=ens33 # 可以访问外网的接口名称
echo 1 > /proc/sys/net/ipv4/ip_forward
iptables -t nat -A POSTROUTING -s 192.168.11.0/24 -j MASQUERADE
iptables -A FORWARD -i ${IFACE} -o veth0s0 -j ACCEPT
iptables -A FORWARD -o ${IFACE} -i veth0s0 -j ACCEPT

然后 nstest 就可以访问外部网络了。

参考资源

namespaces(7) — Linux manual page
network_namespaces(7) — Linux manual page
ip-netns(8) — Linux manual page
veth(4) — Linux manual page
veth of Linux Virtual Network Device
Setup a network namespace with Internet access
A tcpdump Tutorial with Examples — 50 Ways to Isolate Traffic

来由

又一次打开了很久以前浏览过的一个Chip-8教程,Cowgod’s Chip-8,该教程的完成日期是 August 30, 1997 06:00:00,比我年龄大一些😂,该网页使用的仅仅是最朴素的白底黑字布局,然而无论是内容质量,还是排版风格,都令人感觉无比舒适,感觉如果有一天这个网站不在了,也是一种遗憾,于是在此备份一下该网页,它的构成是纯html,十分简洁。

代码

1
2
3
4
5
6
7
8
9
10
11
12
13
14
15
16
17
18
19
20
21
22
23
24
25
26
27
28
29
30
31
32
33
34
35
36
37
38
39
40
41
42
43
44
45
46
47
48
49
50
51
52
53
54
55
56
57
58
59
60
61
62
63
64
65
66
67
68
69
70
71
72
73
74
75
76
77
78
79
80
81
82
83
84
85
86
87
88
89
90
91
92
93
94
95
96
97
98
99
100
101
102
103
104
105
106
107
108
109
110
111
112
113
114
115
116
117
118
119
120
121
122
123
124
125
126
127
128
129
130
131
132
133
134
135
136
137
138
139
140
141
142
143
144
145
146
147
148
149
150
151
152
153
154
155
156
157
158
159
160
161
162
163
164
165
166
167
168
169
170
171
172
173
174
175
176
177
178
179
180
181
182
183
184
185
186
187
188
189
190
191
192
193
194
195
196
197
198
199
200
201
202
203
204
205
206
207
208
209
210
211
212
213
214
215
216
217
218
219
220
221
222
223
224
225
226
227
228
229
230
231
232
233
234
235
236
237
238
239
240
241
242
243
244
245
246
247
248
249
250
251
252
253
254
255
256
257
258
259
260
261
262
263
264
265
266
267
268
269
270
271
272
273
274
275
276
277
278
279
280
281
282
283
284
285
286
287
288
289
290
291
292
293
294
295
296
297
298
299
300
301
302
303
304
305
306
307
308
309
310
311
312
313
314
315
316
317
318
319
320
321
322
323
324
325
326
327
328
329
330
331
332
333
334
335
336
337
338
339
340
341
342
343
344
345
346
347
348
349
350
351
352
353
354
355
356
357
358
359
360
361
362
363
364
365
366
367
368
369
370
371
372
373
374
375
376
377
378
379
380
381
382
383
384
385
386
387
388
389
390
391
392
393
394
395
396
397
398
399
400
401
402
403
404
405
406
407
408
409
410
411
412
413
414
415
416
417
418
419
420
421
422
423
424
425
426
427
428
429
430
431
432
433
434
435
436
437
438
439
440
441
442
443
444
445
446
447
448
449
450
451
452
453
454
455
456
457
458
459
460
461
462
463
464
465
466
467
468
469
470
471
472
473
474
475
476
477
478
479
480
481
482
483
484
485
486
487
488
489
490
491
492
493
494
495
496
497
498
499
500
501
502
503
504
505
506
507
508
509
510
511
512
513
514
515
516
517
518
519
520
521
522
523
524
525
526
527
528
529
530
531
532
533
534
535
536
537
538
539
540
541
542
543
544
545
546
547
548
549
550
551
552
553
554
555
556
557
558
559
560
561
562
563
564
565
566
567
568
569
570
571
572
573
574
575
576
577
578
579
580
581
582
583
584
585
586
587
588
589
590
591
592
593
594
595
596
597
598
599
600
601
602
603
604
605
606
607
608
609
610
611
612
613
614
615
616
617
618
619
620
621
622
623
624
625
626
627
628
629
630
631
632
633
634
635
636
637
638
639
640
641
642
643
644
645
646
647
648
649
650
651
652
653
654
655
656
657
658
659
660
661
662
663
664
665
666
667
668
669
670
671
672
673
674
675
676
677
678
679
680
681
682
683
684
685
686
687
688
689
690
691
692
693
694
695
696
697
698
699
700
701
702
703
704
705
706
707
708
709
710
711
712
713
714
715
716
717
718
719
720
721
722
723
724
725
726
727
728
729
730
731
732
733
734
735
736
737
738
739
740
741
742
743
744
745
746
747
748
749
750
751
752
753
754
755
756
757
758
759
760
761
762
763
764
765
766
767
768
769
770
771
772
773
774
775
776
777
778
779
780
781
782
783
784
785
786
787
788
789
790
791
792
793
794
795
796
797
798
799
800
801
802
803
804
805
806
807
808
809
810
811
812
813
814
815
816
817
818
819
820
821
822
823
824
825
826
827
828
829
830
831
832
833
834
835
836
837
838
839
840
841
842
843
844
845
846
847
848
849
850
851
852
853
854
855
856
857
858
859
860
861
862
863
864
865
866
867
868
869
870
871
872
873
874
875
876
877
878
879
880
881
882
883
884
885
886
887
888
889
890
891
892
893
894
895
896
897
898
899
900
901
902
903
904
905
906
907
908
909
910
911
912
913
914
915
916
917
918
919
920
921
922
923
924
925
926
927
928
929
930
931
932
933
934
935
936
937
938
939
940
941
942
943
944
945
946
947
948
949
950
951
952
953
954
955
956
957
958
959
960
961
962
963
964
965
966
967
968
969
970
971
972
973
974
975
976
977
978
979
980
981
982
983
984
985
986
987
988
989
990
991
992
993
994
995
996
997
998
999
1000
1001
1002
1003
1004
1005
1006
1007
1008
1009
1010
1011
1012
1013
1014
1015
1016
1017
1018
1019
1020
1021
1022
1023
1024
1025
1026
1027
1028
1029
1030
1031
1032
1033
1034
1035
1036
1037
1038
1039
1040
1041
1042
1043
1044
1045
1046
1047
1048
1049
1050
1051
1052
1053
1054
1055
1056
1057
1058
1059
1060
1061
1062
1063
1064
1065
1066
1067
1068
1069
1070
1071
1072
1073
1074
1075
1076
1077
1078
1079
1080
1081
1082
1083
1084
1085
1086
1087
1088
1089
1090
1091
1092
1093
1094
1095
1096
1097
1098
1099
1100
1101
1102
1103
1104
1105
1106
1107
1108
1109
1110
1111
1112
1113
1114
1115
1116
1117
1118
1119
1120
1121
1122
1123
1124
1125
1126
1127
1128
1129
1130
1131
1132
1133
1134
1135
1136
1137
1138
1139
1140
1141
1142
1143
1144
1145
1146
1147
1148
1149
1150
1151
1152
1153
1154
1155
1156
1157
1158
1159
1160
1161
1162
1163
1164
1165
1166
1167
1168
1169
1170
1171
1172
1173
1174
1175
1176
1177
1178
1179
1180
1181
1182
1183
1184
1185
1186
1187
1188
1189
1190
1191
1192
1193
1194
1195
1196
1197
1198
1199
1200

<!-- saved from url=(0048)http://devernay.free.fr/hacks/chip8/C8TECH10.HTM -->
<html><head><meta http-equiv="Content-Type" content="text/html; charset=windows-1252">
<title>Cowgod's Chip-8 Technical Reference</title>
</head>
<body bgcolor="#FFFFFF" text="#000000" link="#0000FF" alink="#00007F" vlink="#7F7F7F" class="vsc-initialized">
<center>
Cowgod's<br>
<font size="7"><strong><tt>Chip-8</tt></strong></font><br>
Technical Reference v1.0<br>
</center>
<br>
<font size="4"><strong><em><u>
<a name="0.0">0.0</a> - Table of Contents&nbsp;&nbsp;&nbsp;&nbsp;&nbsp;&nbsp;&nbsp;&nbsp;&nbsp;&nbsp;<br>
</u></em></strong></font>
<br>
<tt><font size="3">
<strong><a href="http://devernay.free.fr/hacks/chip8/C8TECH10.HTM#0.0">0.0</a> - Table of Contents</strong><br>
&nbsp;&nbsp;&nbsp;&nbsp;&nbsp;&nbsp;<a href="http://devernay.free.fr/hacks/chip8/C8TECH10.HTM#0.1">0.1</a> - Using This Document<br>
<br>
<strong><a href="http://devernay.free.fr/hacks/chip8/C8TECH10.HTM#1.0">1.0</a> - About Chip-8</strong><br>
<br>
<strong><a href="http://devernay.free.fr/hacks/chip8/C8TECH10.HTM#2.0">2.0</a> - Chip-8 Specifications</strong><br>
&nbsp;&nbsp;&nbsp;&nbsp;&nbsp;&nbsp;<a href="http://devernay.free.fr/hacks/chip8/C8TECH10.HTM#2.1">2.1</a> - Memory<br>
&nbsp;&nbsp;&nbsp;&nbsp;&nbsp;&nbsp;&nbsp;&nbsp;&nbsp;&nbsp;&nbsp;&nbsp;<a href="http://devernay.free.fr/hacks/chip8/C8TECH10.HTM#memmap">Diagram</a> - Memory Map<br>
&nbsp;&nbsp;&nbsp;&nbsp;&nbsp;&nbsp;<a href="http://devernay.free.fr/hacks/chip8/C8TECH10.HTM#2.2">2.2</a> - Registers<br>
&nbsp;&nbsp;&nbsp;&nbsp;&nbsp;&nbsp;<a href="http://devernay.free.fr/hacks/chip8/C8TECH10.HTM#2.3">2.3</a> - Keyboard<br>
&nbsp;&nbsp;&nbsp;&nbsp;&nbsp;&nbsp;&nbsp;&nbsp;&nbsp;&nbsp;&nbsp;&nbsp;<a href="http://devernay.free.fr/hacks/chip8/C8TECH10.HTM#keyboard">Diagram</a> - Keyboard Layout<br>
&nbsp;&nbsp;&nbsp;&nbsp;&nbsp;&nbsp;<a href="http://devernay.free.fr/hacks/chip8/C8TECH10.HTM#2.4">2.4</a> - Display<br>
&nbsp;&nbsp;&nbsp;&nbsp;&nbsp;&nbsp;&nbsp;&nbsp;&nbsp;&nbsp;&nbsp;&nbsp;<a href="http://devernay.free.fr/hacks/chip8/C8TECH10.HTM#dispcoords">Diagram</a> - Display Coordinates<br>
&nbsp;&nbsp;&nbsp;&nbsp;&nbsp;&nbsp;&nbsp;&nbsp;&nbsp;&nbsp;&nbsp;&nbsp;<a href="http://devernay.free.fr/hacks/chip8/C8TECH10.HTM#font">Listing</a> - The Chip-8 Hexadecimal Font<br>
&nbsp;&nbsp;&nbsp;&nbsp;&nbsp;&nbsp;<a href="http://devernay.free.fr/hacks/chip8/C8TECH10.HTM#2.5">2.5</a> - Timers &amp; Sound<br>
<br>
<strong><a href="http://devernay.free.fr/hacks/chip8/C8TECH10.HTM#3.0">3.0</a> - Chip-8 Instructions</strong><br>
&nbsp;&nbsp;&nbsp;&nbsp;&nbsp;&nbsp;<a href="http://devernay.free.fr/hacks/chip8/C8TECH10.HTM#3.1">3.1</a> - Standard Chip-8 Instructions<br>
&nbsp;&nbsp;&nbsp;&nbsp;&nbsp;&nbsp;&nbsp;&nbsp;&nbsp;&nbsp;&nbsp;&nbsp;<a href="http://devernay.free.fr/hacks/chip8/C8TECH10.HTM#00E0">00E0</a> - CLS<br>
&nbsp;&nbsp;&nbsp;&nbsp;&nbsp;&nbsp;&nbsp;&nbsp;&nbsp;&nbsp;&nbsp;&nbsp;<a href="http://devernay.free.fr/hacks/chip8/C8TECH10.HTM#00EE">00EE</a> - RET<br>
&nbsp;&nbsp;&nbsp;&nbsp;&nbsp;&nbsp;&nbsp;&nbsp;&nbsp;&nbsp;&nbsp;&nbsp;<a href="http://devernay.free.fr/hacks/chip8/C8TECH10.HTM#0nnn">0<em>nnn</em></a> - SYS <em>addr</em><br>
&nbsp;&nbsp;&nbsp;&nbsp;&nbsp;&nbsp;&nbsp;&nbsp;&nbsp;&nbsp;&nbsp;&nbsp;<a href="http://devernay.free.fr/hacks/chip8/C8TECH10.HTM#1nnn">1<em>nnn</em></a> - JP <em>addr</em><br>
&nbsp;&nbsp;&nbsp;&nbsp;&nbsp;&nbsp;&nbsp;&nbsp;&nbsp;&nbsp;&nbsp;&nbsp;<a href="http://devernay.free.fr/hacks/chip8/C8TECH10.HTM#2nnn">2<em>nnn</em></a> - CALL <em>addr</em><br>
&nbsp;&nbsp;&nbsp;&nbsp;&nbsp;&nbsp;&nbsp;&nbsp;&nbsp;&nbsp;&nbsp;&nbsp;<a href="http://devernay.free.fr/hacks/chip8/C8TECH10.HTM#3xkk">3<em>xkk</em></a> - SE V<em>x</em>, <em>byte</em><br>
&nbsp;&nbsp;&nbsp;&nbsp;&nbsp;&nbsp;&nbsp;&nbsp;&nbsp;&nbsp;&nbsp;&nbsp;<a href="http://devernay.free.fr/hacks/chip8/C8TECH10.HTM#4xkk">4<em>xkk</em></a> - SNE V<em>x</em>, <em>byte</em><br>
&nbsp;&nbsp;&nbsp;&nbsp;&nbsp;&nbsp;&nbsp;&nbsp;&nbsp;&nbsp;&nbsp;&nbsp;<a href="http://devernay.free.fr/hacks/chip8/C8TECH10.HTM#5xy0">5<em>xy</em>0</a> - SE V<em>x</em>, V<em>y</em><br>
&nbsp;&nbsp;&nbsp;&nbsp;&nbsp;&nbsp;&nbsp;&nbsp;&nbsp;&nbsp;&nbsp;&nbsp;<a href="http://devernay.free.fr/hacks/chip8/C8TECH10.HTM#6xkk">6<em>xkk</em></a> - LD V<em>x</em>, <em>byte</em><br>
&nbsp;&nbsp;&nbsp;&nbsp;&nbsp;&nbsp;&nbsp;&nbsp;&nbsp;&nbsp;&nbsp;&nbsp;<a href="http://devernay.free.fr/hacks/chip8/C8TECH10.HTM#7xkk">7<em>xkk</em></a> - ADD V<em>x</em>, <em>byte</em><br>
&nbsp;&nbsp;&nbsp;&nbsp;&nbsp;&nbsp;&nbsp;&nbsp;&nbsp;&nbsp;&nbsp;&nbsp;<a href="http://devernay.free.fr/hacks/chip8/C8TECH10.HTM#8xy0">8<em>xy</em>0</a> - LD V<em>x</em>, V<em>y</em><br>
&nbsp;&nbsp;&nbsp;&nbsp;&nbsp;&nbsp;&nbsp;&nbsp;&nbsp;&nbsp;&nbsp;&nbsp;<a href="http://devernay.free.fr/hacks/chip8/C8TECH10.HTM#8xy1">8<em>xy</em>1</a> - OR V<em>x</em>, V<em>y</em><br>
&nbsp;&nbsp;&nbsp;&nbsp;&nbsp;&nbsp;&nbsp;&nbsp;&nbsp;&nbsp;&nbsp;&nbsp;<a href="http://devernay.free.fr/hacks/chip8/C8TECH10.HTM#8xy2">8<em>xy</em>2</a> - AND V<em>x</em>, V<em>y</em><br>
&nbsp;&nbsp;&nbsp;&nbsp;&nbsp;&nbsp;&nbsp;&nbsp;&nbsp;&nbsp;&nbsp;&nbsp;<a href="http://devernay.free.fr/hacks/chip8/C8TECH10.HTM#8xy3">8<em>xy</em>3</a> - XOR V<em>x</em>, V<em>y</em><br>
&nbsp;&nbsp;&nbsp;&nbsp;&nbsp;&nbsp;&nbsp;&nbsp;&nbsp;&nbsp;&nbsp;&nbsp;<a href="http://devernay.free.fr/hacks/chip8/C8TECH10.HTM#8xy4">8<em>xy</em>4</a> - ADD V<em>x</em>, V<em>y</em><br>
&nbsp;&nbsp;&nbsp;&nbsp;&nbsp;&nbsp;&nbsp;&nbsp;&nbsp;&nbsp;&nbsp;&nbsp;<a href="http://devernay.free.fr/hacks/chip8/C8TECH10.HTM#8xy5">8<em>xy</em>5</a> - SUB V<em>x</em>, V<em>y</em><br>
&nbsp;&nbsp;&nbsp;&nbsp;&nbsp;&nbsp;&nbsp;&nbsp;&nbsp;&nbsp;&nbsp;&nbsp;<a href="http://devernay.free.fr/hacks/chip8/C8TECH10.HTM#8xy6">8<em>xy</em>6</a> - SHR V<em>x</em> {, V<em>y</em>}<br>
&nbsp;&nbsp;&nbsp;&nbsp;&nbsp;&nbsp;&nbsp;&nbsp;&nbsp;&nbsp;&nbsp;&nbsp;<a href="http://devernay.free.fr/hacks/chip8/C8TECH10.HTM#8xy7">8<em>xy</em>7</a> - SUBN V<em>x</em>, V<em>y</em><br>
&nbsp;&nbsp;&nbsp;&nbsp;&nbsp;&nbsp;&nbsp;&nbsp;&nbsp;&nbsp;&nbsp;&nbsp;<a href="http://devernay.free.fr/hacks/chip8/C8TECH10.HTM#8xyE">8<em>xy</em>E</a> - SHL V<em>x</em> {, V<em>y</em>}<br>
&nbsp;&nbsp;&nbsp;&nbsp;&nbsp;&nbsp;&nbsp;&nbsp;&nbsp;&nbsp;&nbsp;&nbsp;<a href="http://devernay.free.fr/hacks/chip8/C8TECH10.HTM#9xy0">9<em>xy</em>0</a> - SNE V<em>x</em>, V<em>y</em><br>
&nbsp;&nbsp;&nbsp;&nbsp;&nbsp;&nbsp;&nbsp;&nbsp;&nbsp;&nbsp;&nbsp;&nbsp;<a href="http://devernay.free.fr/hacks/chip8/C8TECH10.HTM#Annn">A<em>nnn</em></a> - LD I, <em>addr</em><br>
&nbsp;&nbsp;&nbsp;&nbsp;&nbsp;&nbsp;&nbsp;&nbsp;&nbsp;&nbsp;&nbsp;&nbsp;<a href="http://devernay.free.fr/hacks/chip8/C8TECH10.HTM#Bnnn">B<em>nnn</em></a> - JP V0, <em>addr</em><br>
&nbsp;&nbsp;&nbsp;&nbsp;&nbsp;&nbsp;&nbsp;&nbsp;&nbsp;&nbsp;&nbsp;&nbsp;<a href="http://devernay.free.fr/hacks/chip8/C8TECH10.HTM#Cxkk">C<em>xkk</em></a> - RND V<em>x</em>, <em>byte</em><br>
&nbsp;&nbsp;&nbsp;&nbsp;&nbsp;&nbsp;&nbsp;&nbsp;&nbsp;&nbsp;&nbsp;&nbsp;<a href="http://devernay.free.fr/hacks/chip8/C8TECH10.HTM#Dxyn">D<em>xyn</em></a> - DRW V<em>x</em>, V<em>y</em>, <em>nibble</em><br>
&nbsp;&nbsp;&nbsp;&nbsp;&nbsp;&nbsp;&nbsp;&nbsp;&nbsp;&nbsp;&nbsp;&nbsp;<a href="http://devernay.free.fr/hacks/chip8/C8TECH10.HTM#Ex9E">E<em>x</em>9E</a> - SKP V<em>x</em><br>
&nbsp;&nbsp;&nbsp;&nbsp;&nbsp;&nbsp;&nbsp;&nbsp;&nbsp;&nbsp;&nbsp;&nbsp;<a href="http://devernay.free.fr/hacks/chip8/C8TECH10.HTM#ExA1">E<em>x</em>A1</a> - SKNP V<em>x</em><br>
&nbsp;&nbsp;&nbsp;&nbsp;&nbsp;&nbsp;&nbsp;&nbsp;&nbsp;&nbsp;&nbsp;&nbsp;<a href="http://devernay.free.fr/hacks/chip8/C8TECH10.HTM#Fx07">F<em>x</em>07</a> - LD V<em>x</em>, DT<br>
&nbsp;&nbsp;&nbsp;&nbsp;&nbsp;&nbsp;&nbsp;&nbsp;&nbsp;&nbsp;&nbsp;&nbsp;<a href="http://devernay.free.fr/hacks/chip8/C8TECH10.HTM#Fx0A">F<em>x</em>0A</a> - LD V<em>x</em>, K<br>
&nbsp;&nbsp;&nbsp;&nbsp;&nbsp;&nbsp;&nbsp;&nbsp;&nbsp;&nbsp;&nbsp;&nbsp;<a href="http://devernay.free.fr/hacks/chip8/C8TECH10.HTM#Fx15">F<em>x</em>15</a> - LD DT, V<em>x</em><br>
&nbsp;&nbsp;&nbsp;&nbsp;&nbsp;&nbsp;&nbsp;&nbsp;&nbsp;&nbsp;&nbsp;&nbsp;<a href="http://devernay.free.fr/hacks/chip8/C8TECH10.HTM#Fx18">F<em>x</em>18</a> - LD ST, V<em>x</em><br>
&nbsp;&nbsp;&nbsp;&nbsp;&nbsp;&nbsp;&nbsp;&nbsp;&nbsp;&nbsp;&nbsp;&nbsp;<a href="http://devernay.free.fr/hacks/chip8/C8TECH10.HTM#Fx1E">F<em>x</em>1E</a> - ADD I, V<em>x</em><br>
&nbsp;&nbsp;&nbsp;&nbsp;&nbsp;&nbsp;&nbsp;&nbsp;&nbsp;&nbsp;&nbsp;&nbsp;<a href="http://devernay.free.fr/hacks/chip8/C8TECH10.HTM#Fx29">F<em>x</em>29</a> - LD F, V<em>x</em><br>
&nbsp;&nbsp;&nbsp;&nbsp;&nbsp;&nbsp;&nbsp;&nbsp;&nbsp;&nbsp;&nbsp;&nbsp;<a href="http://devernay.free.fr/hacks/chip8/C8TECH10.HTM#Fx33">F<em>x</em>33</a> - LD B, V<em>x</em><br>
&nbsp;&nbsp;&nbsp;&nbsp;&nbsp;&nbsp;&nbsp;&nbsp;&nbsp;&nbsp;&nbsp;&nbsp;<a href="http://devernay.free.fr/hacks/chip8/C8TECH10.HTM#Fx55">F<em>x</em>55</a> - LD [I], V<em>x</em><br>
&nbsp;&nbsp;&nbsp;&nbsp;&nbsp;&nbsp;&nbsp;&nbsp;&nbsp;&nbsp;&nbsp;&nbsp;<a href="http://devernay.free.fr/hacks/chip8/C8TECH10.HTM#Fx65">F<em>x</em>65</a> - LD V<em>x</em>, [I]<br>
&nbsp;&nbsp;&nbsp;&nbsp;&nbsp;&nbsp;<a href="http://devernay.free.fr/hacks/chip8/C8TECH10.HTM#3.2">3.2</a> - Super Chip-48 Instructions<br>
&nbsp;&nbsp;&nbsp;&nbsp;&nbsp;&nbsp;&nbsp;&nbsp;&nbsp;&nbsp;&nbsp;&nbsp;<a href="http://devernay.free.fr/hacks/chip8/C8TECH10.HTM#00Cn">00C<em>n</em></a> - SCD <em>nibble</em><br>
&nbsp;&nbsp;&nbsp;&nbsp;&nbsp;&nbsp;&nbsp;&nbsp;&nbsp;&nbsp;&nbsp;&nbsp;<a href="http://devernay.free.fr/hacks/chip8/C8TECH10.HTM#00FB">00FB</a> - SCR<br>
&nbsp;&nbsp;&nbsp;&nbsp;&nbsp;&nbsp;&nbsp;&nbsp;&nbsp;&nbsp;&nbsp;&nbsp;<a href="http://devernay.free.fr/hacks/chip8/C8TECH10.HTM#00FC">00FC</a> - SCL<br>
&nbsp;&nbsp;&nbsp;&nbsp;&nbsp;&nbsp;&nbsp;&nbsp;&nbsp;&nbsp;&nbsp;&nbsp;<a href="http://devernay.free.fr/hacks/chip8/C8TECH10.HTM#00FD">00FD</a> - EXIT<br>
&nbsp;&nbsp;&nbsp;&nbsp;&nbsp;&nbsp;&nbsp;&nbsp;&nbsp;&nbsp;&nbsp;&nbsp;<a href="http://devernay.free.fr/hacks/chip8/C8TECH10.HTM#00FE">00FE</a> - LOW<br>
&nbsp;&nbsp;&nbsp;&nbsp;&nbsp;&nbsp;&nbsp;&nbsp;&nbsp;&nbsp;&nbsp;&nbsp;<a href="http://devernay.free.fr/hacks/chip8/C8TECH10.HTM#00FF">00FF</a> - HIGH<br>
&nbsp;&nbsp;&nbsp;&nbsp;&nbsp;&nbsp;&nbsp;&nbsp;&nbsp;&nbsp;&nbsp;&nbsp;<a href="http://devernay.free.fr/hacks/chip8/C8TECH10.HTM#Dxy0">D<em>xy</em>0</a> - DRW V<em>x</em>, V<em>y</em>, 0<br>
&nbsp;&nbsp;&nbsp;&nbsp;&nbsp;&nbsp;&nbsp;&nbsp;&nbsp;&nbsp;&nbsp;&nbsp;<a href="http://devernay.free.fr/hacks/chip8/C8TECH10.HTM#Fx30">F<em>x</em>30</a> - LD HF, V<em>x</em><br>
&nbsp;&nbsp;&nbsp;&nbsp;&nbsp;&nbsp;&nbsp;&nbsp;&nbsp;&nbsp;&nbsp;&nbsp;<a href="http://devernay.free.fr/hacks/chip8/C8TECH10.HTM#Fx75">F<em>x</em>75</a> - LD R, V<em>x</em><br>
&nbsp;&nbsp;&nbsp;&nbsp;&nbsp;&nbsp;&nbsp;&nbsp;&nbsp;&nbsp;&nbsp;&nbsp;<a href="http://devernay.free.fr/hacks/chip8/C8TECH10.HTM#Fx85">F<em>x</em>85</a> - LD V<em>x</em>, R<br>

<br>
<strong><a href="http://devernay.free.fr/hacks/chip8/C8TECH10.HTM#4.0">4.0</a> - Interpreters</strong><br>

<br>
<strong><a href="http://devernay.free.fr/hacks/chip8/C8TECH10.HTM#5.0">5.0</a> - Credits</strong><br>

</font></tt>
<br>
<br>

<font size="3"><strong><em><u>
<a name="0.1">0.1</a> - Using This Document&nbsp;&nbsp;&nbsp;&nbsp;&nbsp;&nbsp;&nbsp;&nbsp;&nbsp;&nbsp;
</u></em></strong></font> <a href="http://devernay.free.fr/hacks/chip8/C8TECH10.HTM#0.0">[TOC]</a><br>
<br>
<tt><font size="3">
While creating this document, I took every effort to try to make it easy to read, as
well as easy to find what you're looking for.<br>
<br>
In most cases, where a hexadecimal value is given, it is followed by the equivalent
decimal value in parenthesis. For example, "0x200 (512)."<br>
<br>
In most cases, when a word or letter is italicized, it is referring to a variable
value, for example, if I write "V<em>x</em>," the <em>x</em> reffers to a 4-bit
value.<br>
<br>
The most important thing to remember as you read this document is that every <a href="http://devernay.free.fr/hacks/chip8/C8TECH10.HTM#0.0">[TOC]</a>
link will take you back to the Table Of Contents. Also, links that you have not yet visited
will appear in <font color="#0000FF">blue</font>, while links you have used will be
<font color="#7F7F7F">gray</font>.<br>
</font></tt>
<br>
<br>

<font size="4"><strong><em><u>
<a name="1.0">1.0</a> - About Chip-8&nbsp;&nbsp;&nbsp;&nbsp;&nbsp;&nbsp;&nbsp;&nbsp;&nbsp;&nbsp;
</u></em></strong></font> <a href="http://devernay.free.fr/hacks/chip8/C8TECH10.HTM#0.0">[TOC]</a><br>
<br>
<tt><font size="3">
Whenever I mention to someone that I'm writing a Chip-8 interpreter, the response
is always the same: "What's a Chip-8?"<br>
<br>
Chip-8 is a simple, interpreted, programming language which was first used on some
do-it-yourself computer systems in the late 1970s and early 1980s. The COSMAC VIP,
DREAM 6800, and ETI 660 computers are a few examples. These computers typically
were designed to use a television as a display, had between 1 and 4K of RAM, and
used a 16-key hexadecimal keypad for input. The interpreter took up only
512 bytes of memory, and programs, which were entered into the computer in
hexadecimal, were even smaller.<br>
<br>
In the early 1990s, the Chip-8 language was revived by a man named Andreas
Gustafsson. He created a Chip-8 interpreter for the HP48 graphing calculator,
called Chip-48. The HP48 was lacking a way to easily make fast games at the time,
and Chip-8 was the answer. Chip-48 later begat Super Chip-48, a modification of
Chip-48 which allowed higher resolution graphics, as well as other graphical
enhancements.<br>
<br>
Chip-48 inspired a whole new crop of Chip-8 interpreters for various platforms,
including MS-DOS, Windows 3.1, Amiga, HP48, MSX, Adam, and ColecoVision. I became
involved with Chip-8 after stumbling upon Paul Robson's interpreter on the
World Wide Web. Shortly after that, I began writing my own Chip-8 interpreter.<br>
<br>
This document is a compilation of all the different sources of information I used
while programming my interpreter.<br>
</font></tt>
<br>
<br>

<font size="4"><strong><em><u>
<a name="2.0">2.0</a> - Chip-8 Specifications&nbsp;&nbsp;&nbsp;&nbsp;&nbsp;&nbsp;&nbsp;&nbsp;&nbsp;&nbsp;
</u></em></strong></font> <a href="http://devernay.free.fr/hacks/chip8/C8TECH10.HTM#0.0">[TOC]</a><br>
<br>
<tt><font size="3">
This section describes the Chip-8 memory, registers, display, keyboard, and timers.<br>
</font></tt>
<br>
<br>

<font size="3"><strong><em><u>
<a name="2.1">2.1</a> - Memory&nbsp;&nbsp;&nbsp;&nbsp;&nbsp;&nbsp;&nbsp;&nbsp;&nbsp;&nbsp;
</u></em></strong></font> <a href="http://devernay.free.fr/hacks/chip8/C8TECH10.HTM#0.0">[TOC]</a><br>
<br>
<tt><font size="3">
The Chip-8 language is capable of accessing up to 4KB (4,096 bytes) of RAM, from
location 0x000 (0) to 0xFFF (4095). The first 512 bytes, from 0x000 to 0x1FF, are
where the original interpreter was located, and should not be used by programs.<br>
<br>
Most Chip-8 programs start at location 0x200 (512), but some begin at 0x600 (1536).
Programs beginning at 0x600 are intended for the ETI 660 computer.<br>
<br>
<a name="memmap"><strong>Memory</strong></a><strong> Map:</strong><br>
+---------------+= 0xFFF (4095) End of Chip-8 RAM<br>
|&nbsp;&nbsp;&nbsp;&nbsp;&nbsp;&nbsp;&nbsp;&nbsp;&nbsp;&nbsp;&nbsp;&nbsp;&nbsp;&nbsp;&nbsp;|<br>
|&nbsp;&nbsp;&nbsp;&nbsp;&nbsp;&nbsp;&nbsp;&nbsp;&nbsp;&nbsp;&nbsp;&nbsp;&nbsp;&nbsp;&nbsp;|<br>
|&nbsp;&nbsp;&nbsp;&nbsp;&nbsp;&nbsp;&nbsp;&nbsp;&nbsp;&nbsp;&nbsp;&nbsp;&nbsp;&nbsp;&nbsp;|<br>
|&nbsp;&nbsp;&nbsp;&nbsp;&nbsp;&nbsp;&nbsp;&nbsp;&nbsp;&nbsp;&nbsp;&nbsp;&nbsp;&nbsp;&nbsp;|<br>
|&nbsp;&nbsp;&nbsp;&nbsp;&nbsp;&nbsp;&nbsp;&nbsp;&nbsp;&nbsp;&nbsp;&nbsp;&nbsp;&nbsp;&nbsp;|<br>
|&nbsp;0x200 to 0xFFF|<br>
|&nbsp;&nbsp;&nbsp;&nbsp;&nbsp;Chip-8&nbsp;&nbsp;&nbsp;&nbsp;|<br>
|&nbsp;Program / Data|<br>
|&nbsp;&nbsp;&nbsp;&nbsp;&nbsp;Space&nbsp;&nbsp;&nbsp;&nbsp;&nbsp;|<br>
|&nbsp;&nbsp;&nbsp;&nbsp;&nbsp;&nbsp;&nbsp;&nbsp;&nbsp;&nbsp;&nbsp;&nbsp;&nbsp;&nbsp;&nbsp;|<br>
|&nbsp;&nbsp;&nbsp;&nbsp;&nbsp;&nbsp;&nbsp;&nbsp;&nbsp;&nbsp;&nbsp;&nbsp;&nbsp;&nbsp;&nbsp;|<br>
|&nbsp;&nbsp;&nbsp;&nbsp;&nbsp;&nbsp;&nbsp;&nbsp;&nbsp;&nbsp;&nbsp;&nbsp;&nbsp;&nbsp;&nbsp;|<br>
+-&nbsp;-&nbsp;-&nbsp;-&nbsp;-&nbsp;-&nbsp;-&nbsp;-+= 0x600 (1536) Start of ETI 660 Chip-8 programs<br>
|&nbsp;&nbsp;&nbsp;&nbsp;&nbsp;&nbsp;&nbsp;&nbsp;&nbsp;&nbsp;&nbsp;&nbsp;&nbsp;&nbsp;&nbsp;|<br>
|&nbsp;&nbsp;&nbsp;&nbsp;&nbsp;&nbsp;&nbsp;&nbsp;&nbsp;&nbsp;&nbsp;&nbsp;&nbsp;&nbsp;&nbsp;|<br>
|&nbsp;&nbsp;&nbsp;&nbsp;&nbsp;&nbsp;&nbsp;&nbsp;&nbsp;&nbsp;&nbsp;&nbsp;&nbsp;&nbsp;&nbsp;|<br>
+---------------+= 0x200 (512) Start of most Chip-8 programs<br>
|&nbsp;0x000 to 0x1FF|<br>
|&nbsp;Reserved for&nbsp;&nbsp;|<br>
|&nbsp;&nbsp;interpreter&nbsp;&nbsp;|<br>
+---------------+= 0x000 (0) Start of Chip-8 RAM<br>


</font></tt>
<br>
<br>

<font size="3"><strong><em><u>
<a name="2.2">2.2</a> - Registers&nbsp;&nbsp;&nbsp;&nbsp;&nbsp;&nbsp;&nbsp;&nbsp;&nbsp;&nbsp;
</u></em></strong></font> <a href="http://devernay.free.fr/hacks/chip8/C8TECH10.HTM#0.0">[TOC]</a><br>
<br>
<tt><font size="3">
Chip-8 has 16 general purpose 8-bit registers, usually referred to as
V<em>x</em>, where <em>x</em> is a hexadecimal digit (0 through F). There is also
a 16-bit register called I. This register is generally used to store
memory addresses, so only the lowest (rightmost) 12 bits are usually used.<br>
<br>
The VF register should not be used by any program, as it is used as a flag by
some instructions. See section 3.0, <a href="http://devernay.free.fr/hacks/chip8/C8TECH10.HTM#3.0">Instructions</a>
for details.<br>
<br>
Chip-8 also has two special purpose 8-bit registers, for the delay and sound timers.
When these registers are non-zero, they are automatically decremented at a rate
of 60Hz. See the section 2.5, <a href="http://devernay.free.fr/hacks/chip8/C8TECH10.HTM#2.5">Timers &amp; Sound</a>, for more
information on these.<br>
<br>
There are also some "pseudo-registers" which are not accessable from Chip-8
programs. The program counter (PC) should be 16-bit, and is used to store the
currently executing address. The stack pointer (SP) can be 8-bit, it is used to
point to the topmost level of the stack.<br>
<br>
The stack is an array of 16 16-bit values, used to store the address that
the interpreter shoud return to when finished with a subroutine. Chip-8 allows
for up to 16 levels of nested subroutines.<br>
</font></tt>
<br>
<br>

<font size="3"><strong><em><u>
<a name="2.3">2.3</a> - Keyboard&nbsp;&nbsp;&nbsp;&nbsp;&nbsp;&nbsp;&nbsp;&nbsp;&nbsp;&nbsp;
</u></em></strong></font> <a href="http://devernay.free.fr/hacks/chip8/C8TECH10.HTM#0.0">[TOC]</a><br>
<br>
<tt><font size="3">
<a name="keyboard">The</a> computers which originally used the Chip-8 Language had a 16-key hexadecimal
keypad with the following layout:<br>
<br>
<table border="1" cellpadding="3" cellspacing="0" align="center">
<tbody><tr><td><tt>1</tt></td><td><tt>2</tt></td><td><tt>3</tt></td><td><tt>C</tt></td></tr>
<tr><td><tt>4</tt></td><td><tt>5</tt></td><td><tt>6</tt></td><td><tt>D</tt></td></tr>
<tr><td><tt>7</tt></td><td><tt>8</tt></td><td><tt>9</tt></td><td><tt>E</tt></td></tr>
<tr><td><tt>A</tt></td><td><tt>0</tt></td><td><tt>B</tt></td><td><tt>F</tt></td></tr>
</tbody></table>
<br>
This layout must be mapped into various other configurations to fit the keyboards
of today's platforms.<br>
</font></tt>
<br>
<br>

<font size="3"><strong><em><u>
<a name="2.4">2.4</a> - Display&nbsp;&nbsp;&nbsp;&nbsp;&nbsp;&nbsp;&nbsp;&nbsp;&nbsp;&nbsp;
</u></em></strong></font> <a href="http://devernay.free.fr/hacks/chip8/C8TECH10.HTM#0.0">[TOC]</a><br>
<br>
<tt><font size="3">
<a name="dispcoords">The</a> original implementation of the Chip-8 language used a 64x32-pixel monochrome display
with this format:<br>
<br>
<table border="1" width="128" height="64" cellpadding="0" cellspacing="0" align="center">
<tbody><tr><td>
<table border="0" height="60" width="100%">
<tbody><tr><td valign="top" align="left">(0,0)</td><td valign="top" align="right">(63,0)</td></tr>
<tr><td valign="bottom" align="left">(0,31)</td><td valign="bottom" align="right">(63,31)</td></tr>
</tbody></table>
</td></tr>
</tbody></table>
<br>
Some other interpreters, most notably the one on the ETI 660, also had 64x48 and
64x64 modes. To my knowledge, no current interpreter supports these modes. More
recently, Super Chip-48, an interpreter for the HP48 calculator, added a
128x64-pixel mode. This mode is now supported by most of the interpreters on other
platforms.<br>
<br>
Chip-8 draws graphics on screen through the use of sprites. A sprite is a group
of bytes which are a binary representation of the desired picture. Chip-8 sprites
may be up to 15 bytes, for a possible sprite size of 8x15.<br>
<br>
Programs may also refer to a group of sprites representing the hexadecimal
digits 0 through F. These sprites are 5 bytes long, or 8x5 pixels. The data
should be stored in the interpreter area of Chip-8 memory (0x000 to 0x1FF).
Below is a listing of each character's bytes, in binary and hexadecimal:<br>
<br>
<a name="font">&nbsp;</a>
<table align="center">
<tbody><tr>
<td>
<table border="1" cellpadding="3" cellspacing="0">
<tbody><tr><td>"0"</td><td>Binary</td><td>Hex</td></tr>
<tr>
<td><tt>
****<br>
*&nbsp;&nbsp;*<br>
*&nbsp;&nbsp;*<br>
*&nbsp;&nbsp;*<br>
****<br>
</tt></td>
<td><tt>
11110000<br>
10010000<br>
10010000<br>
10010000<br>
11110000<br>
</tt></td>
<td><tt>
0xF0<br>
0x90<br>
0x90<br>
0x90<br>
0xF0<br>
</tt></td>
</tr>
</tbody></table>
</td>
<td>
<table border="1" cellpadding="3" cellspacing="0">
<tbody><tr><td>"1"</td><td>Binary</td><td>Hex</td></tr>
<tr>
<td><tt>
&nbsp;&nbsp;*&nbsp;<br>
&nbsp;**&nbsp;<br>
&nbsp;&nbsp;*&nbsp;<br>
&nbsp;***<br>
</tt></td>
<td><tt>
00100000<br>
01100000<br>
00100000<br>
00100000<br>
01110000<br>
</tt></td>
<td><tt>
0x20<br>
0x60<br>
0x20<br>
0x20<br>
0x70<br>
</tt></td>
</tr>
</tbody></table>
</td>
</tr>
<tr>
<td>
<table border="1" cellpadding="3" cellspacing="0">
<tbody><tr><td>"2"</td><td>Binary</td><td>Hex</td></tr>
<tr>
<td><tt>
****<br>
&nbsp;&nbsp;&nbsp;*<br>
****<br>
*&nbsp;&nbsp;&nbsp;<br>
****<br>
</tt></td>
<td><tt>
11110000<br>
00010000<br>
11110000<br>
10000000<br>
11110000<br>
</tt></td>
<td><tt>
0xF0<br>
0x10<br>
0xF0<br>
0x80<br>
0xF0<br>
</tt></td>
</tr>
</tbody></table>
</td>
<td>
<table border="1" cellpadding="3" cellspacing="0">
<tbody><tr><td>"3"</td><td>Binary</td><td>Hex</td></tr>
<tr>
<td><tt>
****<br>
&nbsp;&nbsp;&nbsp;*<br>
****<br>
&nbsp;&nbsp;&nbsp;*<br>
****<br>
</tt></td>
<td><tt>
11110000<br>
00010000<br>
11110000<br>
00010000<br>
11110000<br>
</tt></td>
<td><tt>
0xF0<br>
0x10<br>
0xF0<br>
0x10<br>
0xF0<br>
</tt></td>
</tr>
</tbody></table>
</td>
</tr>

<tr>
<td>
<table border="1" cellpadding="3" cellspacing="0">
<tbody><tr><td>"4"</td><td>Binary</td><td>Hex</td></tr>
<tr>
<td><tt>
*&nbsp;&nbsp;*<br>
*&nbsp;&nbsp;*<br>
****<br>
&nbsp;&nbsp;&nbsp;*<br>
</tt></td>
<td><tt>
10010000<br>
10010000<br>
11110000<br>
00010000<br>
00010000<br>
</tt></td>
<td><tt>
0x90<br>
0x90<br>
0xF0<br>
0x10<br>
0x10<br>
</tt></td>
</tr>
</tbody></table>
</td>
<td>
<table border="1" cellpadding="3" cellspacing="0">
<tbody><tr><td>"5"</td><td>Binary</td><td>Hex</td></tr>
<tr>
<td><tt>
****<br>
*&nbsp;&nbsp;&nbsp;<br>
****<br>
&nbsp;&nbsp;&nbsp;*<br>
****<br>
</tt></td>
<td><tt>
11110000<br>
10000000<br>
11110000<br>
00010000<br>
11110000<br>
</tt></td>
<td><tt>
0xF0<br>
0x80<br>
0xF0<br>
0x10<br>
0xF0<br>
</tt></td>
</tr>
</tbody></table>
</td>
</tr>
<tr>
<td>
<table border="1" cellpadding="3" cellspacing="0">
<tbody><tr><td>"6"</td><td>Binary</td><td>Hex</td></tr>
<tr>
<td><tt>
****<br>
*&nbsp;&nbsp;&nbsp;<br>
****<br>
*&nbsp;&nbsp;*<br>
****<br>
</tt></td>
<td><tt>
11110000<br>
10000000<br>
11110000<br>
10010000<br>
11110000<br>
</tt></td>
<td><tt>
0xF0<br>
0x80<br>
0xF0<br>
0x90<br>
0xF0<br>
</tt></td>
</tr>
</tbody></table>
</td>
<td>
<table border="1" cellpadding="3" cellspacing="0">
<tbody><tr><td>"7"</td><td>Binary</td><td>Hex</td></tr>
<tr>
<td><tt>
****<br>
&nbsp;&nbsp;&nbsp;*<br>
&nbsp;&nbsp;*&nbsp;<br>
&nbsp;*&nbsp;&nbsp;<br>
</tt></td>
<td><tt>
11110000<br>
00010000<br>
00100000<br>
01000000<br>
01000000<br>
</tt></td>
<td><tt>
0xF0<br>
0x10<br>
0x20<br>
0x40<br>
0x40<br>
</tt></td>
</tr>
</tbody></table>
</td>
</tr>

<tr>
<td>
<table border="1" cellpadding="3" cellspacing="0">
<tbody><tr><td>"8"</td><td>Binary</td><td>Hex</td></tr>
<tr>
<td><tt>
****<br>
*&nbsp;&nbsp;*<br>
****<br>
*&nbsp;&nbsp;*<br>
****<br>
</tt></td>
<td><tt>
11110000<br>
10010000<br>
11110000<br>
10010000<br>
11110000<br>
</tt></td>
<td><tt>
0xF0<br>
0x90<br>
0xF0<br>
0x90<br>
0xF0<br>
</tt></td>
</tr>
</tbody></table>
</td>
<td>
<table border="1" cellpadding="3" cellspacing="0">
<tbody><tr><td>"9"</td><td>Binary</td><td>Hex</td></tr>
<tr>
<td><tt>
****<br>
*&nbsp;&nbsp;*<br>
****<br>
&nbsp;&nbsp;&nbsp;*<br>
****<br>
</tt></td>
<td><tt>
11110000<br>
10010000<br>
11110000<br>
00010000<br>
11110000<br>
</tt></td>
<td><tt>
0xF0<br>
0x90<br>
0xF0<br>
0x10<br>
0xF0<br>
</tt></td>
</tr>
</tbody></table>
</td>
</tr>
<tr>
<td>
<table border="1" cellpadding="3" cellspacing="0">
<tbody><tr><td>"A"</td><td>Binary</td><td>Hex</td></tr>
<tr>
<td><tt>
****<br>
*&nbsp;&nbsp;*<br>
****<br>
*&nbsp;&nbsp;*<br>
*&nbsp;&nbsp;*<br>
</tt></td>
<td><tt>
11110000<br>
10010000<br>
11110000<br>
10010000<br>
10010000<br>
</tt></td>
<td><tt>
0xF0<br>
0x90<br>
0xF0<br>
0x90<br>
0x90<br>
</tt></td>
</tr>
</tbody></table>
</td>
<td>
<table border="1" cellpadding="3" cellspacing="0">
<tbody><tr><td>"B"</td><td>Binary</td><td>Hex</td></tr>
<tr>
<td><tt>
***&nbsp;<br>
*&nbsp;&nbsp;*<br>
***&nbsp;<br>
*&nbsp;&nbsp;*<br>
***&nbsp;<br>
</tt></td>
<td><tt>
11100000<br>
10010000<br>
11100000<br>
10010000<br>
11100000<br>
</tt></td>
<td><tt>
0xE0<br>
0x90<br>
0xE0<br>
0x90<br>
0xE0<br>
</tt></td>
</tr>
</tbody></table>
</td>
</tr>

<tr>
<td>
<table border="1" cellpadding="3" cellspacing="0">
<tbody><tr><td>"C"</td><td>Binary</td><td>Hex</td></tr>
<tr>
<td><tt>
****<br>
*&nbsp;&nbsp;&nbsp;<br>
****<br>
</tt></td>
<td><tt>
11110000<br>
10000000<br>
10000000<br>
10000000<br>
11110000<br>
</tt></td>
<td><tt>
0xF0<br>
0x80<br>
0x80<br>
0x80<br>
0xF0<br>
</tt></td>
</tr>
</tbody></table>
</td>
<td>
<table border="1" cellpadding="3" cellspacing="0">
<tbody><tr><td>"D"</td><td>Binary</td><td>Hex</td></tr>
<tr>
<td><tt>
***&nbsp;<br>
*&nbsp;&nbsp;*<br>
*&nbsp;&nbsp;*<br>
*&nbsp;&nbsp;*<br>
***&nbsp;<br>
</tt></td>
<td><tt>
11100000<br>
10010000<br>
10010000<br>
10010000<br>
11100000<br>
</tt></td>
<td><tt>
0xE0<br>
0x90<br>
0x90<br>
0x90<br>
0xE0<br>
</tt></td>
</tr>
</tbody></table>
</td>
</tr>
<tr>
<td>
<table border="1" cellpadding="3" cellspacing="0">
<tbody><tr><td>"E"</td><td>Binary</td><td>Hex</td></tr>
<tr>
<td><tt>
****<br>
*&nbsp;&nbsp;&nbsp;<br>
****<br>
*&nbsp;&nbsp;&nbsp;<br>
****<br>
</tt></td>
<td><tt>
11110000<br>
10000000<br>
11110000<br>
10000000<br>
11110000<br>
</tt></td>
<td><tt>
0xF0<br>
0x80<br>
0xF0<br>
0x80<br>
0xF0<br>
</tt></td>
</tr>
</tbody></table>
</td>
<td>
<table border="1" cellpadding="3" cellspacing="0">
<tbody><tr><td>"F"</td><td>Binary</td><td>Hex</td></tr>
<tr>
<td><tt>
****<br>
*&nbsp;&nbsp;&nbsp;<br>
****<br>
*&nbsp;&nbsp;&nbsp;<br>
</tt></td>
<td><tt>
11110000<br>
10000000<br>
11110000<br>
10000000<br>
10000000<br>
</tt></td>
<td><tt>
0xF0<br>
0x80<br>
0xF0<br>
0x80<br>
0x80<br>
</tt></td>
</tr>
</tbody></table>
</td>
</tr>

</tbody></table>
</font></tt>
<br>
<br>
<font size="3"><strong><em><u>
<a name="2.5">2.5</a> - Timers &amp; Sound&nbsp;&nbsp;&nbsp;&nbsp;&nbsp;&nbsp;&nbsp;&nbsp;&nbsp;&nbsp;
</u></em></strong></font> <a href="http://devernay.free.fr/hacks/chip8/C8TECH10.HTM#0.0">[TOC]</a><br>
<br>
<tt><font size="3">
Chip-8 provides 2 timers, a delay timer and a sound timer.<br>
<br>
The delay timer is active whenever the delay timer register (DT) is non-zero.
This timer does nothing more than subtract 1 from the value of DT at a rate
of 60Hz. When DT reaches 0, it deactivates.<br>
<br>
The sound timer is active whenever the sound timer register (ST) is non-zero.
This timer also decrements at a rate of 60Hz, however, as long as ST's value is
greater than zero, the Chip-8 buzzer will sound. When ST reaches zero, the sound
timer deactivates.<br>
<br>
The sound produced by the Chip-8 interpreter has only one tone. The frequency
of this tone is decided by the author of the interpreter.<br>
</font></tt>
<br>
<br>

<font size="4"><strong><em><u>
<a name="3.0">3.0</a> - Chip-8 Instructions&nbsp;&nbsp;&nbsp;&nbsp;&nbsp;&nbsp;&nbsp;&nbsp;&nbsp;&nbsp;
</u></em></strong></font> <a href="http://devernay.free.fr/hacks/chip8/C8TECH10.HTM#0.0">[TOC]</a><br>
<br>
<tt><font size="3">
The original implementation of the Chip-8 language includes 36 different
instructions, including math, graphics, and flow control functions.<br>
<br>
Super Chip-48 added an additional 10 instructions, for a total of 46.<br>
<br>
All instructions are 2 bytes long and are stored most-significant-byte first.
In memory, the first byte of each instruction should be located at an even
addresses. If a program includes sprite data, it should be padded so any
instructions following it will be properly situated in RAM.<br>
<br>
This document does not yet contain descriptions of the Super Chip-48 instructions.
They are, however, listed below.<br>
<br>
In these listings, the following variables are used:<br>
<br>
<em>nnn</em> or <em>addr</em> - A 12-bit value, the lowest 12 bits of the instruction<br>
<em>n</em> or <em>nibble</em> - A 4-bit value, the lowest 4 bits of the instruction<br>
<em>x</em> - A 4-bit value, the lower 4 bits of the high byte of the instruction<br>
<em>y</em> - A 4-bit value, the upper 4 bits of the low byte of the instruction<br>
<em>kk</em> or <em>byte</em> - An 8-bit value, the lowest 8 bits of the instruction<br>
</font></tt>
<br>
<br>
<font size="3"><strong><em><u>
<a name="3.1">3.1</a> - Standard Chip-8 Instructions&nbsp;&nbsp;&nbsp;&nbsp;&nbsp;&nbsp;&nbsp;&nbsp;&nbsp;&nbsp;
</u></em></strong></font> <a href="http://devernay.free.fr/hacks/chip8/C8TECH10.HTM#0.0">[TOC]</a><br>
<br>
<tt><font size="3">
<strong><a name="0nnn">0<em>nnn</em></a> - SYS <em>addr</em></strong><br>
Jump to a machine code routine at <em>nnn</em>.<br>
<br>
This instruction is only used on the old computers on which Chip-8 was originally implemented. It is ignored by modern interpreters.<br>
<br>
<br>

<strong><a name="00E0">00E0</a> - CLS</strong><br>
Clear the display.<br>
<br>
<br>

<strong><a name="00EE">00EE</a> - RET</strong><br>
Return from a subroutine.<br>
<br>
The interpreter sets the program counter to the address at the top of the
stack, then subtracts 1 from the stack pointer.<br>
<br>
<br>

<strong><a name="1nnn">1<em>nnn</em></a> - JP <em><em>addr</em></em></strong><br>
Jump to location <em>nnn</em>.<br>
<br>
The interpreter sets the program counter to <em>nnn</em>.<br>
<br>
<br>

<strong><a name="2nnn">2<em>nnn</em></a> - CALL <em>addr</em></strong><br>
Call subroutine at <em>nnn</em>.<br>
<br>
The interpreter increments the stack pointer, then puts the current PC on
the top of the stack. The PC is then set to <em>nnn</em>.<br>
<br>
<br>

<strong><a name="3xkk">3<em>xkk</em></a> - SE V<em>x</em>, <em>byte</em></strong><br>
Skip next instruction if V<em>x</em> = <em>kk</em>.<br>
<br>
The interpreter compares register V<em>x</em> to <em>kk</em>, and if they are
equal, increments the program counter by 2.<br>
<br>
<br>

<strong><a name="4xkk">4<em>xkk</em></a> - SNE V<em>x</em>, <em>byte</em></strong><br>
Skip next instruction if V<em>x</em> != <em>kk</em>.<br>
<br>
The interpreter compares register V<em>x</em> to <em>kk</em>, and if they are
not equal, increments the program counter by 2.<br>
<br>
<br>

<strong><a name="5xy0">5<em>xy</em>0</a> - SE V<em>x</em>, V<em>y</em></strong><br>
Skip next instruction if V<em>x</em> = V<em>y</em>.<br>
<br>
The interpreter compares register V<em>x</em> to register V<em>y</em>, and if
they are equal, increments the program counter by 2.<br>
<br>
<br>

<strong><a name="6xkk">6<em>xkk</em></a> - LD V<em>x</em>, <em>byte</em></strong><br>
Set V<em>x</em> = <em>kk</em>.<br>
<br>
The interpreter puts the value <em>kk</em> into register V<em>x</em>.<br>
<br>
<br>

<strong><a name="7xkk">7<em>xkk</em></a> - ADD V<em>x</em>, <em>byte</em></strong><br>
Set V<em>x</em> = V<em>x</em> + <em>kk</em>.<br>
<br>
Adds the value <em>kk</em> to the value of register V<em>x</em>, then stores the result in V<em>x</em>.
<br>
<br>

<strong><a name="8xy0">8<em>xy</em>0</a> - LD V<em>x</em>, V<em>y</em></strong><br>
Set V<em>x</em> = V<em>y</em>.<br>
<br>
Stores the value of register V<em>y</em> in register V<em>x</em>.<br>
<br>
<br>

<strong><a name="8xy1">8<em>xy</em>1</a> - OR V<em>x</em>, V<em>y</em></strong><br>
Set Vx = V<em>x</em> OR V<em>y</em>.<br>
<br>
Performs a bitwise OR on the values of V<em>x</em> and V<em>y</em>, then stores the result in V<em>x</em>. A
bitwise OR compares the corrseponding bits from two values, and if either bit
is 1, then the same bit in the result is also 1. Otherwise, it is 0. <br>
<br>
<br>

<strong><a name="8xy2">8<em>xy</em>2</a> - AND V<em>x</em>, V<em>y</em></strong><br>
Set V<em>x</em> = V<em>x</em> AND V<em>y</em>.<br>
<br>
Performs a bitwise AND on the values of V<em>x</em> and V<em>y</em>, then stores the result in V<em>x</em>. A
bitwise AND compares the corrseponding bits from two values, and if both bits
are 1, then the same bit in the result is also 1. Otherwise, it is 0. <br>
<br>
<br>

<strong><a name="8xy3">8<em>xy</em>3</a> - XOR V<em>x</em>, V<em>y</em></strong><br>
Set V<em>x</em> = V<em>x</em> XOR V<em>y</em>.<br>
<br>
Performs a bitwise exclusive OR on the values of V<em>x</em> and V<em>y</em>, then stores the
result in V<em>x</em>. An exclusive OR compares the corrseponding bits from two values,
and if the bits are not both the same, then the corresponding bit in the result
is set to 1. Otherwise, it is 0. <br>
<br>
<br>

<strong><a name="8xy4">8<em>xy</em>4</a> - ADD V<em>x</em>, V<em>y</em></strong><br>
Set V<em>x</em> = V<em>x</em> + V<em></em>y, set VF = carry.<br>
<br>
The values of V<em>x</em> and V<em>y</em> are added together. If the result is greater than 8 bits
(i.e., &gt; 255,) VF is set to 1, otherwise 0. Only the lowest 8 bits of the result
are kept, and stored in V<em>x</em>.<br>
<br>
<br>

<strong><a name="8xy5">8<em>xy</em>5</a> - SUB V<em>x</em>, V<em>y</em></strong><br>
Set V<em>x</em> = V<em>x</em> - V<em>y</em>, set VF = NOT borrow.<br>
<br>
If V<em>x</em> &gt; V<em>y</em>, then VF is set to 1, otherwise 0. Then V<em>y</em> is subtracted from V<em>x</em>,
and the results stored in V<em>x</em>.<br>
<br>
<br>

<strong><a name="8xy6">8<em>xy</em>6</a> - SHR V<em>x</em> {, V<em>y</em>}</strong><br>
Set V<em>x</em> = V<em>x</em> SHR 1.<br>
<br>
If the least-significant bit of V<em>x</em> is 1, then VF is set to 1, otherwise 0. Then
V<em>x</em> is divided by 2.<br>
<br>
<br>

<strong><a name="8xy7">8<em>xy</em>7</a> - SUBN V<em>x</em>, V<em>y</em></strong><br>
Set V<em>x</em> = V<em>y</em> - V<em>x</em>, set VF = NOT borrow.<br>
<br>
If V<em>y</em> &gt; V<em>x</em>, then VF is set to 1, otherwise 0. Then V<em>x</em> is subtracted from V<em>y</em>,
and the results stored in V<em>x</em>.<br>
<br>
<br>

<strong><a name="8xyE">8<em>xy</em>E</a> - SHL V<em>x</em> {, V<em>y</em>}</strong><br>
Set V<em>x</em> = V<em>x</em> SHL 1.<br>
<br>
If the most-significant bit of Vx is 1, then VF is set to 1, otherwise to 0. Then
V<em>x</em> is multiplied by 2.<br>
<br>
<br>

<strong><a name="9xy0">9<em>xy</em>0</a> - SNE V<em>x</em>, V<em>y</em></strong><br>
Skip next instruction if V<em>x</em> != V<em>y</em>.<br>
<br>
The values of V<em>x</em> and V<em>y</em> are compared, and if they are not equal, the program
counter is increased by 2.<br>
<br>
<br>

<strong><a name="Annn">A<em>nnn</em></a> - LD I, <em>addr</em></strong><br>
Set I = <em>nnn</em>.<br>
<br>
The value of register I is set to <em>nnn</em>.<br>
<br>
<br>

<strong><a name="Bnnn">B<em>nnn</em></a> - JP V0, <em>addr</em></strong><br>
Jump to location <em>nnn</em> + V0.<br>
<br>
The program counter is set to <em>nnn</em> plus the value of V0.<br>
<br>
<br>

<strong><a name="Cxkk">C<em>xkk</em></a> - RND V<em>x</em>, <em>byte</em></strong><br>
Set V<em>x</em> = random <em>byte</em> AND <em>kk</em>.<br>
<br>
The interpreter generates a random number from 0 to 255, which is then ANDed
with the value kk. The results are stored in V<em>x</em>. See instruction <a href="http://devernay.free.fr/hacks/chip8/C8TECH10.HTM#8xy2">8<em>xy</em>2</a>
for more information on AND.<br>
<br>
<br>

<strong><a name="Dxyn">D<em>xyn</em></a> - DRW V<em>x</em>, V<em>y</em>, <em>nibble</em></strong><br>
Display <em>n</em>-byte sprite starting at memory location I at (V<em>x</em>, V<em>y</em>), set VF = collision.<br>
<br>
The interpreter reads <em>n</em> bytes from memory, starting at the address stored in
I. These bytes are then displayed as sprites on screen at coordinates (V<em>x</em>, V<em>y</em>).
Sprites are XORed onto the existing screen. If this causes any pixels to be
erased, VF is set to 1, otherwise it is set to 0. If the sprite is positioned
so part of it is outside the coordinates of the display, it wraps around to
the opposite side of the screen. See instruction <a href="http://devernay.free.fr/hacks/chip8/C8TECH10.HTM#8xy3">8<em>xy</em>3</a> for
more information on XOR, and section 2.4, <a href="http://devernay.free.fr/hacks/chip8/2.4">Display</a>, for
more information on the Chip-8 screen and sprites.<br>
<br>
<br>

<strong><a name="Ex9E">E<em>x</em>9E</a> - SKP V<em>x</em></strong><br>
Skip next instruction if key with the value of V<em>x</em> is pressed.<br>
<br>
Checks the keyboard, and if the key corresponding to the value of V<em>x</em> is currently
in the down position, PC is increased by 2.<br>
<br>
<br>

<strong><a name="ExA1">E<em>x</em>A1</a> - SKNP V<em>x</em></strong><br>
Skip next instruction if key with the value of V<em>x</em> is not pressed.<br>
<br>
Checks the keyboard, and if the key corresponding to the value of V<em>x</em> is currently
in the up position, PC is increased by 2.<br>
<br>
<br>

<strong><a name="Fx07">F<em>x</em>07</a> - LD V<em>x</em>, DT</strong><br>
Set V<em>x</em> = delay timer value.<br>
<br>
The value of DT is placed into V<em>x</em>.<br>
<br>
<br>

<strong><a name="Fx0A">F<em>x</em>0A</a> - LD V<em>x</em>, K</strong><br>
Wait for a key press, store the value of the key in V<em>x</em>.<br>
<br>
All execution stops until a key is pressed, then the value of that key
is stored in V<em>x</em>.<br>
<br>
<br>

<strong><a name="Fx15">F<em>x</em>15</a> - LD DT, V<em>x</em></strong><br>
Set delay timer = V<em>x</em>.<br>
<br>
DT is set equal to the value of V<em>x</em>.<br>
<br>
<br>

<strong><a name="Fx18">F<em>x</em>18</a> - LD ST, V<em>x</em></strong><br>
Set sound timer = V<em>x</em>.<br>
<br>
ST is set equal to the value of V<em>x</em>.<br>
<br>
<br>

<strong><a name="Fx1E">F<em>x</em>1E</a> - ADD I, V<em>x</em></strong><br>
Set I = I + V<em>x</em>.<br>
<br>
The values of I and V<em>x</em> are added, and the results are stored in I.<br>
<br>
<br>

<strong><a name="Fx29">F<em>x</em>29</a> - LD F, V<em>x</em></strong><br>
Set I = location of sprite for digit V<em>x</em>.<br>
<br>
The value of I is set to the location for the hexadecimal sprite corresponding to
the value of V<em>x</em>. See section 2.4, <a href="http://devernay.free.fr/hacks/chip8/C8TECH10.HTM#2.4">Display</a>, for more information
on the Chip-8 hexadecimal font.<br>
<br>
<br>

<strong><a name="Fx33">F<em>x</em>33</a> - LD B, V<em>x</em></strong><br>
Store BCD representation of V<em>x</em> in memory locations I, I+1, and I+2.<br>
<br>
The interpreter takes the decimal value of V<em>x</em>, and places the hundreds
digit in memory at location in I, the tens digit at location I+1, and the
ones digit at location I+2.<br>
<br>
<br>

<strong><a name="Fx55">F<em>x</em>55</a> - LD [I], V<em>x</em></strong><br>
Store registers V0 through V<em>x</em> in memory starting at location I.<br>
<br>
The interpreter copies the values of registers V0 through V<em>x</em> into memory,
starting at the address in I.<br>
<br>
<br>

<strong><a name="Fx65">F<em>x</em>65</a> - LD V<em>x</em>, [I]</strong><br>
Read registers V0 through V<em>x</em> from memory starting at location I.<br>
<br>
The interpreter reads values from memory starting at location I into registers
V0 through V<em>x</em>.<br>
<br>
<br>

</font></tt>
<font size="3"><strong><em><u>
<a name="3.2">3.2</a> - Super Chip-48 Instructions&nbsp;&nbsp;&nbsp;&nbsp;&nbsp;&nbsp;&nbsp;&nbsp;&nbsp;&nbsp;
</u></em></strong></font> <a href="http://devernay.free.fr/hacks/chip8/C8TECH10.HTM#0.0">[TOC]</a><br>
<br>
<tt><font size="3">
<strong><a name="00Cn">00C<em>n</em></a> - SCD <em>nibble</em></strong><br>
<strong><a name="00FB">00FB</a> - SCR</strong><br>
<strong><a name="00FC">00FC</a> - SCL</strong><br>
<strong><a name="00FD">00FD</a> - EXIT</strong><br>
<strong><a name="00FE">00FE</a> - LOW</strong><br>
<strong><a name="00FF">00FF</a> - HIGH</strong><br>
<strong><a name="Dxy0">D<em>xy</em>0</a> - DRW V<em>x</em>, V<strong>y</strong>, 0</strong><br>
<strong><a name="Fx30">F<em>x</em>30</a> - LD HF, V<em>x</em></strong><br>
<strong><a name="Fx75">F<em>x</em>75</a> - LD R, V<em>x</em></strong><br>
<strong><a name="Fx85">F<em>x</em>85</a> - LD V<em>x</em>, R</strong><br>
<br>
<br>
<br>

</font></tt>
<font size="4"><strong><em><u>
<a name="4.0">4.0</a> - Interpreters&nbsp;&nbsp;&nbsp;&nbsp;&nbsp;&nbsp;&nbsp;&nbsp;&nbsp;&nbsp;
</u></em></strong></font> <a href="http://devernay.free.fr/hacks/chip8/C8TECH10.HTM#0.0">[TOC]</a><br>
<br>
<tt><font size="3">
Below is a list of every Chip-8 interpreter I could find on the World Wide Web:<br>
<br>
<table border="1" cellspacing="0" cellpadding="3" align="center">
<tbody><tr>
<td><strong>Title</strong></td>
<td><strong>Version</strong></td>
<td><strong>Author</strong></td>
<td><strong>Platform(s)</strong></td>
</tr>
<tr>
<td>Chip-48</td>
<td>2.20</td>
<td>Anrdreas Gustafsson</td>
<td>HP48</td>
</tr>
<tr>
<td>Chip8</td>
<td>1.1</td>
<td>Paul Robson</td>
<td>DOS</td>
</tr>
<tr>
<td>Chip-8 Emulator</td>
<td>2.0.0</td>
<td>David Winter</td>
<td>DOS</td>
</tr>
<tr>
<td>CowChip</td>
<td>0.1</td>
<td>Thomas P. Greene</td>
<td>Windows 3.1</td>
</tr>
<tr>
<td>DREAM MON</td>
<td>1.1</td>
<td>Paul Hayter</td>
<td>Amiga</td>
</tr>
<tr>
<td>Super Chip-48</td>
<td>1.1</td>
<td>Based on Chip-48, modified by Erik Bryntse</td>
<td>HP48</td>
</tr>
<tr>
<td>Vision-8</td>
<td>1.0</td>
<td>Marcel de Kogel</td>
<td>DOS, Adam, MSX, ColecoVision</td>
</tr>
</tbody></table>
</font></tt>
<br>
<br>

<font size="4"><strong><em><u>
<a name="5.0">5.0</a> - Credits&nbsp;&nbsp;&nbsp;&nbsp;&nbsp;&nbsp;&nbsp;&nbsp;&nbsp;&nbsp;
</u></em></strong></font> <a href="http://devernay.free.fr/hacks/chip8/C8TECH10.HTM#0.0">[TOC]</a><br>
<br>
<tt><font size="3">
This document was compiled by <a href="mailto:cowgod@rockpile.com">Thomas P. Greene</a>.<br>
<br>
<strong>Sources include:</strong><br>
<ul>
<li>My own hacking.</li>
<li>E-mail between David Winter and myself.</li>
<li>David Winter's <u>Chip-8 Emulator</u> documentation.</li>
<li>Christian Egeberg's <u>Chipper</u> documentation.</li>
<li>Marcel de Kogel's <u>Vision-8</u> source code.</li>
<li>Paul Hayter's <u>DREAM MON</u> documentation.</li>
<li>Paul Robson's web page.</li>
<li>Andreas Gustafsson's <u>Chip-48</u> documentation.</li>
</ul>
</font></tt>
<br>
<br>
<br>
<font size="2"><tt>August 30, 1997 06:00:00</tt></font>

</body></html>

思路

首先需要区分开 2^N2N2N 很好判断,直接看数字能否被2整除即可。如果想用类似 2N 的思路去判别 2^N,可能就需要递归计算 N=N/2

不过借助二进制表示的性质,可以简化 2^N 的判别。

假设一个正整数 val 的表示形式为1XX...X

  • 假如它是2的幂,val 的表示形式必然是 100...0,并且 val-1 的表示形式会是 011..1。则有 val & (val-1) == 0

  • 假如它不是2的幂, val 的表示形式会是 1XX...X,它的末尾数字中至少有一位为1, 则 val-1 无需借最开始的1val-1 表示形式会是 1XX...X。则有 val & (val-1) != 0

而任意一个正整数 val 要么是2的幂,要么不是2的幂,上面讨论已经概括了所有的正整数。

上述两个命题的逆否命题分别为:

对于一个正整数 val

  • 假如 val & (val-1) != 0,则它不是2的幂
  • 假如 val & (val-1) == 0,则它是2的幂

代码

1
2
3
4
bool isPowOf2(int val) {
// == 优先级高于 &
return (val & (val - 1)) == 0;
}

设备

  • Newifi D2
  • RaspberryPi 3B+
  • 笔记本电脑

网络拓扑

  • Raspberry Pi 3B+Newifi D2 CPU(Openwrt) 的地位是类似的,它们都同时属于 VLAN-1VLAN-2eth0.1 处理 VLAN-1 的数据包,eth0.2 处理 VLAN-2 的数据包
  • Raspberry Pi 3B+Newifi D2 CPU(Openwrt) 的不同之处仅仅在于,Raspberry Pi 3B+ 通过外部接口LAN1接入交换机,而Newifi D2 CPU(Openwrt)通过内部接口Internal Port接入交换机
  • Newifi D2 CPU(Openwrt) 内部通过网桥 br-laneth0.1wlan0wlan1 桥接在一起,使得 wlan0wlan1 可以和 eth0.1 所属的 vlan1 互通

配置过程

VLAN配置

交换机VLAN配置

  • 路由器内嵌可编程交换机的 LAN2/LAN3/LAN4 属于 untagged VLAN-1
  • 路由器内嵌可编程交换机的 WAN 属于 untagged VLAN-2
  • 路由器内嵌可编程交换机的 LAN1Internal Port 属于 tagged VLAN-1 & tagged VLAN-2

树莓派VLAN接口配置

树莓派的 eth0.1 属于 VLAN 1eth0.2 属于 VLAN 2,到达 eth0 的数据包会根据其中包含的 VLAN ID 传递到对应的VLAN虚拟接口,而从VLAN虚拟接口发出的数据包也会打上对应的 VLAN ID (后两句是我的猜测,然而由于我并不了解Linux协议栈以及虚拟接口的工作原理,无法保证准确性,大致工作原理可能类似)。其实路由器的 eth0.1eth0.2 也是这样的。

配置方法

  1. 通过IP命令配置
    1
    2
    sudo ip link add link eth0 name eth0.1 type vlan id 1
    sudo ip link add link eth0 name eth0.2 type vlan id 2
  2. /etc/network/interfaces 中配置
    1
    2
    3
    4
    5
    6
    7
    8
    9
    10
    11
    12
    13
    # interfaces(5) file used by ifup(8) and ifdown(8)

    # Please note that this file is written to be used with dhcpcd
    # For static IP, consult /etc/dhcpcd.conf and 'man dhcpcd.conf'

    # Include files from /etc/network/interfaces.d:
    source-directory /etc/network/interfaces.d

    auto eth0.1
    iface eth0.1 inet manual

    auto eth0.2
    iface eth0.2 inet manual

为树莓派的 eth0.1 配置静态IP

树莓派默认会通过 dhcpcd 为各个接口配置IP,可以为树莓派的eth0.1配置静态IP便于进行局域网访问并进一步作为网关。可以在 /etc/dhcpcd.conf 中配置:

1
2
interface eth0.1
static ip_address=192.168.2.10/24

如果仅仅希望阻止 dhcpcd 自动为某些接口通过局域网中的DHCP服务器配置IP,可以这样配置:

1
2
# deny
denyinterfaces eth0 eth0.2

树莓派利用PPPoE连接网络

Raspberry Pi 3B+ 可以通过 eth0.2 与经 WAN 连接的运营商通信,就像 Newifi D2 CPU(Openwrt) 一样。

连接步骤

  1. 安装 pppoe 相关软件包
    1
    sudo apt install pppoe pppoeconf pppstatus
  2. 配置 pppoe 连接信息
    1
    sudo pppoeconf eth0.2
    然后根据提示输入账号和密码即可,账号和密码只需配置一次
  3. 连接管理
    1
    2
    3
    sudo pon dsl-provider #建立连接
    sudo poff #断开连接
    sudo plog #查看连接日志

连接成功之后,通过 ip -d addr 就能看到PPPoE接口 ppp0,下面的内容还顺便展示了 eth0.1eth0.2 的接口信息,可以忽略其中的 wlan0,树莓派的 wlan0 其实连接到了路由器的无线网络 Openwrt 当中,与本次实验关系不大。

1
2
3
4
5
6
7
8
9
10
11
12
13
14
15
16
17
18
19
20
21
22
23
2: eth0: <BROADCAST,MULTICAST,UP,LOWER_UP> mtu 1500 qdisc pfifo_fast state UP group default qlen 1000
link/ether b8:27:eb:98:76:96 brd ff:ff:ff:ff:ff:ff promiscuity 0 minmtu 68 maxmtu 9000 numtxqueues 1 numrxqueues 1 gso_max_size 8824 gso_max_segs 65535

3: wlan0: <BROADCAST,MULTICAST,UP,LOWER_UP> mtu 1500 qdisc pfifo_fast state UP group default qlen 1000
link/ether b8:27:eb:cd:23:c3 brd ff:ff:ff:ff:ff:ff promiscuity 0 minmtu 68 maxmtu 1500 numtxqueues 1 numrxqueues 1 gso_max_size 65536 gso_max_segs 65535
inet 192.168.2.151/24 brd 192.168.2.255 scope global dynamic noprefixroute wlan0
valid_lft 27475sec preferred_lft 22075sec

4: eth0.1@eth0: <BROADCAST,MULTICAST,UP,LOWER_UP> mtu 1500 qdisc noqueue state UP group default qlen 1000
link/ether b8:27:eb:98:76:96 brd ff:ff:ff:ff:ff:ff promiscuity 0 minmtu 0 maxmtu 65535
vlan protocol 802.1Q id 1 <REORDER_HDR> numtxqueues 1 numrxqueues 1 gso_max_size 8824 gso_max_segs 65535
inet 192.168.2.10/24 brd 192.168.2.255 scope global noprefixroute eth0.1
valid_lft forever preferred_lft forever

5: eth0.2@eth0: <BROADCAST,MULTICAST,UP,LOWER_UP> mtu 1500 qdisc noqueue state UP group default qlen 1000
link/ether b8:27:eb:98:76:96 brd ff:ff:ff:ff:ff:ff promiscuity 0 minmtu 0 maxmtu 65535
vlan protocol 802.1Q id 2 <REORDER_HDR> numtxqueues 1 numrxqueues 1 gso_max_size 8824 gso_max_segs 65535

6: ppp0: <POINTOPOINT,MULTICAST,NOARP,UP,LOWER_UP> mtu 1492 qdisc pfifo_fast state UNKNOWN group default qlen 3
link/ppp promiscuity 0 minmtu 0 maxmtu 0
ppp numtxqueues 1 numrxqueues 1 gso_max_size 65536 gso_max_segs 65535
inet 100.82.232.18 peer 100.82.0.1/32 scope global ppp0
valid_lft forever preferred_lft forever

树莓派配置路由表

如果树莓派在建立PPPoE之前不存在默认路由,那么在PPPoE连接过程中应该会自动添加至新建的 PPPoE接口 ppp0 的默认路由,否则,它将不会覆盖原本就存在的默认路由。
由于我的树莓派还同时经树莓派的无线网卡 wlan0 连接了路由器的无线网络,原本存在默认路由,故在连接PPPoE之后需要配置默认路由,从而确保树莓派通过其自身建立的 ppp0 连接互联网,而非路由器。

配置好之后的默认路由为PPPoE接口 ppp0

1
2
3
4
5
6
pi@rasp:~ $ ip route

default dev ppp0 scope link
100.82.0.1 dev ppp0 proto kernel scope link src 100.82.232.18
192.168.2.0/24 dev eth0.1 proto dhcp scope link src 192.168.2.10 metric 204
192.168.2.0/24 dev wlan0 proto dhcp scope link src 192.168.2.151 metric 303

网络测试1

在完成上述配置之后,如果不出意外的话,树莓派应该就可以连接互联网了,可以随便ping一下百度进行测试,或者ping一个知名如 114.114.114.114,如果能ping IP却不能ping 域名,可以检查下DNS设置,在此不再赘述。

配置NAT(Network Address Translation)

完成上面的配置之后,树莓派本身可以通过其建立的PPPoE连接互联网,但局域网中的其他设备却仍然无法访问互联网,那么如何使其他设备可以借助树莓派的PPPoE访问互联网呢?答案是NAT。

NAT的中文名称是网络地址转换,配置好NAT之后,局域网其他设备就可以将树莓派作为网关,然后该设备(称为设备A)的网络协议栈就会将目的地址为外部网络的数据包发往树莓派(IP数据包目的地址仍然是真实目的IP,MAC数据包的目的地址是树莓派,准确地说是树莓派的eth0.1),树莓派会将原始IP数据包的 src 改为自身PPPoE接口ppp0的IP地址,然后发往目标设备,并且,会将目标设备返回的IP数据包的 dst 改为设备A的IP地址,使得局域网设备可以透明地与互联网中的设备进行通信。
如果想要深入了解NAT,可以参考Network address translation - WikipediaNAT - Network Address Translation,前一篇文章侧重于NAT的概念和实现,后一篇文章侧重于Linux系统中NAT的配置和用途。

配置方法
配置NAT需要使用*nux的防火墙工具,比如 iptables。关于防火墙可以参考Linux防火墙配置(iptables, firewalld)

在本次实验当中,我使用iptables,并且配置为masquerade,除了masquerade还可以采用snat。他们的区别在于,snat需要指定要改写为哪个IP地址,这种情况适用于静态IP用户,而PPPoE分配的IP一般为动态IP,这时一般应该采用masquerade,在这种情况下,无需指定要改写为哪个IP,内核会自动读取对应网络接口的IP地址进行改写。

不过在配置NAT之前,需要先开启Linux内核的数据包转发功能,默认情况下会禁止转发数据包。配置命令如下:

1
sudo bash -c 'echo 1 > /proc/sys/net/ipv4/ip_forward'

下面是NAT配置命令:

1
sudo iptables -t nat -A POSTROUTING -s 192.168.2.0/24 -j MASQUERADE

上面的命令的意思是这样的,在nat表中的POSTROUTING链中添加一条规则:如果IP数据包的 src 属于 192.168.2.0/24 网段,则在发送出去之前,改写其 src 为出口网络接口的IP地址。同时,该规则隐含了一条反向规则,将应答数据包的 dst 改为真实的 dst(即被改掉的 src )。实际实现过程中,只改IP应该是不够的,可能还需要修改sport,并对应修改应答数据包的dport

网络测试2

完成上述配置之后,为局域网设备设置合适的IP地址,网关设为树莓派的局域网IP 192.168.2.10,配置好DNS,应该就可以访问互联网了。

我的测试设备IP是这样的:

  • 笔记本电脑:无线网卡连接至路由器的无线网 Openwrt-5G,IP为 192.168.2.51Openwrt-5G经路由器的br-lan与路由器的eth0.1桥接在一起,从而能够接入vlan1
  • 树莓派:通过 LAN1 接入 vlan-1vlan-2eth0.1 的IP为 192.168.2.10,经eth0.2建立的PPPoE连接 ppp0 的IP为 100.82.232.18

测试方法为,在笔记本电脑上 ping 8.8.4.4,然后在树莓派的 eth0.1ppp0 上抓包。测试结果如下:

ping 8.8.4.4

1
2
3
4
5
6
7
8
9
10
11
12
PS C:\Users\lpy> ping -n 4 8.8.4.4

正在 Ping 8.8.4.4 具有 32 字节的数据:
来自 8.8.4.4 的回复: 字节=32 时间=208ms TTL=113
来自 8.8.4.4 的回复: 字节=32 时间=209ms TTL=113

8.8.4.4 的 Ping 统计信息:
数据包: 已发送 = 4,已接收 = 4,丢失 = 0 (0% 丢失),
往返行程的估计时间(以毫秒为单位):
最短 = 208ms,最长 = 209ms,平均 = 208ms

抓包结果

1
2
3
4
5
6
7
8
9
10
11
12
13
14
15
16
17
18
19
20
21
22
23
24
25
26
27
28
29
30
31
pi@rasp:~ $ sudo tcpdump -i eth0.1 dst 8.8.4.4
tcpdump: verbose output suppressed, use -v or -vv for full protocol decode
listening on eth0.1, link-type EN10MB (Ethernet), capture size 262144 bytes
14:20:42.281074 IP 192.168.2.51 > dns.google: ICMP echo request, id 1, seq 346, length 40
14:20:43.292657 IP 192.168.2.51 > dns.google: ICMP echo request, id 1, seq 347, length 40
14:20:44.311231 IP 192.168.2.51 > dns.google: ICMP echo request, id 1, seq 348, length 40
14:20:45.333757 IP 192.168.2.51 > dns.google: ICMP echo request, id 1, seq 349, length 40

pi@rasp:~ $ sudo tcpdump -i eth0.1 src 8.8.4.4
tcpdump: verbose output suppressed, use -v or -vv for full protocol decode
listening on eth0.1, link-type EN10MB (Ethernet), capture size 262144 bytes
14:20:42.487554 IP dns.google > 192.168.2.51: ICMP echo reply, id 1, seq 346, length 40
14:20:43.499652 IP dns.google > 192.168.2.51: ICMP echo reply, id 1, seq 347, length 40
14:20:44.518266 IP dns.google > 192.168.2.51: ICMP echo reply, id 1, seq 348, length 40
14:20:45.540728 IP dns.google > 192.168.2.51: ICMP echo reply, id 1, seq 349, length 40

pi@rasp:~ $ sudo tcpdump -i ppp0 dst 8.8.4.4
tcpdump: verbose output suppressed, use -v or -vv for full protocol decode
listening on ppp0, link-type LINUX_SLL (Linux cooked), capture size 262144 bytes
14:20:42.281130 IP 100.82.232.18 > dns.google: ICMP echo request, id 1, seq 346, length 40
14:20:43.292714 IP 100.82.232.18 > dns.google: ICMP echo request, id 1, seq 347, length 40
14:20:44.311320 IP 100.82.232.18 > dns.google: ICMP echo request, id 1, seq 348, length 40
14:20:45.333840 IP 100.82.232.18 > dns.google: ICMP echo request, id 1, seq 349, length 40

pi@rasp:~ $ sudo tcpdump -i ppp0 src 8.8.4.4
tcpdump: verbose output suppressed, use -v or -vv for full protocol decode
listening on ppp0, link-type LINUX_SLL (Linux cooked), capture size 262144 bytes
14:20:42.487470 IP dns.google > 100.82.232.18: ICMP echo reply, id 1, seq 346, length 40
14:20:43.499578 IP dns.google > 100.82.232.18: ICMP echo reply, id 1, seq 347, length 40
14:20:44.518194 IP dns.google > 100.82.232.18: ICMP echo reply, id 1, seq 348, length 40
14:20:45.540656 IP dns.google > 100.82.232.18: ICMP echo reply, id 1, seq 349, length 40

测试结果是:

  • 笔记本电脑ping通8.8.4.4
  • ppp0 上可以看到 dns.google(即8.8.4.4) 与 ppp0(即100.82.232.18)之间的往来数据包,ppp0 发出 ICMP echo request,然后 dns.google 回应 ICMP echo reply
  • eth0.1 上可以看到 dns.google(即8.8.4.4) 与笔记本电脑(即192.168.2.51)之间的往来数据包,笔记本电脑发出 ICMP echo request,然后 dns.google 回应 ICMP echo reply

数据交换流程如下所示,由于这个例子是ICMP协议,不涉及端口号,如果是TCP/UDP还需要考虑端口号的转换:

需要再次强调一下,本例只是选用了最简单的ICMP协议,而应用程序大部分情况下使用的是TCP和UDP协议,在这种情况下,NAT是同时涉及IP和Port的,此图展示了两次对NTP服务器的访问,其中就涉及到了端口号。

扩展玩法

  • 进一步在树莓派上安装 dnsmasq,提供DNS Server以及DNS缓存服务
  • 利用树莓派的wlan0开启无线热点,并通过Linux虚拟网桥桥接wlan0和eth0.1,将网关IP配置在虚拟网桥接口上,使wlan0所创建的WLAN也能通过树莓派的PPPoE接口经NAT访问互联网

参考资料

逻辑构造图

先放结论,经过探究,Newifi D2的网络结构图是这样的:

  • 可编程交换机各端口对应关系为
Port Switch Port
Internal (CPU) 6
Internet (WAN) 4
LAN1 3
LAN2 2
LAN3 1
LAN4 0
  • 默认的网络配置为
Interface Name Description Default configuration
br-lan LAN & 2.4GHz WiFi & 5GHz WiFi 192.168.1.1/24
vlan1 (eth0.1) LAN ports(1 - 4) None
vlan2 (eth0.2) WAN port DHCP
wlan0 2.4GHz WiFI Disabled
wlan1 5GHz WiFI Disabled

产品信息

芯片结构

Newifi已经倒闭所以找不到官网产品信息页了,根据MediaTek | MT7621A/N的介绍,MT7621A内嵌 5端口千兆以太网交换机,下面是 MT7621A Datasheet 中的芯片功能模块图,图中也可以看出WAN口和4个LAN口同属于一个Switch,他们都是交换机的端口。除了以太网交换机,芯片还包含了两个以PCIe方式连接的WiFi模块,11n WiFi11ac WiFi,分别用于2.4GHz和5GHz。

内嵌可编程交换机结构

下面是摘自 MT7621 Giga Switch Programming Guide 的交换机功能模块图以及部分寄存器配置截图,该文档描述了 MT7621A 内嵌可编程交换机的结构以及编程方法,可以看到内嵌可编程交换机共有 7 个Port,其中有5个Port引出了网口,根据交换机编程手册,可以配置 CPU_PORTPort Number

Openwrt for Newifi D2 交换机端口分配方式

我也不懂设备树文件(Device Tree Source)的具体语法,但阅读下面两段代码,大致可以看出Openwrt源码对Newifi D2硬件交换机的配置方式为:

  • Port0 - Port3 记为 lan4 - lan1
  • Port4 记为 wan
  • Port6 定义为 CPU端口

这些都是对 MT7621A 中集成的硬件交换机的配置。

1
2
3
4
5
6
7
8
9
10
11
12
13
14
15
16
17
18
19
20
21
22
23
24
25
26
27
28
29
30
31
32
33
34
35
36
37
38
39
40
41
42
43
44
45
46
47
48
// From: /target/linux/ramips/dts/mt7621.dtsi
// Url: https://github.com/openwrt/openwrt/blob/master/target/linux/ramips/dts/mt7621.dtsi
ports {
#address-cells = <1>;
#size-cells = <0>;
reg = <0>;

port@0 {
status = "disabled";
reg = <0>;
label = "lan0";
};

port@1 {
status = "disabled";
reg = <1>;
label = "lan1";
};

port@2 {
status = "disabled";
reg = <2>;
label = "lan2";
};

port@3 {
status = "disabled";
reg = <3>;
label = "lan3";
};

port@4 {
status = "disabled";
reg = <4>;
label = "lan4";
};

port@6 {
reg = <6>;
label = "cpu";
ethernet = <&gmac0>;
phy-mode = "rgmii";

fixed-link {
speed = <1000>;
full-duplex;
};
};
1
2
3
4
5
6
7
8
9
10
11
12
13
14
15
16
17
18
19
20
21
22
23
24
25
26
27
28
29
30
31
// From: /target/linux/ramips/dts/mt7621_d-team_newifi-d2.dts
// Url: https://github.com/openwrt/openwrt/blob/master/target/linux/ramips/dts/mt7621_d-team_newifi-d2.dts
&switch0 {
ports {
port@0 {
status = "okay";
label = "lan4";
};

port@1 {
status = "okay";
label = "lan3";
};

port@2 {
status = "okay";
label = "lan2";
};

port@3 {
status = "okay";
label = "lan1";
};

port@4 {
status = "okay";
label = "wan";
mtd-mac-address = <&factory 0xe006>;
};
};
};

查看网络设备

通过 ls /sys/class/net/ -al 可以查看系统中所有的网络设备:

1
2
3
4
5
6
7
8
9
root@OpenWrt:~# ls /sys/class/net/ -l
lrwxrwxrwx 1 root root 0 Jul 22 14:01 br-lan -> ../../devices/virtual/net/br-lan
lrwxrwxrwx 1 root root 0 Jan 1 1970 eth0 -> ../../devices/platform/1e100000.ethernet/net/eth0
lrwxrwxrwx 1 root root 0 Jul 22 14:01 eth0.1 -> ../../devices/virtual/net/eth0.1
lrwxrwxrwx 1 root root 0 Jul 22 14:01 eth0.2 -> ../../devices/virtual/net/eth0.2
lrwxrwxrwx 1 root root 0 Jan 1 1970 lo -> ../../devices/virtual/net/lo
lrwxrwxrwx 1 root root 0 Jul 22 14:01 pppoe-wan -> ../../devices/virtual/net/pppoe-wan
lrwxrwxrwx 1 root root 0 Jul 22 14:01 wlan0 -> ../../devices/pci0000:00/0000:00:01.0/0000:02:00.0/net/wlan0
lrwxrwxrwx 1 root root 0 Jul 22 14:01 wlan1 -> ../../devices/pci0000:00/0000:00:00.0/0000:01:00.0/net/wlan1

根据符号链接指向的位置,可以分辨出Newifi D2中有三个物理网络设备,五个虚拟网络设备。

物理设备有:

  • eth0
  • wlan0
  • wlan1

虚拟设备有:

  • br-lan
  • eth0.1
  • eth0.2
  • lo
  • pppoe-wan

系统网络信息

接口信息

通过 ip -d addr 可以查看系统中接口以及其IP地址信息:

1
2
3
4
5
6
7
8
9
10
11
12
13
14
15
16
17
18
19
20
21
22
23
24
25
26
27
28
29
30
31
32
33
34
35
36
37
38
39
1: lo: <LOOPBACK,UP,LOWER_UP> mtu 65536 qdisc noqueue state UNKNOWN group default qlen 1000
link/loopback 00:00:00:00:00:00 brd 00:00:00:00:00:00 promiscuity 0 numtxqueues 1 numrxqueues 1 gso_max_size 65536 gso_max_segs 65535
inet 127.0.0.1/8 scope host lo
valid_lft forever preferred_lft forever

2: eth0: <BROADCAST,MULTICAST,UP,LOWER_UP> mtu 1500 qdisc fq_codel state UNKNOWN group default qlen 1000
link/ether 20:76:93:44:fe:97 brd ff:ff:ff:ff:ff:ff promiscuity 2 numtxqueues 1 numrxqueues 1 gso_max_size 65536 gso_max_segs 65535

5: br-lan: <BROADCAST,MULTICAST,UP,LOWER_UP> mtu 1500 qdisc noqueue state UP group default qlen 1000
link/ether 20:76:93:44:fe:97 brd ff:ff:ff:ff:ff:ff promiscuity 0
bridge forward_delay 200 hello_time 200 max_age 2000 ageing_time 30000 stp_state 0 priority 32767 vlan_filtering 0 vlan_protocol 802.1Q bridge_id 7fff.20:76:93:44:FE:97 designated_root 7fff.20:76:93:44:FE:97 root_port 0 root_path_cost 0 topology_change 0 topology_change_detected 0 hello_timer 0.00 tcn_timer 0.00 topology_change_timer 0.00 gc_timer 100.32 vlan_default_pvid 1 vlan_stats_enabled 0 group_fwd_mask 0 group_address 01:80:c2:00:00:00 mcast_snooping 0 mcast_router 1 mcast_query_use_ifaddr 0 mcast_querier 0 mcast_hash_elasticity 4 mcast_hash_max 512 mcast_last_member_count 2 mcast_startup_query_count 2 mcast_last_member_interval 100 mcast_membership_interval 26000 mcast_querier_interval 25500 mcast_query_interval 12500 mcast_query_response_interval 1000 mcast_startup_query_interval 3125 mcast_stats_enabled 0 mcast_igmp_version 2 mcast_mld_version 1 nf_call_iptables 0 nf_call_ip6tables 0 nf_call_arptables 0 numtxqueues 1 numrxqueues 1 gso_max_size 65536 gso_max_segs 65535
inet 192.168.2.1/24 brd 192.168.2.255 scope global br-lan
valid_lft forever preferred_lft forever

6: eth0.1@eth0: <BROADCAST,MULTICAST,UP,LOWER_UP> mtu 1500 qdisc noqueue master br-lan state UP group default qlen 1000
link/ether 20:76:93:44:fe:97 brd ff:ff:ff:ff:ff:ff promiscuity 1
vlan protocol 802.1Q id 1 <REORDER_HDR>
bridge_slave state forwarding priority 32 cost 100 hairpin off guard off root_block off fastleave off learning on flood on port_id 0x8001 port_no 0x1 designated_port 32769 designated_cost 0 designated_bridge 7fff.20:76:93:44:FE:97 designated_root 7fff.20:76:93:44:FE:97 hold_timer 0.00 message_age_timer 0.00 forward_delay_timer 0.00 topology_change_ack 0 config_pending 0 proxy_arp off proxy_arp_wifi off mcast_router 1 mcast_fast_leave off mcast_flood on neigh_suppress off vlan_tunnel off numtxqueues 1 numrxqueues 1 gso_max_size 65536 gso_max_segs 65535

7: eth0.2@eth0: <BROADCAST,MULTICAST,UP,LOWER_UP> mtu 1500 qdisc noqueue state UP group default qlen 1000
link/ether 20:76:93:44:fe:98 brd ff:ff:ff:ff:ff:ff promiscuity 0
vlan protocol 802.1Q id 2 <REORDER_HDR> numtxqueues 1 numrxqueues 1 gso_max_size 65536 gso_max_segs 65535

8: pppoe-wan: <POINTOPOINT,MULTICAST,NOARP,UP,LOWER_UP> mtu 1492 qdisc fq_codel state UNKNOWN group default qlen 3
link/ppp promiscuity 0
ppp numtxqueues 1 numrxqueues 1 gso_max_size 65536 gso_max_segs 65535
inet 100.82.7.242 peer 100.82.0.1/32 scope global pppoe-wan
valid_lft forever preferred_lft forever
inet6 2409:8a20:ae02:f845:539:f95a:7989:37c8/64 scope global dynamic noprefixroute
valid_lft 259059sec preferred_lft 172659sec

9: wlan0: <BROADCAST,MULTICAST,UP,LOWER_UP> mtu 1500 qdisc noqueue master br-lan state UP group default qlen 1000
link/ether 20:76:93:44:fe:96 brd ff:ff:ff:ff:ff:ff promiscuity 1
bridge_slave state forwarding priority 32 cost 100 hairpin on guard off root_block off fastleave off learning on flood on port_id 0x8002 port_no 0x2 designated_port 32770 designated_cost 0 designated_bridge 7fff.20:76:93:44:FE:97 designated_root 7fff.20:76:93:44:FE:97 hold_timer 0.00 message_age_timer 0.00 forward_delay_timer 0.00 topology_change_ack 0 config_pending 0 proxy_arp off proxy_arp_wifi off mcast_router 1 mcast_fast_leave off mcast_flood on neigh_suppress off vlan_tunnel off numtxqueues 4 numrxqueues 1 gso_max_size 65536 gso_max_segs 65535

10: wlan1: <BROADCAST,MULTICAST,UP,LOWER_UP> mtu 1500 qdisc noqueue master br-lan state UP group default qlen 1000
link/ether 20:76:93:44:fe:98 brd ff:ff:ff:ff:ff:ff promiscuity 1
bridge_slave state forwarding priority 32 cost 100 hairpin on guard off root_block off fastleave off learning on flood on port_id 0x8003 port_no 0x3 designated_port 32771 designated_cost 0 designated_bridge 7fff.20:76:93:44:FE:97 designated_root 7fff.20:76:93:44:FE:97 hold_timer 0.00 message_age_timer 0.00 forward_delay_timer 0.00 topology_change_ack 0 config_pending 0 proxy_arp off proxy_arp_wifi off mcast_router 1 mcast_fast_leave off mcast_flood on neigh_suppress off vlan_tunnel off numtxqueues 4 numrxqueues 1 gso_max_size 65536 gso_max_segs 65535

接下来,我们逐一分析一下各个接口所展示的信息,为了便于展示以及分析,忽略IPv6地址(已从输出中删掉):

  • lo: 虚拟设备,本地回环设备,IPv4地址为 127.0.0.1
  • eth0:物理设备,物理以太网设备,MAC地址为 20:76:93:44:fe:97,无IP地址
  • br-lan:虚拟设备,Linux网桥设备,MAC地址为 20:76:93:44:fe:97,IP地址为 192.168.2.1
  • eth0.1@eth0:虚拟设备,基于 eth0 的VLAN设备,VLAN id为1,MAC地址为 20:76:93:44:fe:97,无IP地址,bridge_slave表示它是网桥的从设备
  • eth0.2@eth0:虚拟设备,基于 eth0 的VLAN设备,VLAN id为2,MAC地址为 20:76:93:44:fe:98,无IP地址
  • pppoe-wan:虚拟设备,PPPoE拨号设备,未显示MAC地址(暂不清楚如何解释,估计是这种虚拟设备就没有MAC,应该是依赖于某个其他设备),IP地址为 100.82.7.242
  • wlan0:物理设备,无线网卡,MAC地址为 20:76:93:44:fe:96,无IP地址,bridge_slave表示它是网桥的从设备
  • wlan1:物理设备,无线网卡,MAC地址为 20:76:93:44:fe:98,无IP地址,bridge_slave表示它是网桥的从设备

桥信息

系统自带了 brctl,通过 brctl show 可以查看系统中的桥信息:

1
2
3
4
bridge name     bridge id               STP enabled     interfaces
br-lan 7fff.20769344fe97 no eth0.1
wlan0
wlan1

也可以另外安装 ip-bridge 包,然后使用 bridge 命令进行Linux虚拟网桥操作,比如 bridge link 可以展示桥中的接口:

1
2
3
6: eth0.1@eth0: <BROADCAST,MULTICAST,UP,LOWER_UP> mtu 1500 master br-lan state forwarding priority 32 cost 100
9: wlan0: <BROADCAST,MULTICAST,UP,LOWER_UP> mtu 1500 master br-lan state forwarding priority 32 cost 100
10: wlan1: <BROADCAST,MULTICAST,UP,LOWER_UP> mtu 1500 master br-lan state forwarding priority 32 cost 100

上面的信息表明,网桥 br-lan 中包含三个设备:eth0.1wlan0wlan1

根据上面对各个接口的分析,得知 br-lan 有IP地址,eth0.1wlan0wlan1均没有IP地址,而网桥的作用就类似于交换机,可以在桥中各个设备直接交换MAC帧,这三者的关系如下图所示:

1
2
3
4
5
6
7
8
9
10
11
12
13
14
+--------------------------------------------------------------------+
| |
| +--------------+ |
| | 192.168.2.1 | |
| +------------→| br-lan |←--------------+ |
| | +--------------+ | |
| | ↑ | |
| | | | |
| ↓ ↓ ↓ |
| +---------+ +---------+ +---------+ |
| | eth0.1 | | wlan0 | | wlan1 | |
| +---------+ +---------+ +---------+ |
| |
+--------------------------------------------------------------------+

默认网络配置

网络配置位于 /etc/config/network

1
2
3
4
5
6
7
8
9
10
11
12
13
14
15
16
17
18
19
20
21
22
23
24
25
26
27
28
29
30
31
32
33
34
35
36
37
38
39
40
41
42
43
44
45
46
47
48
49
50
51
52

config interface 'loopback'
option ifname 'lo'
option proto 'static'
option ipaddr '127.0.0.1'
option netmask '255.0.0.0'

config globals 'globals'
option ula_prefix 'fdff:faeb:0d9b::/48'

config interface 'lan'
option type 'bridge'
option ifname 'eth0.1'
option proto 'static'
option ipaddr '192.168.2.1'
option netmask '255.255.255.0'
option ip6assign '60'

config device 'lan_eth0_1_dev'
option name 'eth0.1'
option macaddr '20:76:93:44:fe:97'

config interface 'wan'
option ifname 'eth0.2'
option proto 'pppoe'
option password '************'
option ipv6 'auto'
option username '************'

config device 'wan_eth0_2_dev'
option name 'eth0.2'
option macaddr '20:76:93:44:fe:98'

config interface 'wan6'
option ifname 'eth0.2'
option proto 'dhcpv6'

config switch
option name 'switch0'
option reset '1'
option enable_vlan '1'

config switch_vlan
option device 'switch0'
option vlan '1'
option ports '0 1 2 3 6t'

config switch_vlan
option device 'switch0'
option vlan '2'
option ports '4 6t'

网络拓扑汇总

通过查看硬件信息,以及系统中的网络信息,可以大致得知整体的网络拓扑结构为:

参考资料&相关链接